

Trailbraking is often misunderstood, causing many riders to avoid learning the techique. I often hear people say that they think trailbraking is a technique used only by performance riders and road racers. Not true.
This braking technique is actually quite important for safe and skillful cornering. The first rule for safe cornering is to enter a turn at a safe speed.
What exactly is a “safe” speed? It is a speed that allows you to negotiate the turn comfortably while applying gradual acceleration without the need for deceleration or mid-to-late corner braking. Steady acceleration keeps the bike stable and makes the bike corner predictably, so entry speed should allow for this steady drive through the curve.
The amount of brake pressure needed to slow the motorcycle is directly dependent on the approach speed and the point where you begin braking. Braking earlier means you can use less brake force and braking later requires more brake force.
See the complete list of Riding in the Zone articles here.
Trail Braking Defined
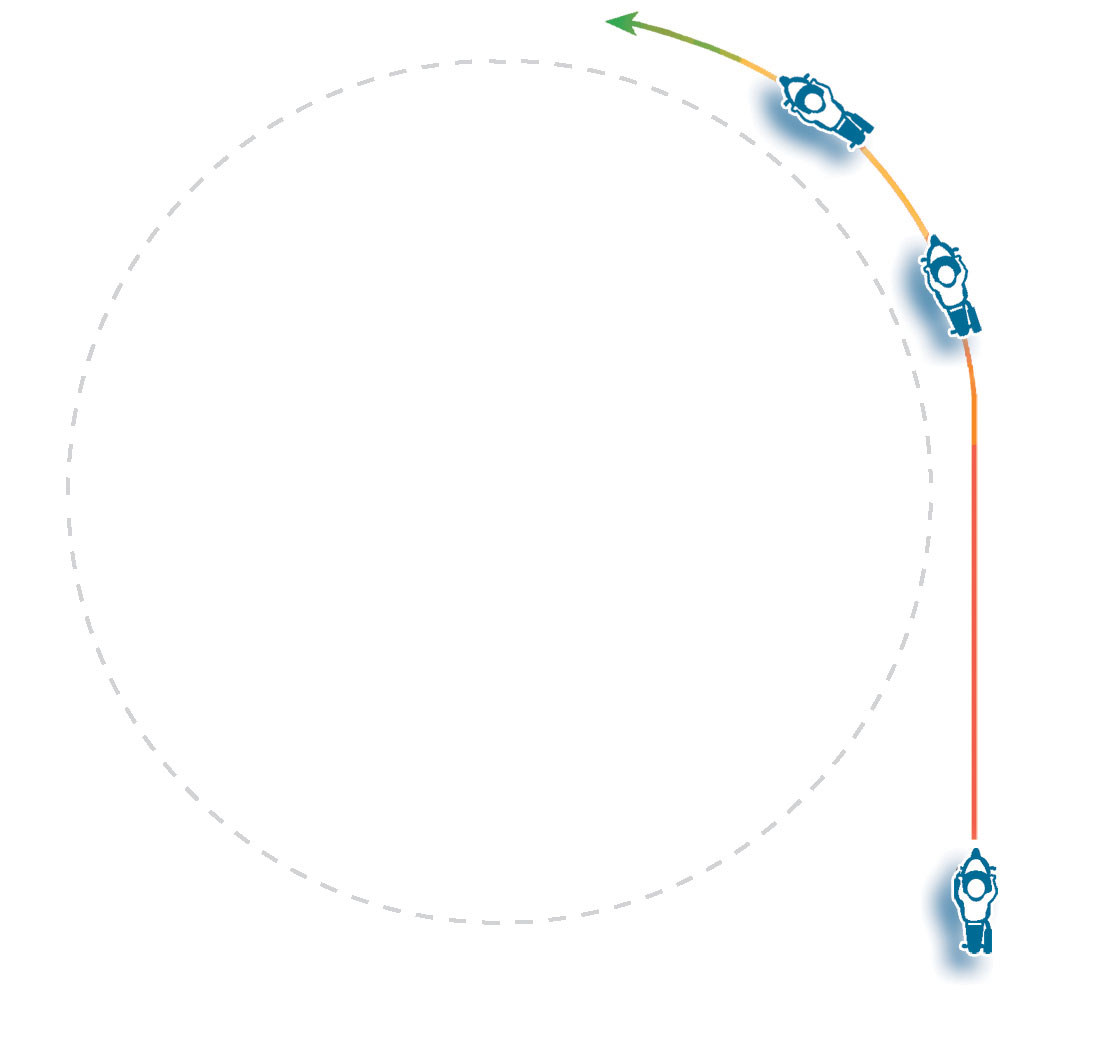
Sometimes delaying your braking can be a useful tool. Trail braking is a technique that is done by continuing to brake beyond the turn-in point. You then gradually “trail” off the brakes as you lean until there is no brake pressure by the time you are at full lean. Trail braking is most useful for tighter turns with a relatively high approach speed and for downhill hairpins.
On the racetrack, trail braking is typically done using the front brake only, although trail braking can be done with either the front only, rear only or both brakes. It can be argued that engine braking is also trailbraking. I’ve actually coined the phrase “trail-deceleration” to describe the timing of when to initiate engine braking and when to begin accelerating again.
As I mentioned earlier, trail braking is a technique associated with racing as a means to keep the competition at bay. But, it is also useful for street riders. Let’s see how.
*Contrary to what I say in this 2008 video, I have come to believe that trailbraking is very useful on the street to manage corner entry speeds. It is one of the skills we work on during on-street training.
1. Helps Refine Entry Speed
One advantage of trail braking is that it allows the rider to extend the time and distance used to establish entry speed. This can be a real advantage if a bit more braking is needed for a tightening turn or to avoid a mid-corner obstacle. By entering a turn with light brake pressure, you are less likely to upset the chassis if you need to slow a bit more. For minor speed adjustments, simply remain on the brakes a bit longer.
Staying on the brakes past turn-in allows more time and space to get your entry speed just right. On the other hand, if you release the brakes completely before leaning, you have committed to that entry speed. If you need to slow more, you’ll have to begin braking again, which can easily upset the chassis and stress the tires. To prevent front tire traction loss, you must avoid increasing brake force and lean angle at the same time.
For those of you who use the quick-turn method of initiating lean (an excellent thing to learn and use) understand that it isn’t often conducive to trail braking. Most times you will ease into the corner more when trail braking. To turn quickly, you will release the brakes quicker, immediately after turn-in.
Dragging the rear brake a little longer after releasing the front brake is useful for further refining entry and mid-corner speed. Being a weaker brake makes the rear brake easier to introduce smoother braking forces.
2.It Helps the Bike Turn
Trailbraking puts more load onto the front tire for increased traction to handle countersteering inputs. It also steepens chassis geometry as the forks compress to help the bike change direction. It’s important to know that as you begin to release the brakes, you must also relax your arms to let the front wheel track freely through the turn. Follow with a smooth transition to the throttle for a predictable line toward your exit (see #8 below).
Dragging the rear brake is also useful for helping the bike to “pivot” around the center of gravity by “pulling” the rear contact patch rearward.
3. It Enhances Stability (when done right)
Trail braking is also used as a way to enhance stability and control. Trail braking helps minimize forward and rearward chassis pitch that occurs when applying and then releasing the brakes. When the front brake is applied the forks compress, and when the brakes are released they rebound and extend. The forks compress once again when the bike is leaned into the curve. When trail braking, the forks remain compressed as the bike is leaned and the “off-brake” rebound action is eliminated. This also steepens the front end geometry for easier turning. The suspension stays compressed as the bike leans and then rebounds gradually as the brakes are released and the throttle is rolled on.
Trailbraking with both brakes helps slow, but also increases stability even more. The rear brake also increases stability by “pulling” the rear contact patch in line with the front contact patch, controlling any side-to-side fishtailing effect.
4. It Can be Risky (when done wrong)
Trail braking is a technique that combines both cornering and braking forces, which means that you must use light brake pressure otherwise you can lose traction. This is why it is best to get most, if not all, of your braking done before the turn. Because trail braking can be risky it should be used judiciously and should be avoided when traction is limited. However, trail braking is an advanced technique that can be useful for all riders.
Learning how to trail brake starts with overcoming the anxiety that the tires will slide. To prevent “tucking” the front tire and lowsiding, you must use light front brake pressure and understand that increased lean angle requires decreased brake pressure. Once this fundamental level of trail braking is learned, then you can use the technique.
5. Help Salvage a Blown Corner… I Suppose
Remember that trailbraking is a planned technique to refine cornering control and should NOT be confused with salvaging a blown corner entry (that’s called screwing up a corner becasue you didn’t judge entry speed correctly). That said, we all make mistakes and knowing how to trailbrake can be used to fix a mistake. One of the most common reasons for crashes in corners is when a rider enters a turn too fast and lowsides or goes off the road. Most untrained riders panic and either stand the bike up and leave their lane or grab the brakes and lowside. If you are adept at trailbraking, then you can brake past the turn entry while still maintaining a relatively relaxed composure (depending how overspeed you are). To reiterate…trailbraking is not technically “braking to save a blown corner”.
6. You Must Get a Feel for it
To brake effectively you must develop a feel for how much brake power is possible without losing control. Brake feel is a learned skill that includes understanding the dynamics of load transfer on traction as well as developing a feel for how your motorcycle’s brakes respond to subtle inputs. This knowledge is necessary if you are to learn to use brake force to maximum advantage.
One way to help refine the trail braking technique is to use two fingers on the front brake. This allows the use of both the brake and the throttle, which is useful for transitioning smoothly between braking and acceleration. The advantage of two-finger braking is that it allows the two remaining digits to remain on the throttle grip (usually the ring and pinkie). This is useful when implementing advanced throttle/brake techniques such as brake and throttle overlapping or throttle blipping (to be covered in a future post).
7. Trailing off is as important as Trailing on
Getting the right brake pressure applied is critical when trail braking. Progressively squeezing the brake transfers weight gradually and avoids spikes in tire load. But, it’s also important to release the brakes progressively to prevent abrupt rebound of the suspension, which can cause the tires to lose traction, especially when at full lean. Even if you don’t lose traction, the extended forks can push the bike into a wider line than desired.
8. Use the Thrake/Brottle Overlap Technique
The throttle/brake overlap technique (Thrake or Brottle, get it?) is how you smoothly transition from brakes to acceleration while leaned fully in a corner. Begin throttle roll-on just before completely releasing the brakes to smooth the transition from braking force to driving force. See me use this technique through turn 1 at Loudon in the video
The brake/throttle overlap technique takes some practice. One technique that is helpful is if you curl your fingers over the front brake lever as you squeeze, then simply straighten your fingers to release brake pressure as you roll on the throttle. You can practice this technique using Brake Drill #4 in Riding in the Zone.
9.Timing is Critical
How long you remain on the brakes is determined by the curve. Imagine yourself barreling dwn a tight downhill hairpin and need to scrub of, say 15-20mph. You trailbrake into the turn, but then release the brakes well before the middle part of the turn. What then happens is gravity “accelerates the bike at a time when you haven’t gotten the bike turned enough. The result is a too wide line that needs another turning inpt to stay in your lane. By hanging onto the brakes a bit longer, the front wheel is pointed more toward the corner exit and not toward the outside of the turn.
10. Brake Pressure is Critical
The right amount of brake pressure (force) will preserve traction (see #4) but also help the bike turn more easily (see #2). At some point in the trailbraking process, perhaps 1/3 around the curve, you are no longer trailbraking to slow down, rather you are using the brakes as a tool to help get the bike completely turned and pointed safely toward the exit (where you can then transition to the throttle (see #8). Brake too hard and the bike will likely stand up instead of lean in…not what you want at that point.
Trail braking Takes Practice
Trailbraking requires expert-level brake and corner control, which means that most people should be careful with this technique until they become proficient through practice. Once a rider is reasonably proficient at both braking and cornering, then he or she should start to explore the benefits of trailbraking, because one day, they’ll need this skill.
How to Practice Trail Braking
By mastering trail braking, you can train your mind and muscles so that you believe it is possible to slow the bike down even when leaned and stay upright. This mastery tells you not only that it’s possible to salvage the corner, but also tells you just how much braking force can be used without sliding the tires. If you think this skill will magically appear when you need it, you are dead wrong! You must practice to make this important tool available to you. How do you practice trail braking? Start in a clean and clear parking lot (see the video above) And then practice on the street where no surface hazards are present. Then refine and solidify the technique by going to a track day and asking an instructor to help you work on this technique.
Braking is one of the most important skills to learn. Regularly practice emergency braking and refine your corner braking technique so these skills remain sharp.
Listen to the Trailbraking PODCAST
See the complete list of Riding in the Zone articles here.
Please Donate to Keep the Articles Coming
If you liked this article and the many other articles on this site, please toss a buck or five into the hat. It’s greatly appreciated!
Support the website by buying from Twisted Throttle
I had no idea that trail braking actually allows you to extend the time and distance used for entry speed. I am going to a track this weekend. It would be nice to try trail braking and see what happens.
I first learned about trail braking from Motorcycle Consumer News when I was about 17. I practiced for quite a long time using rear only. This helped me get a feel for the new cornering dynamics, and lessened the “cost of failure” (I can recover a rear wheel slide/walk out). I started in parking lots, then practiced maintaining brake pressure/consistency in turns around town, then progressed to canyon carving before finally beginning the training again with front and rear (progressed much more quickly). Finally I ran through it all with front brake only (just over a week this time). I’ve been riding for 13 years now, and except for pushing the envelope on a track day, I haven’t been down in 10. Aside from the usefulness of the technique itself, the act of training it gave me a new mindfulness for not just cornering, but overall the physics of motorcycle riding. I ride a lot, put 10,000 miles on two wheels between April and September last year. I’ve run in too hot in turns, dodged unexpected obstacles and wildlife while cornering, and danced around jerk cagers; even in conditions that don’t use trail braking, my understanding of suspension and traction that came from it has saved my skin.
Nice. Trailbraking is a powerful tool.
I was brought up on bikes as a teen, riding on dirt roads so quickly learnt to “feel” the breakaway traction point under braking on a variety of surfaces, especially at the front so when I went tar-circuit racing, I seemed to be able to able to out-brake and out-corner everybody using, what you are basically describing above.
I would enter a corner under braking, then lean in whilst applying a little throttle in order to avoid “chain-snatch” when going from braking to accelerating, all whilst applying some gentle “feel” braking, until I could safely consider the corner to be over.
Tyres work best when they are being abraded heavily, as on the verge of a slide so this technique offered the best option: my tyres were always under duress, (but not past the fall-off point) and the transition from off-throttle to on-throttle was smooth. Most guys brake, trail-throttle, then get back onto the throttle again so that is 3 transitions and 3 more times for causing a ditching.
Effectively, my technique had no hard transitions.
Especially on the driven wheel, by keeping the brakes on lightly whilst opening the throttle a little, I maintain that there is minimal chance of a snap-change to the tyre of braking direction and power-on direction. The chain is kept in the driving direction so there is no snap-back when the brakes are released and full-gas is applied.
I also felt that I had more control of the bike in the corner and could brake more or less, or throttle (not so much) more or less depending upon the circumstances, almost dirt-bike drifting style. The bike always felt more connected to me when compared to the traditional brake-trail-gas-on situation.
Also, the front shocks especially, transitioned more smoothly from hard braking (down) to release (up) more gradually, also minimising an off.
So, the steps were, laaate brake and whilst still on the brakes start applying gentle gas as you enter the corner, then enter the corner whilst gently releasing the brakes, but never completely, especially at the rear, then control the back wheel through gas and brake combination, and sometimes even the front brake….not letting the back go by applying a little more front. Sure, you might drift out a bit more but you will, with practice find the perfect balance: until you hit that unknown bump or oil-slick!
I’m sure I’m not the only person on earth to discover this technique, but its worth noting that nobody ever out-braked or overtook me in a corner on a similarly tyred machine!
Thanks for the reply, Keith. Most track riders and racers I know don’t use the rear brake because they often brake hard enough to lighten the rear too much for good control, but you describe how the rear brake can be used in less extreme braking corners.
Hi Keith,
I’ve been searching all over the internet to see if anyone else is doing this technique.
In the past I hardly used the rear brake at all until I recently bought a Road King which I mainly ride around the many curves here in the Algarve.
Not for speed, I’m happy trolling around, but for stability. When I enter a corner I may brake front and back if necessary but as I’m going in I set up a balance between rear brake and throttle as if the two are having a gentle “tug of war” then gently release the rear as I start to accelerate or apply a little more if a blind corner is tighter than expected.
Like you say, I also don’t like the change from deceleration to acceleration. This way the engine is always driving the wheel but being held back by the rear brake. On really tight or slow bends it starts to feel like doing a moto gymkhana because of the way the bike slows in the corner and then seems to jump to a faster speed when in a high gear (OK, it’s a big Harley and I’m no MotoGP wannabe).
Someone showed me a similar technique in a car where he used the brakes and accelerator at the same time, dancing onto the clutch with his right foot.
Still waiting for someone to say this technique has dangers or that it really good but so far my confidence and therefore happiness in riding these endless and multi various curves makes the riding so much better. I’m hoping a lot more time on the road might let me give the weekend sports riders a bit of a run.
Other thing is that I don’t seem to be scraping the footplates as much unless I want to. Not sure if that because my riding’s changed with this technique or that the bike’s not needing to lean so much for the curves.
Only been doing this for about 6 weeks but it seems to have potential.
Cheers
I have a 2002 BMW 1150RT with linked braking, servo assisted. I cannot say trail braking works like described. When I use the back brake the front will come on too based on what the computer determines the force should be. Using the front brake only would do somewhat the same. Using the front brake on a turn would load up the suspension in front and eat up the traction available. I would use the rear brake instead.
I always understood it as rear brake on and release apron turn in is it possible to upset the front tire using this technique ?and I typically lift the front brake just before turn in I thought this would settle front tire just before turn in
I wanna learn how too back the rear end in.can someone describe that technique for me ? Great, detailed, well explained jeez now I feel sloppy and now I understand how I lowsided my duc thank you .
Hi Ken,
Good article and I feel the technique was well-described. That said, it seems obvious that the other commenters did not get it. Adding more braking while simultaneously adding more lean angle is NOT trail-braking. Braking with the rear brake only is NOT trail-braking. I know that, and I know you know that, but I feel it’s important that other readers know that as well.
I’ve used this technique for years but exclusively with rear brake. It’s way more safer on street condition since recovery from rear wheel skid is much more likely then from front wheel washout. Very good article BTW.
I’ve never heard of this technique, but having ridden for several years, and having a basic understanding of physics, this makes perfect sense.
One personal experience comes to mind. I was in a tunnel in NorCal and screaming up to the exit of the tunnel (at an unsafe speed which was an incredibly stupid thing to do). This particular set of tunnels is three tunnels (now four), the middle one’s direction being switched depending on the time of day.
I had previously done this same scream in the tunnel and brake on the exit corner on the right most tunnel going eastbound, but not typically in the middle tunnel in the eastbound direction; on account of my schedule at the present time. In hindsight, I think the corner on the middle tunnel is a slightly smaller radius in the eastbound direction than the right tunnel in the same direction.
One day, while feeling abnormally reckless, I decided to go a little faster in the middle tunnel. Upon entering the final turn, I realized that I was approaching the edge of the road with alarming speed. I was already on the brakes and did what I could in my state of near panic to brake as hard as I thought reasonable and lean over just a little more. I was already lightly on the brakes but had to increase braking pressure far more quickly than I was comfortable with.
By the time I exited the turn, I had tiptoed over the white line, scared myself $#!tless and realized that I needed to stop this tunnel monkey business and reckless riding in general.
This technique is obviously not to recover from reckless driving, but I certainly wish I would have been more familiar with the method given the high likelihood that I was about to eat a guardrail.
Thanks again for the post.
And in case your curious, I sold the bike and haven’t ridden for years. I’ll get back on the horse again some day and when I do, I’ll have my kicks on the track, not on the street.