As predicted, Spring has begun to awaken as it has every year. This means that it’s time to dust off the bike and head back out onto the road. But, before you strap on your helmet and thumb the starter, there are a few things you must first take care of. If you want to personalize your helmet, consider buying motorcycle helmet stickers.
Hopefully, you put your motorcycle away so it takes minimal effort to bring it to life after its long winter nap. If not, you may be in for some frustrating downtime.
Performing Maintenance
With the help of a motorcycle owner’s manual, someone with moderately competent mechanical skill can perform most of the tasks we are about to discuss. For tasks that are not covered in your owner’s manual, please consult your dealer’s service center like https://titangaragedoors.ca/service-area/garage-door-repair-in-coquitlam/ to know about your garage doors.
Fuel System
One of the most common pre-season mechanical problems involve the fuel system. This is caused by riders parking their bikes without adding fuel stabilizer to the gasoline. The problem is that old fuel turns into a gooey varnish that can clog the small passageways in the fuel system. This is a significant problem on motorcycles with carburetors, but even fuel-injected bikes can be affected. The use of Ethanol makes the problem even more likely.
If you neglected this task you may be looking at the time and expense of a thorough fuel system cleaning. If the gas in your tank is old it’s best to resist starting your motorcycle. Instead, drain the old fuel from the tank (and drain the carburetors if applicable). This can prevent stale gas from circulating through the system. If your bike runs poorly even after draining the gas, consult a mechanic and store your bike properly next time.
Air Filter
Check your air filter, as rodents seem to be particularly attracted to building nests in air boxes, which is cozy place with nest building filter material handy. Remove any debris and replace the filter if it’s been chewed or looks particularly dirty.
Tires
Tread wear indicators can be found in the bottom of the tread.
Tire pressure will drop significantly over the winter and nothing affects handling and wear more than very low tire pressures, so be sure to put a gauge on those stems before the motorcycle rolls out of the garage. If you require a new tire, contact Tire Shop Lynchburg for new tires in Lynchburg, VA. Chicago Garage Door professional screen repair can make your garage safe. If the tread is worn near the tread-wear indicators or if the tires show any signs of rot, now’s a good time to replace the old tires with new rubber.
And check the date code found in an oval stamp with 4 number indicating the week and year the tire was manufactured. 5 years is a good guideline to follow even if the tires look okay.
Drive Train
Pull the chain away from the sprocket to check for wear.
While you’re down there, check drive train wear. Sprockets should show no significant signs of hooking and the chain should not pull very far away from the back of the sprocket. Replace the chain and sprockets as a set if necessary. If all looks good, then check the adjustment and give the chain a good lube. Hopefully you lubricated the chain before storage, which means no rust should be present. If this duty was neglected, give the chain a cleaning and lubricate it before the first ride, then perform a more thorough lubrication after the chain is warm.
Engine Fluids
Check your oil level, or better yet, change the oil and filter if you didn’t do it before tucking your bike away last fall. Old engine oil contains acids that are best removed. If your bike is liquid cooled, check coolant levels, including the fluid in your overflow tank (see your owner’s manual). You can go to a shop that does motor and car oil change to do it for you.
Brakes
Change brake fluid if it looks darker than apple juice or hasn’t been changed in a couple of years.
Brakes are obviously an important system to maintain. Squeeze the front brake lever and press on the rear brake pedal to feel for a firm application. Look in the sight glass or at the brake master cylinders to see that brake fluid levels are good and plan to replace the fluid if it is the color of apple juice or darker.
Grab a flashlight and take a close look at your front and rear brake pads to see how much material there is remaining. Most brake pads have a notch cut into the pad as a wear indicator. If in doubt, have the pads replaced. It’s cheap insurance.
Brake pad wear indicators
Battery
Weak or dead batteries are another common mechanical issue that can stand in the way of reviving a motorcycle after a long period of dormancy. Hopefully, you kept your battery charged. I use a Battery Tender Junior. If not, then you will likely have to charge the battery before it will start the engine. If it will not hold a charge, then a new battery is in your future.
Lights, Cables & Fasteners
Once your battery is good to go, be sure to check that all of your lights are operational. Check that both front and rear brake light switches illuminate the brake light. Check turn signals, tail light and headlights (high and low beam) to make sure they work.
Confirm that the throttle, clutch and brake cables (if applicable) operate smoothly before heading out. Finally, go around the whole bike with a wrench and screwdriver, tightening any loose fasteners.
Awakening the Rider
Cornering practice
Now that you’ve taken care of the motorcycle you can think about your first ride. But, before you press the starter button, keep in mind that your likely a bit rusty, too. Spending many months in a car can cause you to become oblivious to motorcycle issues like visibility or road surface hazards.
It’s also smart to take some time on their own to brush up on your emergency skills in a parking lot. Whether you choose to attend a formal rider course or go it alone, we recommend that every rider practice the critical skills by performing some cornering and braking drills.
Spring Roads and Inattentive Drivers
There’s a lot to look for on the street.
Even if you and your bike are fully ready for the new season, remember that the roads may not yet be motorcycle-friendly. Traction-robbing road salt and sand are used extensively in snowy regions to keep roadways ice-free. Keep your eyes peeled for these surface hazards. In many towns and counties, the road sweepers will eventually take care of the majority of the excess sand.
Roadways take a lot of abuse from snowplows scraping the surface and from the effects of repeated freezing and thawing. Expect surface hazards during the early spring until the earth thaws and the road crews can repair the scars.
And remember that drivers aren’t used to seeing motorcycles on the road, so be extra vigilant when riding in traffic.
Your owner’s manual can help you perform these routine tasks so you are prepared for the upcoming season. Taking the time to prepare for the upcoming season can ensure that it is a safe and enjoyable one.
I never really understood the draw toward a “motorcycle” that didn’t lean. My mentor, David Hough has been a sidecarist for many years, actively lobbying for the recognition of sidecars and trikes in safety programs.
He gave me my first ride in a borrowed Hannigan rig at Americade back in 1999 and later taxied me around his hometown in his beautiful BMW K1 outfit.
The ride was a lot of fun, but I wondered what the practical aspects of hack ownership were. Here is a list of the essentials you need to know before considering a hack.
Advantages
Three-wheelers will not fall over, making slippery surfaces and slow speed riding situations much easier.
The sidecar driver doesn’t need to put a foot down to support the motorcycle when stopped, making it possible for short riders and disabled riders to not fear dropping the bike.
Carrying a child is less risky, where you can enjoy the piece of mind that they are secure. They may also enjoy the ride more if they can read, color, or play video games.
The possibility of riding year-round even in northern climates,
The ability to carry a pet,
Increased carrying capacity.
Sidecars are fun!
Disadvantages
With all good things come some bad and this holds true with three-wheelers, too.
Extra weight and girth that effects acceleration, stopping and maneuverability.
Novice sidecar drivers fail to “remember the car”, running over various obstacles and curbs before learning to allow more space.
Parking may be easy as far as stability is concerned, but a sidecar or trike will take up most of a full-sized parking space.
More wear and tear on many of the motorcycle’s components– the frame, engine and brakes must withstand greater stresses.
Significant modifications are usually required to obtain a good-handling outfit, including a subframe to provide sidecar attachments, changing the front-end geometry to make steering easier and fitting wheels that will take automobile tires.
Converting back and forth is impractical once the motorcycle has been modified to handle well as a three-wheeler.
Hack School
With the inherit stability of a sidecar rig, it’s easy to think that riding one is easy. But attempting to drive a rig for the first time will quickly convince you that a sidecar outfit requires special skills. I decided that the best way to learn how to operate a hack would be to sign up for a sidecar course.
Hack school
The one-day sidecar course was for experienced riders. The course began with sidecar-specific information, such as motorcycle/sidecar attachments, and demonstrated the basics of sidecar operation, including body position, and throttle/ brake techniques.
I realized there was more to riding a rig than I previously imagined. The training company provided Honda 250 Nighthawks outfitted with Velorex sidecars. I learned that sidecars need to be matched by size and weight to the motorcycle to help keep the outfit stable. In general terms, the sidecar should weigh approximately 30% of the naked motorcycle.
Steering
One thing I learned right away is that a rig steers “backwards” from a two-wheeler. While a rigid sidecar outfit corners “flat” like an automobile, it has one less wheel to help resist a rollover, especially in right-hand turns when the car has a tendency to lift off the ground.
There are differences in turning techniques between two-wheelers and three-wheelers. Sidecars turn using “direct steering” (turn left to go left and turn right to go right) as opposed to countersteering for two-wheelers (turn right to go left and turn left to go right).
This 3-wheeler steering process is similar to driving a car, once you get the right messages from your brain to your hands. For an experienced rider, the sensation of cornering without leaning was odd at first, but became familiar within only a few minutes.
Even though countersteering isn’t part of normal sidecar operation, there are circumstances when a sidecar operator will countersteer. Motorcycle control reverts from direct steering to countersteering when the sidecar is “flying” and only two wheels are in contact with the ground.
Throttle
As with two-wheeled motorcycle operation, the sidecar outfit turns more easily and smoothly with some throttle application. Throttle can be tricky while cranking the handlebars from side to side, but the results are quite noticeable. I even started playing around with the throttle a bit more aggressively and spinning the rear tire to help the rig turn the corner. “Drifting” sure was fun!
We also learned some expert sidecar skills, such as simultaneously rolling on the throttle and dragging the front brake, to help control the rig and keep the car on the ground in right-handers.
Body Position
We repeated the exercise, but this time we learned to hang off the seat toward the inside of the turn to help prevent a rollover. It worked like a charm. We were able to negotiate the course with more speed and stability.
Braking
Braking technique is very similar between two and three wheelers– apply both brakes, squeeze the clutch, downshift, eyes up, no skidding– with the exception that you don’t have to put your foot down when you come to a stop.
I noticed with my first practice run into the braking area that the training rig pulled to the left under braking. The trainer I was driving didn’t have the sidecar brake connected. A brake on the car’s wheel can minimize this effect.
I also noticed how much brake pressure was needed to stop the rig. Sidecars add a lot of weight to a motorcycle and that weight adds a lot of braking distance to a stop. This is a good reason why a sidecar operator must recognize hazards early and maintain a greater following distance. Of course, the big advantage is that if you manage to skid the front tire, you don’t fall down.
When a front tire does skid, the rig will continue in the direction it is traveling even though the rider may attempt to change direction by turning the front wheel. If the front tire regained traction while the wheel is turned, the rig would suddenly follow in the direction the front wheel is pointed, possibly veering into traffic.
If you do skid the front tire you have the option of either keeping it locked or releasing and re-applying the front brake. If you decide to release the front brake, it’s important to make sure the wheel is pointed in the direction of travel!
Learning to Fly
One of the most fun parts of driving a sidecar is learning to “fly” the car. At first I thought this was more of a show-off technique than something useful. But it actually teaches the important skill of switching from direct steering to countersteering and back.
And there may be times when a hack driver needs to lift the car wheel over a pothole or curb. You want to be able to lift the sidecar wheel about a foot off the ground for extended periods by carefully balancing throttle and steering.
Swerving
Controlled flying is enjoyable, but uncontrolled flying when swerving can be hazardous to your health. Swerving a three-wheeler is not unlike swerving a two-wheeler– two consecutive steering inputs, one to swerve and the other to recover. However, a sidecar needs direct steering and dramatic body changes to keep the rig from flipping.
The driver needs to quickly move body weight from one side to the other just before the steering input. Initiating a right-hand swerve and recovering after a left-hand swerve caused the car to lift into the air even after hanging my body as far over the sidecar as I could reach.
The other issue with swerving a sidecar is that the operator must remember just how wide the outfit is. This requires a much more dramatic swerve so the car can clear the obstacle.
A Unique Experience
As a longtime rider, I’m always looking for more experiences with motorcycles and was glad to have experienced the world of sidecars. If you get the opportunity to drive a hack, just remember that operating a sidecar is not as easy as just throwing a leg over the seat and driving away. But ilike always, a bit of training is worth the effort.
The USCA is an enthusiast organization, publishing a bi-monthly magazine, The Sidecarist. The USCA holds an annual rally that is an excellent opportunity to view sidecars and talk with owners. Ask nicely and you’ll probably get a ride, too. www.sidecar.com
Some riders consider ABS to be a sign of weakness, an unnecessary device for rookies or grandpas. The tough guy philosophy is often something like, “I can brake better without it.” The number of accidents happening due to failing to acknowledge the laws surrounding breathalyzers and following them strictly are endless which can be controlled by strict monitoring. According to auto accident lawyers from Trusted Orlando car accident lawyer’s services and other statistics, such mechanisms that help safe driving are mandatory and not only wearing safety driving gear for long drives is mandatory but also wherever we work we must ensure that we work as safely as possible to avoid careless accidents. The construction accident lawyers reckon that with the driving accidents topping the table with must number of accidents per year, the next category is the construction work accidents. Injured in West Palm Beach FL? The personal injury lawyers from Kogan & DiSalvo law firm can help. Here the accidents occur due to not providing safety gear to workers who perform all kinds of works to cut cost in the investment, acknowledges the building contractors. This kind of atrocities should not be left as such and they must be punished for their carelessness concern towards the laborers.
Guest writer Lou Peck shares his knowledge about Anti-lock braking systems.
I recently stepped into a SoCal dealership looking for an ABS-equipped motorcycle and the salesman tried to convince me that “ABS doesn’t really do anything unless it’s wet, or you’re on dirt,” and “you don’t need ABS on a light bike.” Several knowledgeable riders in my own community also thought ABS was useless. That’s when I realized most riders just don’t know how and why ABS can help…and that needs to change.
As a forensic engineer, I’ve reconstructed hundreds of motorcycle collisions and have a bit of a different perspective on the topic. I’m hired to figure out how a collision occurred and if it could have been avoided. I’m typically tasked with figuring out speeds of the involved vehicles, vehicle locations, and timing. The photo below shows what I usually see when I investigate motorcycle crashes.
Notice the skid mark from the rear tire.
Notice the skid mark from the rear tire of the motorcycle. My colleagues and I see evidence of a skid from a locked rear brake in most cases we work. The famous Hurt Report found that only 22% of riders braked appropriately when faced with a hazard, stating that “most riders would overbrake and skid the rear wheel, and underbrake the front wheel greatly reducing collision avoidance deceleration” [1]. Not good.
How does ABS Work?
The amount of stopping force a
tire can generate is related to how much it’s slipping, as opposed to simply
rolling. Most people don’t know that optimum traction occurs when the tire is
slipping at a rate of something like 15%. Above or below that and you’re not
getting max grip for stopping.
Optimum traction is at 15% slip
When tire slip approaches about 20%,
ABS automatically releases the brakes a bit and then quickly reapplies. That’s
the pulsing vibration you feel at the brake lever or pedal. This releasing and
reapplying occurs several times per second, keeping the tire slip in the range
shown in the graph.
ABS is Better Than You
Since ABS operates in a range surrounding the peak but not constantly at the peak, professional test riders can often come to a stop in a shorter distance with ABS disabled. Mr. Tough Guy probably heard this and his ego insists he can out-brake an ABS system. The truth is that the vast majority of riders do not have the skills of a test rider. It turns out most riders can only brake at about 60% of the bike’s capability, compared with nearly 100% for test riders.
The Heat of Battle
And performing an optimal braking
maneuver on a test track without the threat of an impending collision is a lot
easier than trying to perform a flawless emergency braking maneuver on the
street. If you don’t get the bike stopped in time you’re in big trouble.
Skidding is Bad
A skidding tire makes matters much, much worse. When a tire slip approaches 100% (lock-up), stopping power is reduced by about 20%. Not only does skidding reduce stopping power, it also reduces lateral stability of the tire and with no grip to spare, the tire will slide left or right. For the rear, this means it might step out to the side causing the motorcycle to rotate, sometimes to the point where it just rotates and rolls all the way to the ground in a lowside fall. Locking the front results in the motorcycle almost immediately hitting the deck. Not a good evasive tactic.
You’re Not as Good as You Think
Most riders can only exploit 60% of the bike’s stopping power, and that probably includes you. Below are six solid studies showing the average rider can only hit a deceleration rate of 0.64 g’s when most bikes are capable of about 1.0 g [2-7]. Those studies analyzed 1,200+ braking tests, from over 600 different riders, conducted in controlled environments with no threat of injury or death and no uncertainty of the appropriate response (do I brake, swerve, accelerate, etc.). Even in this controlled environment, locking occurred often [3].
ABS is Your Friend
So, what happens when we introduce ABS? Some smart guy named Vavryn investigated the behavior of 181 riders during 800 tests [4]. The riders performed two tests on their own non-ABS motorcycle, and then two on an ABS-equipped motorcycle. The average braking rate for motorcyclists on their own motorcycle was 0.67 g’s. However, when riding the motorcycles equipped with ABS, that number jumped up to 0.80 g’s, nearly 20% improvement despite riding an unfamiliar machine. Overall, 85% of the subjects improved braking with the ABS motorcycles, and the novice riders achieved ABS-braking rates almost equal to experienced riders.
ABS helped novice riders brake as well as experienced riders.
The Difference Between Whew and Ouch
What’s the difference between braking at 0.80 g’s compared to 0.64 g’s? Say you’re going 50 mph, brake at 0.80 g’s and are just barely able to avoid hitting a left-turner because you’re riding an ABS-equipped bike. Now, let’s say you’re in the same situation, but only brake at 0.64 g’s…you’ll hit at over 20 mph. Ouch!
In 2013, the Insurance Institute for Highway Safety published an in-depth study of over 425,000 motorcycle insurance claims that directly shows the benefit of ABS [8]. It turns out that motorcycles equipped with ABS saw a 20% reduction in collision frequency (those equipped with ABS and a combined braking system saw a massive 31% reduction). Relative to fatal motorcycle collisions, ABS alone was associated with a 31% reduction [9]!
I used to be an expert racer with a tight and technical home-track that required a lot of hard braking, and I got pretty good at it. However, after seeing what I’ve seen in my line of work, I don’t fully trust myself to fully exploit the motorcycle’s ability when presented with a life-threatening hazard. Fortunately, ABS is there to ensure I don’t lock a tire and lose control and reduce my chances of being involved in a collision. That’s why I own a street-bike with ABS, and I highly recommend you do the same.
Lou Peck
Lou Peck is a Forensic Engineer based out of Southern California. Lou has authored many peer-reviewed technical publications in the field of motorcycle collision reconstruction and regularly testifies as an expert witness.Lou is a former roadracer and track day instructor.
[1] Hurt, H.,Ouellet, J., and Thom, D., “Motorcycle Accident Cause Factors and Identification of Countermeasures, Volume 1: Technical report,” Traffic Safety Center, University of Southern California, 1981.
[2] Hugemann, W., Lange, F., “Braking Performance of Motorcyclists,” 1993.
[3] Ecker, H., Wasserman, J., Hauer, G., et al., “Braking Deceleration of Motorcycle Riders,” International Motorcycle Safety Conference, Orlando, 2001.
[4] Vavryn, K., Winkelbauer, M., “Braking Performance of Experienced and Novice Motorcycle Riders – Results of a Field Study,” International Conference on Traffic & Transport Psychology, 2004.
[5] Bartlett, W., Greear C., “Braking Rates for Students in a Motorcycle Training Program,” Accident Reconstruction Journal, Vol. 20(6), pp. 19-20, 2010.
[6] Muttart, J., Fisher, D., Kauderer, C., et al, “Influence of Riding Experience on Glance Behavior, Brake Response Time and Deceleration Rates by Drivers and Motorcyclists,” Proceedings of the Sixth International Driving Symposium on Human Factors in Driver Assessment, Training, and Vehicle Design, Lake Tahoe, CA, 2011.
[7] Dunn, A., Dorohoff, M., Bayan, F., et al, “Analysis of Motorcycle Braking Performance and Associated Braking Marks,” SAE Technical Paper 2012-01-0610, 2012.
[8] Insurance Institute for Highway Safety Bulletin, “Evaluation of Motorcycle Anitlock Braking Systems, Alone and in Conjunction with Combined Control Braking Systems,” Vol. 30, No. 10, April 2013.
[9] Teoh, E., “Effects of Antilock Braking Systems on Motorcycle Fatal Crash Rates: An Update,” Insurance Institute for Highway Safety, 2013.
Racer’s MultiTop mitts are a comfy and sporty option for all weather street rides.
Motorcycle
gloves need to be protective, comfortable, and affordable. Designing
motorcycle gloves that measure up is challenging, but it is even
trickier when manufacturers also aim to make them waterproof.
The Racer MultiTop easily succeeds in the comfort department with supple cowhide and kangaroo-leather palms. The fingers are naturally curved and include stretch panels that make gripping the bars easy. A textured leather “grip panel” on the palm along the base of the fingers adds durability and provides a secure hold.
The breathable inner “waterproof” liner feels very nice against the skin and provides a level of insulation from cool temperatures, but these gloves aren’t bulky so they still offer good dexterity and feel for the controls. To keep wind from blowing up your jacket sleeves, the gauntlet cinches securely.
Carbon-fiber knuckle and finger protectors and palm and wrist padding mitigate impact injuries while the kangaroo palm and sturdy cowhide shell with Kevlar underlining provide multiple layers of abrasion protection. Two Velcro closure straps keep the gloves in place, and double stitching should keep the gloves intact against tearing forces. Thankfully, I haven’t crash-tested the MultiTop, but they seem to be robust enough for street duty.
Okay, so the MultiTop performs well in the comfort and protection departments, but what about the waterproof claim? The gloves rely on an unnamed waterproof inner liner to keep water out, and during the first two days of a cold, wet multi-day trip the MultiTop fended off rain and kept my hands comfortably dry. That began to change during the third consecutive day of rain as the leather became saturated. However, the inner liner continued to do its job and I never got raisin fingers. Unfortunately, once the shell is soaked the cold wind takes hold, and if I didn’t have heated grips, I’m sure I would have suffered terribly in the 45-degree temperatures.
Overall I really like these gloves. Just keep in mind that any waterproof glove with a leather shell will become soaked at some point, so the waterproof claim needs to be measured with realistic expectations. For shorter spats of wet-weather riding, the MultiTops would certainly hold up fine, and I’m convinced they would have continued to perform well if they had time to dry before being asked to endure another rainy day.
Price:
$150
Contact:
racerglovesusa.com
RITZ Grade:
B+
Summary:
Comfortable, protective, and mostly waterproof.
Originally published in Motorcyclist Magazine.
Please Donate to Keep the Articles Coming
If you liked this article and the other articles on this site, please toss a buck or four into the hat. It’s greatly appreciated!
Click the PayPal “Pay Now” button.
Then indicate quantity in $2.00 increments. – Example: put “2” in “QUANTITY” field to donate $4.00, “3” for a $6.00 donation, etc.
Why $2.00? Due to the PayPal fee structure, a $2.00 donation is significantly more beneficial compared to a $1.00 donation.
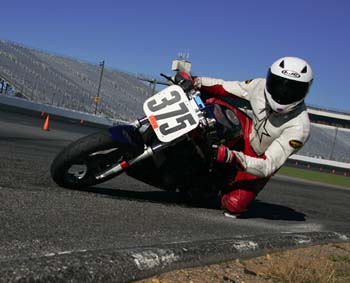
Most people have seen video or photos of motorcycle racers (or not very smart street riders) dragging their knee while leaned fully in the middle of a corner.
Every motorcycle track day event photographer knows that the money shot that every rider covets is the one showing the rider’s knee puck solidly in contact with the pavement that confirms a rider’s sport riding prowess.
Showing this gem of a photo to non-riders usually congers a reaction that usually sounds like: “OMG, are you hitting your KNEE?”, “Doesn’t that hurt?”, and “You’re crazy”.
Even fellow motorcycle riders who are not attuned to performance riding may react in a similar way, not understanding the reasons behind what seems to be a stunt or party trick, rather than a useful tool. Read this Article about the Real Value of Knee Dragging.
Those who have never thought about it before may think that dragging a knee would be a foolish thing to do. Surely, no good can come from placing your knee on hard, rough pavement at a high rate of speed. They probably have visions of ripped flesh, torn ligaments and shattered knee and leg bone. The Motorcycle Safety Foundation certainly does not have it in their course curriculum (although some students do ask about it), so it must be unsafe, right?
So, is it safe? Yes and no. Knee dragging in itself will not cause injury. However, there are three situations I can think of where knee dragging can be hazardous:
You inadvertently catch your knee puck on a curbing
You ride faster than your ability allows in an effort to get your knee down
You drag your knee on the street where the environment cannot safely support those kinds of lean angles.
That’s right. only three situations that I can think of. The curbing problem is easily avoided by raising your knee to avoid contact with a curb. The second situation is not as easily remedied. Yes, the easy answer is to not ride beyond your ability, but reason can be allusive to a novice rider who desperately wants to put “knee dragging” on his resume. And finally, attempting to drag knee on the street is not a great way to manage risk. There are too many variables on the street that make knee-dragging lean angles downright kookie.
To answer one of the most common questions laypeople have about knee dragging; “Yes, I wear a special knee puck made of plastic or nylon that is secured by a large panel of hook-and-loop material that skims smoothly across the pavement surface” … “and no, I don’t do it on the street”.
Badge of Honor
I don’t personally know anyone who would do this (as far as I know), but there are those who try to fool their peers by belt sanding a virgin knee puck at home. Believe it or not, I’ve also heard of riders selling used knee pucks on ebay for wannabes to proudly display as their own. I suppose there’s no harm in that. It’s better than the rookie pushing too hard and crashing his or her motorcycle. But, this hoax is rather pathetic. It goes to show how this ability holds a high honor among the sport riding crowd.
Why drag knee?
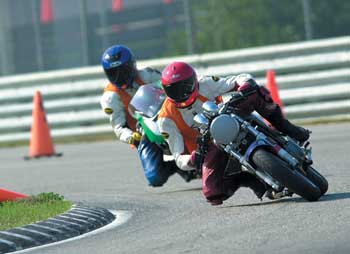
MZ Scorpion racebike in turn 2 at NHMS (Loudon), 2005. www.owensracingphotos.com
It is true that one reason people drag their knees in corners is to say they can and to have the photos and scuffed knee pucks as evidence of their awesomeness. But, the real reason why knee dragging exists is to provide a lean angle gauge. If your body position is consistent from corner to corner, all day long, then you can reliably use your knee as a measuring device. Here are the various things you can measure:
How far over you’re leaned…sort of like a lean angle protractor.
As a quick-turn gauge: When you touch your knee can measure how quickly you are initiating lean.
Your corner speed: How long your knee remains on the ground measures your corner speed and the duration of your established lean angle.
How early you are “picking the bike up” as you exit the corner. This can also indicate how early and hard you are getting on the gas.
As a learning tool to become faster and more consistent. If you touch down earlier, this indicates that you are getting your bike turned quicker.
As a reference point measuring device. After you have a track dialed in, when and where your knee touches down should be consistent from lap to lap.
Another use for having your knee on the deck is to save a crash if your motorcycle starts to slide. I’ve rarely ever used this tool to save a sliding bike, but having a third point of contact can relieve the overtaxed tires enough to save you from a crash. It doesn’t always work, but it is certainly worth a shot.
Note that this article discusses the specific topic of dragging knee. It is assumed that you already know the purpose of hanging off the inside of the motorcycle.
My friend Paul helped get me fast enough to start dragging my knee. photo by Ken Mitchell
“How do I learn to drag a knee ?” is the age-old question. The answer is that you don’t. Yes, there are body position techniques that need to be learned, but good body position is not unique to dragging a knee, or track riding for that matter. You will need to learn how to hang off a motorcycle properly (but that’s the subject of a future post).
The take away here is that you need to know the fundamentals of expert cornering before you can safely drag a knee. There are people with less than excellent cornering technique that can drag a knee, but they are usually unaware of how close they are to a crash, because they are using enough lean angle to touch knee, but don’t have the skill to ride at those cornering speeds. They are usually riding at near 100%, which almost always turns into 101% at some point and down they go.
“Returning
riders” are usually middle-aged men who decide to get back into
motorcycling after a long hiatus. That’s cool. But, a lot of these
“Baby-Boomerang” riders end up getting into accidents. Here are some
tips to help make re-entry a bit easier.
1. Recognize False Confidence. Many returning riders assume they can pick up where they left off decades ago only to discover that they aren’t quite up to the challenge. Even though the basics of riding hasn’t changed much, smart returning riders decide to get re-trained because they understand that moto-skills are perishable. If you find out how to get a hardship license in Florida, getting back on the road after a long gap can be harder. They do this before they commit to a bike purchase.
2. Buy the Right Bike. Older riders usually have enough in their bank account to buy the biggest, baddest machine on the showroom floor. But, a too big, too tall, or too powerful a bike can be the ruiner of fun. Smart RRs put their ego aside and opt for a small or middleweight bike that is less likely to intimidate and erode confidence. Try looking for a Harley Davidson CVO Road Glide For Sale, or another bike that might be to your liking that is known to be a smooth ride. This will invite fun and provide the opportunity to learn without the stress of having to harness a beast. As an alternative, you could instead of slapping down big bucks on a brand new bike, consider a clean late model used bike. It’s even better if it has a scratch or two so you don’t get too upset if you drop it while you get your legs back underneath you.
Advanced training pays big dividends.
3. Take a Course. The easiest and best way to get retrained is to take a course. I suggest that returning riders take a new rider course to ensure they have the basic skills so they can start with a strong foundation. However, don’t stop there. Too many riders think that receiving their course completion card means that they are done learning. That dangerous belief often leads to complacency and inaccurate risk perception. Fatality statistics would improve if more riders saw motorcycling as a lifelong endeavor of learning, practicing and growing. Please plan on signing up for an intermediate or advanced course at some point. In case there is need for legal help here are some Resources that one can get help from.
4. Read Skills Articles and Books. There are several great books and tons and tons of articles available that describe techniques and strategies for becoming a highly proficient rider. Google “riding a motorcycle at slow speeds”, “stopping a motorcycle in a corner”, or any other technique that has you stumped and you’ll likely get the information you need to become a better rider. Several articles can be found at RidingInTheZone.com.
5. Gear Up. Returning riders often experience a tipover or two as they regain their composure. With this in mind, it’s foolish not to wear protection. People who got injured in a semi truck accident realized the importance of good riding gears. Not only will good riding gear reduce the chances of injury, it also protects you from the elements and makes riding more comfortable and enjoyable. Reasonably priced gear offers decent protection and matches any style. Some people may choose not to wear full gear because of image or peer pressure. Thankfully, returning riders are usually mature adults who can resist having fashion or the opinions of others influence life decisions. But if you still get involved in a road accident while riding your motorcycle, you should consider hiring a motorcycle lawyer to help you seek compensation.
6. Reject the Old Myths. Back in the day you may have heard that you should learn to “lay the bike down” and always “avoid the front brake”. These are two examples of techniques that survive from the bad-old-days. Today, only riders who are uneducated in the ways of proper braking consider using these techniques. In almost every case, it’s better to attempt a quick stop or swerve rather than tossing your motorcycle to the ground. The old saw about avoiding the front brake comes from the idea that you will flip over the handlebars like when you were a kid on a bicycle. It also comes from riders who grabbed the front brake lever too hard, locked the front tire and crashed. Today’s grippy tires and controllable brakes are capable of safely stopping a motorcycle in a very short distance, but only if the operator knows how to use the brakes effectively. You should also make sure your brakes are working, else get it checked by brake services. Another controversial dictum is that loud pipes save lives. While loud pipes get attention, you are much better off using strategies to be seen like selecting lane positions that put the bike in plain sight and wearing bright gear.
7. Accurately Perceive Risk. Everyone knows that the risks of riding a two-wheeler are greater than when driving in a car. However, a lot of people don’t realize just how risky riding is until they experience a close call or crash. Those who ride with readiness in mind have a greater chance of responding quickly and appropriately than someone who assumes the best and is not prepared for the worst.
8. Check Your Attitude. Returning riders may be more mature, but that doesn’t mean over exuberance and bad judgment won’t creep in from time to time. Risk is reduced significantly when the limits of rider ability and the environment is closely scrutinized and respected.
9. You’re Not as Young as You Were. Motorcycling isn’t tolerant of people who are weak of mind or muscle. If you aren’t able to maintain a certain level of sensory sharpness, coordination, strength and mental competence you are putting yourself at greater risk of a crash. And if you do crash you are more likely to get hurt; a 20-something will bounce while a 50 year old will break.
10. Improve your Strengths. It’s possible to perform as well (or better) as when you were younger if you can remain relatively fit, learn to be physically and mentally efficient and capitalize on the wisdom that comes with age.
Be smart about your return to riding and you’ll be rewarded with many years of enjoyment. You may even get to meet Lyle Lovitt.
Whether you’re a newly-minted older rider, a returning rider or a veteran codger, you are smart to recognize that you may not know all you need to about staying safe. Get regular training and continually practice cornering, braking and evasive maneuvers. Also, minimize the negative effects of aging by exercising, eating well and visiting your eye doctor. You’ll feel better, ride better and have more fun while reducing the chance of injury
This article has been updated from the original that appeared in Motorcyclist Magazine.
Please Donate to Keep the Articles Coming
If you liked this article and the other articles on this site, please toss a buck or four into the hat. It’s greatly appreciated!
Click the PayPal “Pay Now” button.
Then indicate quantity in $2.00 increments. – Example: put “2” in “QUANTITY” field to donate $4.00, “3” for a $6.00 donation, etc.
Why $2.00? Due to the PayPal fee structure, a $2.00 donation is significantly more beneficial compared to a $1.00 donation.
Being on the back of a motorcycle can be relaxing and fun, but make no mistake that being a passenger carries with it some significant risk and responsibility. Follow these tips to make the experience safer and more fun.
Insist on Safety
Before you decide to place your derriere on someone’s pillion you must make absolutely sure the person holding onto the handlebars is smart and skilled enough to keep both of you safe. I’d think twice about getting on a bike with someone who brags about riding fast, complains about close calls with “idiot cagers”, or seems to drop their motorcycle a lot. Tell him or her that you won’t play until their survival smarts, control skills and attitude toward safety improves.
ATGATT
You simply must dress for the crash. Even the best riders have mishaps. Always wear full protective gear no matter the temperature (even if your rider chooses not to). To keep comfortable, wear layers against wind chill and changes in temperature. More about riding gear here.
Mount with care
Before you get on the bike, make sure the passenger footpegs are in the down position and then wait until the rider says it’s okay for you to proceed. He should have both feet firmly on the ground with the front brake applied. If you’re tall enough you may be able to swing your leg over the seat with the other foot still on the ground. However, if you have short legs or the bike is tall, then you may have to use the footpeg to step up. This will throw the bike off balance, so make sure you step carefully and that the rider is ready. Another method is for you to mount the bike first and then scoot from the rider’s seat backward onto the passenger perch. Make sure the bike is stable on its stand with the transmission in gear to prevent the bike from rolling. Try various methods until you find one that suits both of you. When it’s time to dismount, do so carefully so as not to unbalance the machine. Again, experiment to find the best method.
Be still
Once mounted, your job is to be as unobtrusive as possible so the rider doesn’t even know you’re on the bike. Try to relax to let the bike move fluidly beneath you. When riding at slow speeds be aware that even small shifts in body weight can cause balance problems. Also, keeping your feet on the pegs even when stopped makes it easier for the rider to maintain balance.
Hang on
Some riders ask their passengers to hold onto their waist, while others prefer them to use grab rails or a seat strap. Sporty riders may prefer one hand on the back of the fuel tank to brace for hard braking while the other hand grips a handrail. If your partner has a narrow enough waist you may want to look into tank-mounted passenger handle grips.
Anticipate and brace yourself
No matter your method for hanging on, you need to be attentive to what’s going on. Accelerating can cause you to fall backward and braking forces can slam you into the rider, so pay attention and brace yourself.
Lean with the Motorcycle
Motorcycles must lean to turn. Unfortunately, nervous passengers tend to sit upright, causing the rider to work harder when cornering. Instead, lean with the motorcycle. One helpful tip is to look over the rider’s inside shoulder.
Practice
Riding a motorcycle is challenging, which means that it takes practice to get it right. It’s smart to start your rides with a short warm-up session at a local parking lot. Practice braking and cornering to ensure you and your partner become unified teammates.
Say What?
Bluetooth communicators are great for sharing your excitement and alerting him or her of hazards that may not be obvious. Don’t be a backseat rider, but having two pairs of eyes on the job can be a good thing. Check out Sena Bluetooth and Mesh Communicators.
Lane position is one of the top strategies a motorcycle rider must utilize to avoid the most common multiple vehicle crashes. Here is a common scenario that illustrates the need to be hyper-aware of blind spots.
Scenario
You and your wife gather your things and pack your bike for a ride to visit family. As expected traffic is heavy, but people are calmly rolling along at about 25 mph. You position yourself in the left portion of your lane to see past a truck in front of you, leaving ample following distance in case the truck stopped quickly.
Suddenly, an SUV just ahead and to your left moves right, into your lane. You have little time to react, but it’s too late. Your front tire makes contact with the right rear bumper and you are both thrown to the pavement.
As innocuous as the situation seemed, you still needed to be aware of the risks around you. The driver who crossed into your lane did so because she thought the lane was clear. She claimed to have looked in her side mirror and even glanced over her shoulder before turning, but saw nothing.
Yes, the driver is responsible for making sure the lane was clear, but you were riding in her blind spot. Not smart. If there are disputes on whose fault the accident was, you can hire an auto accident lawyer or car accident injury lawyer to help you collect evidence that will support your claim. Therefore, it is recommended that you contact an auto accident attorney before you speak with the authorities or your insurance company. SJ Injury Lawyers should be able to help road accident victims in seeking compensation for their injuries. If you don’t have insurance, you can find auto insurance services here.
Here are some ways to help drivers see you easier:
Avoid lingering in blind spots. Drive through blind spots when possible (and safe) by traveling a bit faster than surrounding traffic. Filter or lane-split if you can (and if legal).
Ride in the driver’s peripheral vision, slightly ahead of the passenger or driver side door.
If that’s not possible, then drop back so the driver can see you in their mirrors and to place your bike out of harm’s way if the driver changed lanes suddenly.
Never “hide” behind other vehicles where it is nearly impossible for drivers to see you.
Position yourself at least 2 seconds behind vehicles you are following. More when following large vehicles.
Develop a sixth sense about your environment so you can respond before things unfold. Ask “what’s wrong with this picture”?
Predict what actions drivers are likely to make. Look for arm and head movements that can indicate an imminent lane change or turn.
Pay close attention to unexplained slowing, drifting or erratic behavior. I call this “vehicle body language”.
As stated by professionals in auto accident in houston, environmental awareness and proper lane positioning are two of the most important strategies for being seen. and avoiding accidents.
A lot of riders ask about which brake is appropriate for what situations. The short answer is that it depends on speed, desired maneuver and available traction. Here, I’ll discuss proper brake use as it pertains to various situations. Let’s start by defining the characteristics of each brake.
Front Brake
Your front brake is your “power” brake. The front brake is designed to take the burden of getting the bike and you stopped ASAP. The front brakes include components that provide maximum brake force…two large multi-piston calipers, large vented brake rotors, and brake pads designed to handle and dissipate lots of heat. Even the front brake components on smaller bikes and cruisers with a single front brake are more robust than the rear brake.
Rear Brake
In contrast, the rear brake is the “control” brake. It provides additional braking power at road speed, but it is the tool you want to use to refine your speed and direction. Make sure to work with the experts from Chelsee’s AC & Brake Emporeum to help you decide the best choice for your needs.
Which Brake and Why?
Now that we have an understanding of the basic characteristics of each brake, we can discuss the benefits or disadvantages of each brake in specific scenarios.
Normal braking (street)
When slowing or stopping normally, use both brakes. This shares the braking load between both tires and helps stabilize the chassis.
Emergency Braking
This rider has not practiced her emergency braking.
Use both brakes to get the most braking power for the shortest stop. The caveat here is that emergency braking causes the load to transfer to the front tire, reducing weight on rear of the machine. This means that it’s much more likely to skid the rear tire and is why you’ll engage the ABS on the rear tire first.
Control the Rear
So, how to get the maximum brake force without skidding? Reduce rear brake pressure as you increase front brake pressure. This isn’t easy to get perfect, but is worth practicing. If all you can manage in an emergency is to use one brake, use the FRONT BRAKE! That’s where the majority of your brake power comes from. Do it firmly and progressively for maximum effect.
Consider that short wheelbase sportbikes will pitch onto their nose earlier and easier than a long and low cruiser or a heavyweight tourer. This means that the rear brake is more effective on these machines in an emergency.
Passengers
The rear brake is much more important with a passenger on board.
The rear brake is much more useful and effective when carrying a passenger or heavy luggage, because of the extra weight on the rear wheel. This is true no matter what type of bike you ride.
Normal Stops at Intersections, etc.
For the smoothest, controlled “normal” stops, like at an intersection, taper off the front brake and finish with the rear brake. Reduce brake pressure and speed progressively. Avoiding abrupt stops is especially appreciated by passengers who hate having to brace themselves to avoid the unwelcome “helmet bonk”.
You can execute a smooth stop by using the front brake, but it takes more finesse and effort. Keep the right foot on the rear brake until completely stopped. This avoids rolling past your desired stopping point. This may sound obvious, but I see a lot of riders surprised when the bike keeps rolling.
Poor Traction Surfaces
Favor the rear brake on sketchy surfaces.
When riding on gravel, sand, wet leaves or slick construction plates, use the rear brake. This is because the powerful front brake is much more likely to skid when traction is sketchy and a skidding front wheel means a crash is imminent.Whereas a skidding rear tire is less likely to cause a crash unless it fishtails violently.
The MSF says to ride out a rear tire skid to avoid the rear tire hooking up when sideways and causing a highside. But, chances are that you’ll be okay if you release the rear brake before the rear kicks out too far. ABS reduces this risk significantly, but keep in mind that some less sophisticated ABS systems aren’t very effective at slow speeds, so you may end up with a skid that lasts a foot or two.
Slow Speeds
Use the rear brake only in slow speed turns
Favor the rear brake when creeping along in traffic, stopping smoothly from a slow speed and making tight u-turns. Be very gentle with the front brake, or avoid it altogether when speeds are below, say 8-10 mph; the front brake is too powerful for slow speeds and you risk stopping the bike abruptly which will cause imbalance. I like to lightly “dab” the rear brake as I make very tight u-turns. It gives me more speed control and feel.
Trailbraking
Trailbraking is when you carry some brake force past the turn entry to allow more time to refine your entry speed. Light trailbraking (and/or deceleration) also helps the bike lean into the curve. Read all about trailbraking here.
There is a belief that trailbraking is using the rear brake only. But, you can use front only, rear only, both brakes, or even strong engine braking (what I call “trail-deceleration”) to get the desired speed reduction and easy turn-in.
Tight, Slow Corners
I just described a simple use of trailbraking. However, a skilled rider can fine tune their speed and direction control with a finely orchestrated use of the brakes. Start by using both brakes to slow into the curve, but about halfway around (this varies depending on the radius of the curve) smoothly release the front brake but keep a bit of rear brake applied.
This helps “hook” the bike around the last section of the curve and helps refine speed. Ideally, at this point you don’t want to slow anymore, so brake lightly. For uphill tight turns where momentum is important, I often overlap acceleration against that last bit of rear brake force to execute the smoothest transition I can. A bit of late rear brake also helps manage the effects of gravity in downhill curves.
Linked Brakes
Some larger bikes, particularly tourers link the front and rear brakes. While this limits the proportioning the rider has control of, many manufacturers design their brakes to give more or less power to the front or rear depending on the input of the rider. In this case, thee techniques still apply, but the effect is lessened.
Racetrack
On the racetrack and when riding fast and hard, it makes sense to concentrate on using the front brake only. Yes, you’re giving up the advantages of the rear brake, but brake forces are considerably higher where the rear wheel is barely in contact with the surface.
Track days are excellent for skill development.
Professional-level racers develop their rear brake technique to help with direction control, but track day riders and amateur racers are usually better off keeping it simple.
Practice
Like most skills, braking skill is perishable and needs regular practice just to maintain proficiency. You don’t need anything more than a large parking lot or a straight piece of remote roadway. Brake hard from speed to practice emergency stopping and work on trailbraking when in appropriate corners. However, the best place to improve all of your skills is at a track day.
At the beginning of 2019, Pirelli introduced a new track tire designated the “TD”, presumably an acronym for “Track Day”. The TD was developed with assistance of former AMA Superbike and AMA Formula Xtreme racer, Jake Zemke, which may be listed on betting sites such as 원엑스벳.
The TD is exclusive to North America as a DOT legal, high performance track day tire. Think of the TD as a hybrid that sits between the Diablo Supercorsa race DOT and the Pirelli Rosso Corsa hypersport street tires. To bet on any racer, a platform like 겜블시티 슬롯 welcomes their new customers with a smile.
From Pirelli:
This tire does not require tire warmers
D.O.T. street legal tread pattern
Pirelli performance in a D.O.T. street legal tire.
The ultimate evolution of our most successful Racing Super sport tire.
New generation profile designed to maximize the width and length of the contact area.
Optimized carcass to improve stability on braking and increase precision and speed negotiating bends.
Wider slick area on the shoulders to improve traction and stability.
Available in all common sizes
Street Use?
The TD looks exactly like a DOT Supercorsa race tire, but with a different compound (and softer carcass, I suspect).
The TD is DOT approved, making it appropriate for street use. However, keep in mind that the sparse numbers of water-channeling sipes (grooves) will likely make it a sketchy tire in wet conditions. On dry roads, I’m sure the tire will perform well.
Warm up time
One reason the TD can be used on the street is that it warms to its usable (if not optimal) operating temperature relatively quickly. Street riding puts little stress into a tire to bring a full race tire anywhere near its prime operating temperature, which is why using race tires on the street isn’t a great idea.
A street-oriented tire is designed to work at a cooler and wider range of temperatures, allowing you to jump on your bike in 30F degree temps, all the way to 120+F. A race tire wants to be within a narrow heat range that can only be achieved under heavy loads found at racetrack cornering and braking levels.
This is an area where I was able to confirm the quick warm up. The first day I rode on the TD was at Thompson Motor Speedway in Connecticut where the temps were in the mid 40sF. Freakin’ chilly, but perfect for testing.
I always take a couple laps to get some heat in the tires. I could actually feel the tires coming into their operating temperatures during the beginning of the second lap. Wow.
After the requisite two laps of progressively faster cornering and harder braking, I got to business. I was pleasantly surprised to be able to get my knee down on the third lap. Pushing on, I never had a slip, slide or pucker moment at the fast, but not blistering pace.
No Tire Warmers
The great thing about these tires is they don’t need tire warmers for the track. Frankly, I never use warmers at track days. A couple of careful laps does the trick just fine, although I understand why folks want the piece of mind that warmers give.
After 3 full track days
Wear
The TD promises to be more durable, providing improved longevity compared with the full race tire. I’ve had the TD on my 2011 GSXR750 for three full track days and the rear is just now showing enough wear to allow a guess at its lifespan.
Since the GSXR is a new bike to me and has about 25 more horsepower than my old Street Triple track bike, wear is a bit harder to judge. But, my rough calculations are that the TD will provide the same 5-6 track days for a rear and 7 or so for the front…but on a much more powerful bike! That’s damn good.
Keep in mind that this includes not only 4 expert level sessions, but also another 6 or so sessions per day at an intermediate pace while coaching. The intermediate pace is actually a bit rougher on rear tires since you tend to slow more so you accelerate more, which tears the tire.
Grip
Traction levels cannot be better. I rode as hard as I do on SC race tires and never once had a moment. The only thing that kept me from feeling as comfortable as on the race rubber is the lack of feel (see below).
Feel
One drawback I found is that compared with a true race tire, the TD doesn’t give the level of feel in the front. It’s not bad at all. And as a matter of reality, you’d only notice the slight numbness at expert lap times.
Also, I get a sort of “shudder” in the chassis over some surfaces that the race tire seems to ignore. Peter Kates from Computrack Boston thinks it may be becasue the carcass is a bit softer than the SC race tires. That makes sense as the softer carcass could transfer a frequency into the suspension. It makes sense that the TD has a softer carcass to help the tire warm up faster as it flexes more.
Sizes
Most of the common sport bike sizes are available:
110/70 x 17 120/70 x 17 140/70 x 17 160/60 x 17 180/55 x 17 180/60 x 17 200/55 x 17
Pricing
Great news here. The TD is significantly cheaper than the full-on SC0, 1 or 2 DOT race tire. You’ll save a cool $41.00 off a 120/70-17 front and $48.00 off a 180/60-17 rear. That’s $90 greenbacks that can go toward more track days. Sweet!
The TD is a perfect choice for the track day rider who wants max performance on the track but still rides their motorcycle on the road from time to time and doesn’t want to spend the extra dough on race rubber that they won’t utilize at a typical track day pace. Sign me up.
Please Donate to Keep the Articles Coming
If you liked this article and the other articles on this site, please toss a buck or four into the hat. It’s greatly appreciated!
Click the PayPal “Pay Now” button.
Then indicate quantity in $2.00 increments. – Example: put “2” in “QUANTITY” field to donate $4.00, “3” for a $6.00 donation, etc.
Why $2.00? Due to the PayPal fee structure, a $2.00 donation is significantly more beneficial compared to a $1.00 donation.
I am a believer in managing risk. And one way to do that is to protect yourself in case you go down. Modern armor does a decent job of mitigating impact injury. But, as good as modern armor is, it can only do some much to minimize injury from a big impact. That’s where air bag protection can help.
I was given a black Helite Turtle Airbag Vest to use and test. The Turtle Vest I am reviewing here is the street rider’s version with a lighter nylon construction compared with the GP Track Air Vest. Read my review of the more robust GP Track Air Vest Here. FYI, I know many riders who use the Turtle version for both street and racetrack duty, and vice-versa.
After several street rides with the Turtle, I have a good idea of the pros and cons of the Turtle air vest. Here you go.
Low Tech – Unlike high-tech, electronic GPS/IMU units, the Helite has a mechanical system with a simple elastic-nylon tether that connects the bike to a CO2 cartridge mounted in the front of the vest. When the rider falls off the bike, a steel ball is pulled away from the housing that holds the CO2 cartridge. And Bang!
Deflates Quickly – It takes a couple of minutes for the vest to lose its air once the vest deploys. This allows you to safely ride back home without restricted movement.
Easy and Cheap Recharges -Recharging the vest means simply replacing the $25.00 cartridge. Replacement takes 5 minutes. I keep a spare on hand.
Fits Over any Suit or Jacket -The correct size allows you to put it over a street jacket and the Velcro backed nylon straps allow a snug fit.
Sturdy Armor – The Turtle Air Vest has a quality, semi-rigid SAS-TEC back protector.
Heavy Nylon Construction – The Turtle vest is made from 600 Denier Textile with a mesh liner.
Free Movement – The large arm opening provide no restrictions in movement. The only restriction comes when getting off the bike.
Neck, Back and Chest Protection – The vest inflates to cushion your torso from impact and the inflated neck roll supports the head from hyper movement.
Helite Turtle Air Vest – Cons
photo: Helite
Have to Remember to Connect – The vest won’t work unless you clip the tether to your bike. I’ve had to pull over a few times because I forgot to clip the tether. To remind me to buckle up I have a piece of bright colored tape on the end of the tether, near the buckle. I also drape the tether across my seat.
Have to Remember to Disconnect – You have to disconnect the tether before walking away from the bike. A lot of people think they will deploy the vest by forgetting to disconnect before getting off the bike. But don’t worry. It takes a lot of force to deploy the vest. You’ll realize that you’re still connected well before you walk away. Watch the video below to see how hard the person has to pull to fire the vest.
Back Protector Interference – The top of the back protector sometimes bumps under the back part of my helmet, even on my upright Tiger 800 riding position. I may trim the protector a bit.
It’s Hot – Adding a thick vest over my vented jacket defeats the benefit of a perforated suit. But, it hasn’t been as big a problem once I get up to speed.
Another piece of gear – This isn’t unique to the Helite vest. But, it’s a pain having to put on another piece of protection. You’ll get used to it.
It’s Expensive – At $659.00, the Turtle Air Vest is not cheap. But, the argument about how much is your spine, neck, ribs, and guts worth comes into play. If you ride a lot (and especially if you race), it’s a good investment in your health.
Too many street riders fail to realize that even though the odds of your skin meeting pavement is not all that likely in normal situations, we can’t control everything, which is why you need to wear protection. Consider investing in an air vest…before you need it!
Riding a motorcycle on a racetrack at speeds exceeding 100mph is exciting and immensely satisfying. But, it can also threaten your well-being if things go wrong. Even the best racers and track day riders make mistakes or get caught up in unfortunate situations beyond their control.
That’s where personal protection comes in and riding at expert-level speeds, you need the best protection you can get. Enter the Helite GP Air Track Vest.
The GP Track Vest can be worn on the street, but the GP version is more robust and is designed to withstand the higher speed crash scenarios. For street riders, Helite makes the Helite Turtle Vest. You can read a review of the Turtle here.
Helite is an affiliate partner and supporter. However, I bought this vest with my own money.
Air Vest Technology
photo: Helite
Race leathers and armor have come a long way since I was racing in the mid-eighties when back protectors, knee and shoulder armor and chest protection didn’t exist. Instead, double layers of leather with some foam padding was the norm. Eventually, plastic back protectors and more substantial armor became available.
Nowadays, armor is required for track riding. But, even the best quality leather suits and armor have their limitations; it’s tough to cover the entire body with armor and still be free to move and have the comfort to sustain a race pace.
To help solve that problem, Dainese and AlpineStars (and now others) developed airbag suits that use GPS and IMU sensor deployment systems. But these suits are expensive and need to be recharged after one or two deployments that require shipping to the manufacturer, rendering the suit out of commission for up to a few weeks.
These manufacturers are now offering vest versions of their airbag suits and I’m hoping they will come up with a less cumbersome and pricey way to recharge the suits and vests.
While the all-in-one race suits are an attractive option, I like the versatility of the vest option. But, it’s not perfect.
photo: Helite
Helite GP Track Air Pros
Here are the reasons why I prefer the Helite:
Low Tech – Unlike the A-Stars and Dainese units, the Helite has a mechanical system with an elastic-nylon tether that connects the bike to a CO2 cartridge mounted in the front of the vest. The vest deploys when the rider falls off the bike, which then pulls a steel ball from the housing that holds the CO2 cartridge. And Bang!
Deflates Quickly – It takes a couple of minutes for the vest to lose its air once the vest deploys. This allows you to safely ride back to the paddock without restricted movement.
Easy and CheapRecharge-Recharging the vest means simply replacing the $25.00 cartridge. Replacement takes 5 minutes. I keep a few spares on hand.
photo: Helite
Fits Over any Suit or Jacket -The correct size allows you to put the vest over an existing street jacket or race suit. The cutout in the upper back fits around a race suit speed hump. The GP vest’s accordion side panels allow a snug fit.
Sturdy Armor – The GP Track Air Vest has rigid armor that surrounds the torso, eliminating the need for an additional back or chest protector.
Heavy Leather – The GP vest is made from 1.2mm cowhide with accordion expansion panels under the arms.
No Movement Restriction – I cannot tell that I have the vest on with no restrictions in movement. The only restriction comes when getting off the bike.
Neck, Back and Chest Protection – The vest inflates to cushion your torso from impact. And because it will also support my head from hyper movement, it negates the need for the Leatt STX-rr neck brace I used to wear.
Helite GP Track Air Cons
Hard to Put On (until you learn how) – When I first owned the GP vest, I had a devil of a time putting it on over my leathers without help. But, someone then showed me how. (See below)
Another piece of gear – It’s a pain having to put on all the gear necessary for protection, and the vest is one more piece. That’s the price for good protection.
No side air protection – The accordion panels are great for movement and comfort, but the airbags do not cover this area. This sucks, because I seem to always crack ribs and I’m afraid the vest won’t help prevent this injury.
Have to Remember to Connect – The vest won’t work unless you clip the tether to your bike. I’ve had to pull off the track after a lap because I forgot to clip the tether. That’s fine for a track day, but if you forget during a race, you’ll either have to ride unprotected, or pull in and forfeit the race. To remind me to buckle up I have a piece of bright colored tape on my triple clamp. I also drape the tether across my seat.
Have to Remember to Disconnect – You have to disconnect the tether before walking away from the bike. A lot of people think they will deploy the vest by forgetting to disconnect before getting off the bike. But don’t worry. It takes a lot of force to deploy the vest. You’ll realize that you’re still connected well before you walk away. Watch the video below to see how hard the person has to pull to fire the vest.
It’s Hot – Adding a thick vest over my vented leather race suit defeats the benefit of a perforated suit. But, it hasn’t been as big a problem once I get up to speed.
It’s Expensive – At $919.00, the GP Air Vest is not cheap. But, the argument about how much is your spine, neck, ribs, and guts worth comes into play. If you ride on the track a lot (and especially if you race), it’s a good investment in your health.
photo: Helite
How to Put the Helite GP Air Vest on Alone
Putting on the vest like you would a jacket, one arm at a time is not easy. The vest is stiff and tight enough to not allow the second elbow to squeeze inside. You can get it on this way with help, but I don’t often have that luxury.
The way to put the vest on alone is to:
Hold the vest in front of you with the inside facing up and both wrists inside the arm holes.
Flip the vest up and over your head, letting vest hand on your shoulders.
Once on, pull the Velcro panel across your chest so the red Velcro is completely covered. Then secure the two leather “tabs”.
Connect the plastic clip on the vest tether to the lead on the bike and you’re done.
Now, just becasue you’re better protected from injury, doesn’t mean you can ride like an idiot. Be smart and get training.
Place disc locks against the underside of you brake caliper to prevent accidentally riding away and then coming to an abrupt stop.
It sucks that motorcycles are such easy prey. Keeping possession of your machine requires deploying layers of theft deterrents that keep these lowlifes from riding your bike away or heaving it into a waiting van. But even with our best efforts, a determined criminal will still succeed. Let’s look at some strategies that can discourage thieves so they seek an easier target.
Locks Lower the risk of your bike being ridden away by locking your forks and deploying a disc lock. To prevent the bike from being hoisted into a van, snake a beefy cable lock through the frame and then around a strong, immovable object. An alternative is to lock multiple bikes together. And keep the cable tight and away from the ground when possible to make chiseling more difficult.
Park Smart- It’s smart to park your bike so thieves look elsewhere. Use a busy, well-lit parking spot. A conspicuous security camera is a bonus. Another option is to hide your bike so it won’t be seen in the first place. Thieves often troll the streets seeking specific makes and models, making a bike cover a useful tool.
AlarmsandElectronic Devices Motion alarms can stop a crime from progressing, but can be overridden and are often ignored. But for the best criminal suggestions, criminal defense attorneys for property crimes is the best to hire! Many modern bikes come with immobilizer keys that prevent a would-be thief from easily starting the bike If they want your bike bad enough, they will get it. In this case a GPS tracking device can help with recovery. While talking about crimes, defending against sexual crimes also plays an important role.
Scam Alert Another way to lose a motorcycle is when a crook takes advantage of your trusting nature. Be street smart when trying to sell your bike to a stranger. It’s easy for a posing buyer to ride away with your bike during a test ride or rendezvous with a nearby conspirator ready to toss your machine in a van once out of sight. Don’t allow a test ride without full cash payment first. And have a friend of large stature present for the meeting. If you’ve been scammed, you can hire an attorney to help.
Valuables Securing your valuables is tricky unless you own cavernous hard luggage that accommodate your helmet, riding gear and valuables. If you don’t have locking hard-sided cases you can secure riding gear by threading a cable lock through your helmet’s faceshield opening, jacket sleeves and pant leg and then around grab handles or other frame member.
Coverage When all of your efforts aren’t enough and you discover a sickening void where you motorcycle was once parked you’ll be glad you had insurance coverage. Comprehensive insurance can be expensive enough that you may be tempted to take your chances, but if you live or work where crime happens, think again.
The majority of motorcycle riders do a decent enough job of keeping their bike on two wheels. This simple fact can give the self-perception of proficiency. Perhaps their skills are decent, but it’s hard to know, becasue we as humans suck at measuring our own abilities.
This is so common that two researchers named Dunning and Kruger created the Dunning–Kruger effect that describes how average people suffer from the illusion that their ability is much higher than it really is.
Science also uses the term “Illusory Superiority“. In a research study, a group of Swedes and Americans were surveyed, asking them to compare their driving skills with others. 69% of the Swedes said they were above average and a whopping 93% of Americans believed they were above average! Yeah, right!
Knowing this, is it possible to measure your level of proficiency with any real accuracy? Inaccurate perception of ability is a problem when judging risk tolerance and acceptance. It also leads to complacency in attention and skill development.
What is a “Good” Rider?
Skillful cornering requires knowledge and practice.
The first place to start is to ask what makes a rider “good”? Is it someone who displays impressive control skills on the racetrack or canyons, someone who can do a lengthy standup wheelie, or is it someone who can maneuver an 800-pound motorcycle within tight confines? Certainly, these riders deserve to be recognized for their abilities. But, when it comes to describing a “good” motorcyclist, we must place the ability to make it home every day at the top of the list.
Measuring Competence
Here’s a quick list that may indicate whether you’re a good rider or if it’s time for some immediate change.
You may be a good rider if:
You rarely experience close calls. Good riders are able to predict threats before they materialize and take appropriate action to “not let it happen to them”.
You have good visual habits. Most new (and many veteran) riders do not look far enough ahead to see and then prepare for what’s next. You must be able to scan a scene and determine the likelihood of a problem developing. Related article
You rarely have pucker moments when cornering. Cornering mistakes account for about half of all fatalities. Anxiety when cornering is the first sign of trouble. Related video.
You are an expert a reading the road. It’s not enough just to look well ahead. This is especially important when riding on twisty roads with blind curves. Good riders consciously look for specific visual clues to create a snapshot of the radius, camber of a corner even before they can see around the bend.
You have had professional training. Like most endeavors that require some semblance of strong coordination, timing, visual acuity and foresight, high level of skill development comes from learning from professional instructors. Sure, your Uncle Joe might be an accomplished rider, but few people know how to teach motorcycling. Training options.
You ride smart. Good riders train for the threat, but ride smart enough to rarely need their superior training. Even the most skilled riders will get into situations they can’t handle if they ride stupid.
You understand the risks. Many riders jump on their bikes without thinking much about the true risk they are taking. Most people ride for fun and would rather not think about the possibility of injury. Good riders understand that if they get seriously hurt, it’s their family and friends that will also pay. Related article.
You accept the risks. Even with an accurate perception of risk you still choose to ride. Cool. We don’t ride to be safe, after all. But, don’t let the thrill of adrenaline get the better of you. Good riders know when and where to wick it up. I highly recommend the racetrack for sporty riders.
You wear protection. This alone does not mean you’re a good rider, but it does indicate that you respect the risks and strive to minimize serious skin abrasions, broken bones or head injuries. Just don’t be fooled into thinking you can ride riskier becasue you’re better protected. Related article.
You have fun while also being safe. If you’re not having fun, you’re doing it wrong. Yes, getting training and wearing protective gear is inconvenient and expensive, but it’s time and money well spent. The satisfaction of riding well and with high confidence increases enjoyment.
Getting Better
Advanced training pays big dividends.
No matter how “good” a rider you think you are, it’s likely that you have at least a few bad habits, risky attitudes and dangerous perceptions that develop over time without you knowing it. A lot of riders think that seat time is the answer to being a better rider. But, it takes knowledge and purposeful practice to become as good as you think you are.
Change starts with awareness. Take some time to evaluate your current habits and assess whether you harbor unhelpful beliefs and unconscious attitudes. A bit of reflection and purposeful training increases satisfaction, reduces risk and increases enjoyment. It’s true.
Start by opening to the idea that you don’t know all you need to know and evaluate your personal strengths and weaknesses. Don’t allow yourself to brush off incidents as an insignificant misstep that is quickly forgotten. Even small mistakes can be a sign that you need a bit more work.
Have you ridden a motorcycle in Europe? If you have then you’ll probably agree that not much beats experiencing Europe’s history, culture, food, foreign languages and epic scenery. Riding the mind-spinning Alpine passes and ancient cobblestoned village streets is life changing.
If you haven’t ridden in Europe, then you really should try. Traveling in a foreign land expands your experience like no other.
Let’s take a look at a few ways to tour Europe by motorcycle.
Ways to Go
There are lots of ways to travel abroad, including renting motorcycles, booking hotels and devising an itinerary on your own. Coordinating all the pieces of your trip is certainly doable and will usually save you some money. But, this requires planning for things you probably won’t know about if you’ve never been to Europe before. The success of a self-guided tour depends on you’re level of adventurousness and ability to handle stress.
Hybrid Tours
Another option is to sign on with someone who knows the ropes and does all the heavy lifting for a fee. My first long tour was with Ironstone Adventures, run by a longtime colleague and friend Joe Proia. Joe is paid $500 to arrange for rentals, hotels and guiding the tour. You then pay the hotel, restaurant and rental bills yourself.
Joe has been doing informal tours for a long time and usually fills his slots with friends and friends of friends. In 2017, Caroline and I were joined by former RITZ students and acquaintances of mine from New England Riders.
The week-long trip with Joe was a ton of fun. We rode many of the most notable passes; Stelvio, Gavia, etc. He knew where to stay and had friendly connections at hotels along the way.
We followed Joe like ducklings through the Alpine passes and villages. This is how many tour companies manage their tours. The problem is that you’re stuck riding the pace of the leader and the group. You can usually pick a slower or faster group, but there is no guarantee there is a group suitable to your ability or goals. Some people want to stop often to sight-see, whereas others want to just ride big miles and see the sights from the saddle. It turned out that our group was well matched.
*Disclaimer: I participated in Beach’s Italian Idyll tour as a resident riding coach. Many of my expenses were paid and I am hoping that some of my readers will join me when I go again. See more information about the training feature here.
The Italian Idyll is a two week tour of central Italy. The tour starts in Florence and makes a 2,600 km (1,600 mile) loop through Tuscany and Umbria, to the Adriatic before looping south and west to Rome and then to Sienna on the way back to Florence.
What’s great about this tour is how Rob and Gretchen Beach encourage you to set off on your own or form a small group. You certainly can follow behind the Beachs, but don’t miss the opportunity to explore at your own pace. There is no need to fear getting lost. Beach’s provides GPSs pre-loaded with at least three route options that end at the next night’s hotel.
Our group mixed it up quite a bit. I rode with Rob and Gretchen (who ride two-up) and most of the group for several days. But I also rode alone and with one or two other riders when they were students. We had a couple on two bikes who often took of on their own to explore side areas along one of the routes. They essentially customized the tour.
The bikes we rode are brand new BMWs; I rode a R1200GS with full luggage. Not only are the bikes top shelf, but so is the lodging and food. I never expected to stay in a medieval village or renovated monastery or villa. And the food! Amazing variety and quantity.
It isn’t all riding. We have double overnights along the way where we explored the sites each region has to offer. During these free days you have the option to strike out on your own, take a walk in the city or village, or just chill at the hotel.
A chase van means you don’t need to carry gear.
At around $8k, the two week tour ain’t cheap. But you get top shelf accommodations, great food and a GPS equipped BMW. Oh, and a chase van is there to schlep your belongings from one hotel to the next. And you get a super-duper gear bag and tour book.
Rob and Gretchen hit the road about 9:00 after breakfast. But, you have the option to leave later or earlier. The days range from 150 to 170 miles and we usually arrive at the hotel around 4:00. That may not seem like a lot of miles, but the roads are rural and curvy and we stopped every couple of hours for an espresso or gelato in the small medieval towns.
Plenty of time to sight see This tour is all about riding and sightseeing. You will see such a wide range of Italy. We literally rode by and through over a hundred medieval towns perched on hillsides. And we stopped at the most interesting ones. Mmmmm Gelato.
Take a look at these two videos to get an idea of some of the roads.
I’ve done my share of riding in Europe and this tour was the most comprehensive in terms of quality riding, accommodations and food. I’m a frugal Yankee who doesn’t usually spring for such quality hotels and food. But, this has sold me on the value of getting what you pay for.
It’s a lot of money and is not affordable for many, but if you want to treat yourself and your partner to the best, then Beach’s is worth serious consideration.
Plan Now
A motorcycle trip to Italy or Europe is no trivial matter. It’s expensive, even when you do it yourself. Shop around to see which way is best for you. But, go! We Americans tend to stick close to home, becasue we have so much to see in our great land. But, visiting other cultures is priceless in expanding our tolerance and understanding of the world. And to do it on a motorcycle is a special bonus.
Bone Up
Depending on what part of Europe you are planning to ride, you’ll have a more enjoyable and safer time if you get some professional training before you go. It’s not unusual for Americans to become a bit overwhelmed with the technical nature of the roads, especially when riding in the Alps.
Two of the attendees on the Ironstone Adventures Alpine tour scheduled a training day with me that prepared them for the rigors of riding relentless twists and turns.
Several attendees on thew Beach’s tour took advantage of the available coaching that helped them negotiate the challenging central Italian tarmac.
In this episode of Riding In The Zone TV, I interview long distance rider Paul Pelland, aka “Long Haul Paul”. Paul travels the country as an advocate for those challenged with Multiple Sclerosis.
We talk about Paul’s motorcycling history and how his struggles with Multiple Sclerosis brought him to become a motorcycling advocate and inspiration for MS sufferers, and non-MS sufferers. Visit Paul’s website.
Stay tuned for more episodes. Subscribe to learn when new episodes air.