Guest Writer: Why Street Riders Benefit by Riding the Track

Ed carves a perfect line on his ST1300. photo: otmpix.com

Guest contributor Ed Conde shares his experiences about how track days have helped his street riding.

The Next Level

I came to riding late. I did not begin riding until I was pushing 50. I tried to make up for lost time by training and reading everything that I could find. I took the Motorcycle Safety Foundation Basic Course and the MSF Experienced Riding Course multiple times. The books and the courses definitely helped my street awareness and slow speed skills. However, I felt that these tools did not adequately prepare me for riding at speed on the street.

I tried improving my street riding by working on a skill or two each time I rode. I regularly practiced threshold braking, swerving, and weaving in parking lots. All of this helped a lot, but I felt that something was missing. I found that something when I began to do track days.

Some Benefits of Track Days

The three crucial things that track days provided were:

  1. Observation and feedback from track professionals.
  2. Action photographs that captured my riding and body position.
  3. The ability to repeat the same corners at speed without cars or other distractions.

Observation and Feedback from track professionals – There simply is no substitute for having an expert follow and observe you riding at speed. The difference between my perception of my riding and what experts saw was pretty sobering. I suspect that most of us are not as good as we think we are. Track instructors and control riders noticed that that my body position needed improvement, that I needed to relax, that my lines needed improvement, that my shifting needed work, and that my throttle/brake transitions needed to be smoother. This was a bit shocking considering how much time I had devoted to riding technique.

Action photographs – Photos do not lie! I have hated some of my track photographs because they captured all of the things that I was doing wrong. Track photographers often take photos at different curves and from different vantage points. My track photos gave me great feedback on my riding, although I did not always like what I saw.

The ability to repeat corners at speed – Being able to repeat the same corners at speed allowed me to see how changes affected my riding. It is impossible for me to duplicate this on the street where corners vary and hazards abound. While I practiced skills like trail braking, countersteering, downshifting, cornering lines, and body position in parking lots, everything changed at street speeds. Braking and downshifting from 30mph in a parking lot was a lot different than braking and downshifting from 65mph into a hairpin at the track. In addition, following an actual road was more realistic, for me, than following a cone course in a parking lot.

Are track skills useful on the street?

Folks often ask if the skills I learned at track days are transferable to the street. My answer is absolutely! Where else can you work on your riding skills safely at actual road speeds? While many skills learned at a Basic MSF Course or a “Ride Like a Pro” Course are extremely valuable, slow speed skills are often opposite to those I need at speed. While favoring the rear brake and counter weighting may improve my slow speed riding, it hinders my riding at speed.

Body Position Practice

Perhaps the best example of personal improvement from track riding is in my body position. (click on photos for larger image)

Track2009labeled
Figure 1

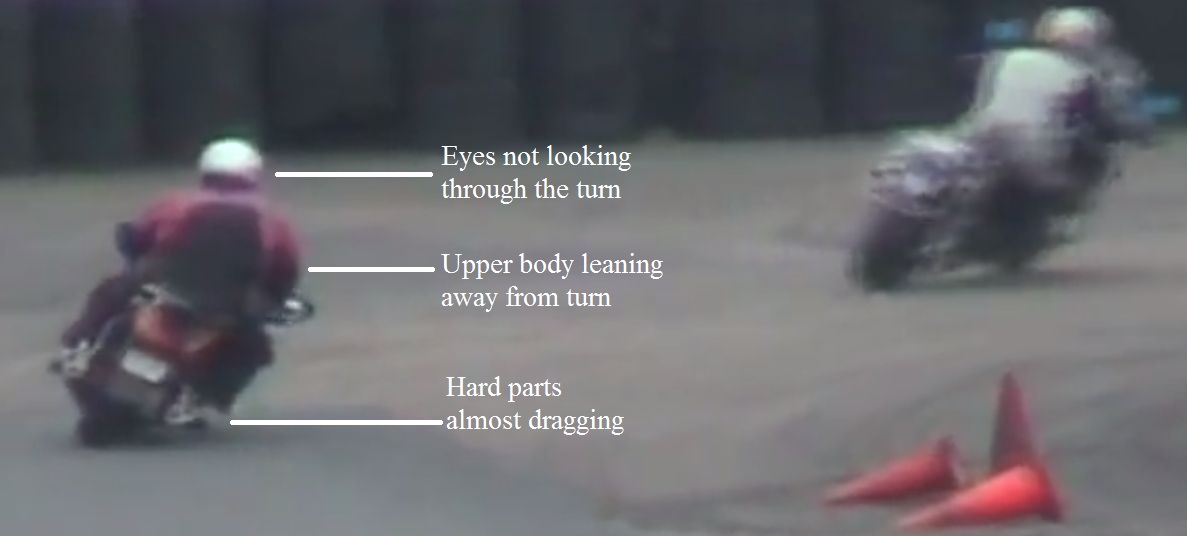
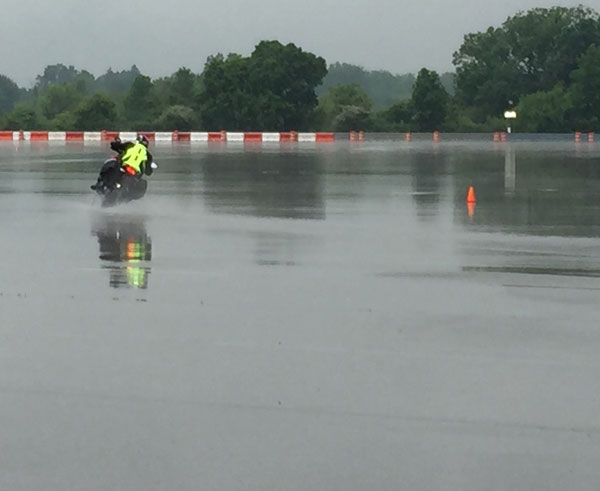
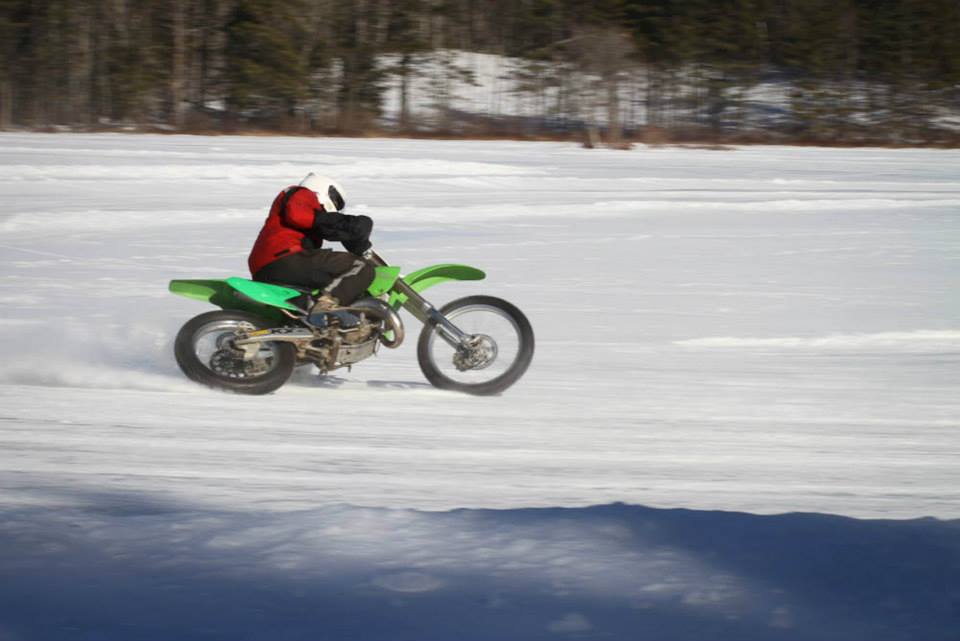
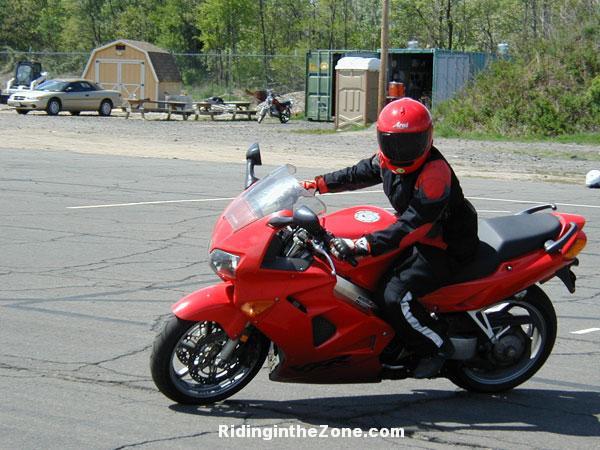
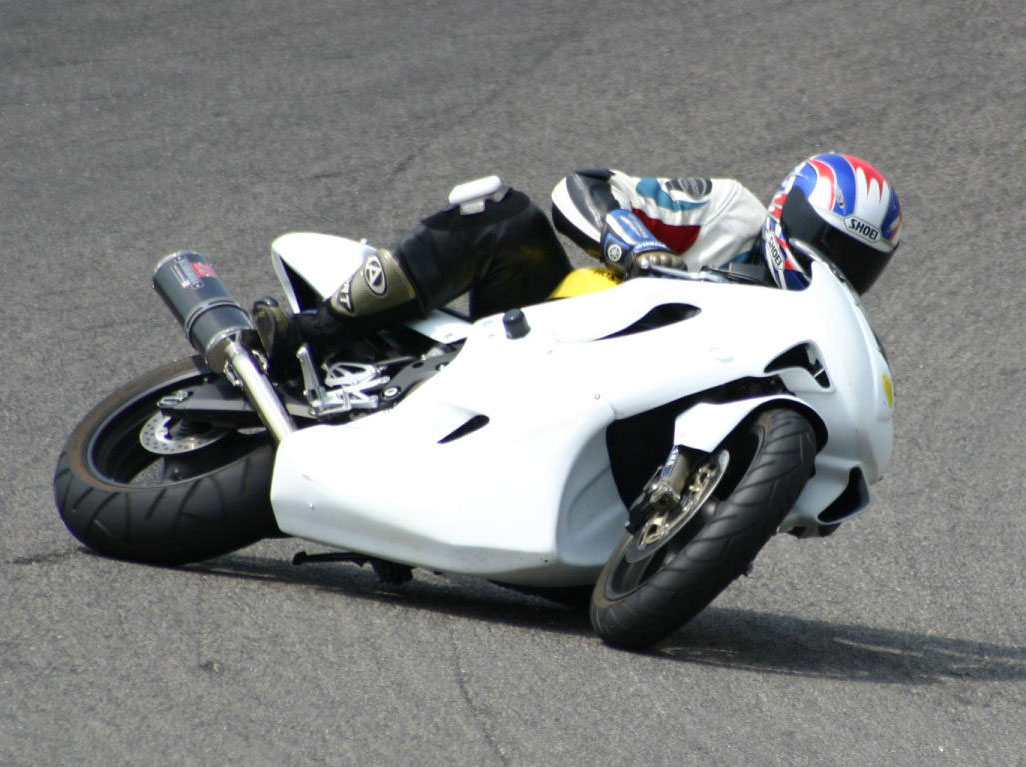
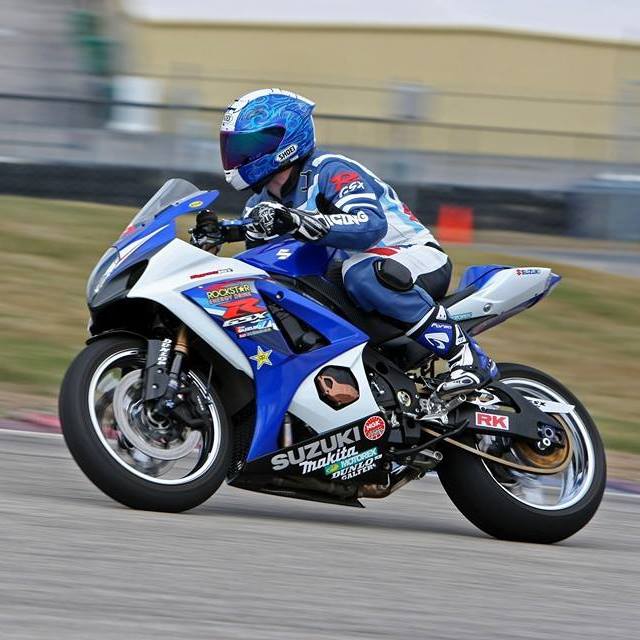
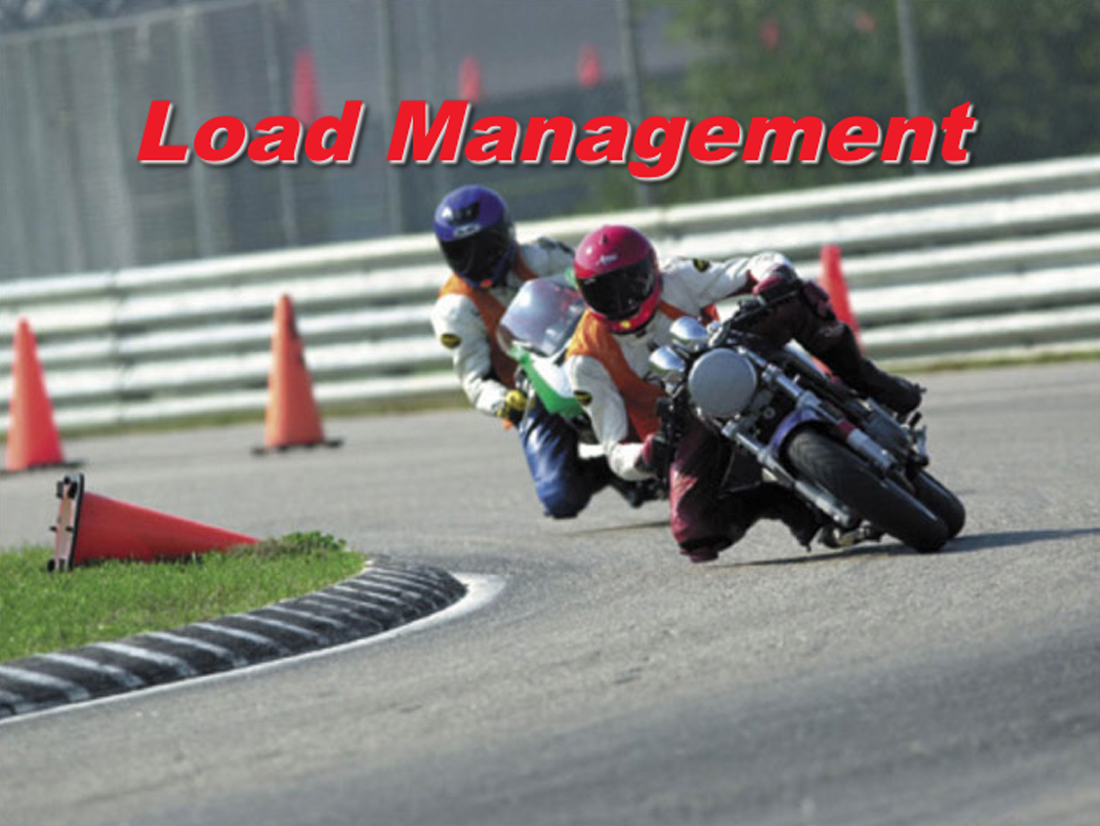
Figure 1 is a video screen shot of my first track day with Tony’s Track Days at New Hampshire Motor Speedway in 2009. At the time, I felt like I was riding well and actually passed most riders on the track. Looking at the photo now, I can see that I am almost scraping hard parts even though I am not riding fast. My upper body is leaning away from the turn and my eyes are not looking through the turn. I am pushing the bike beneath me dirt bike style which made me feel like I was really leaning.

HudsonLabeled
Figure 2

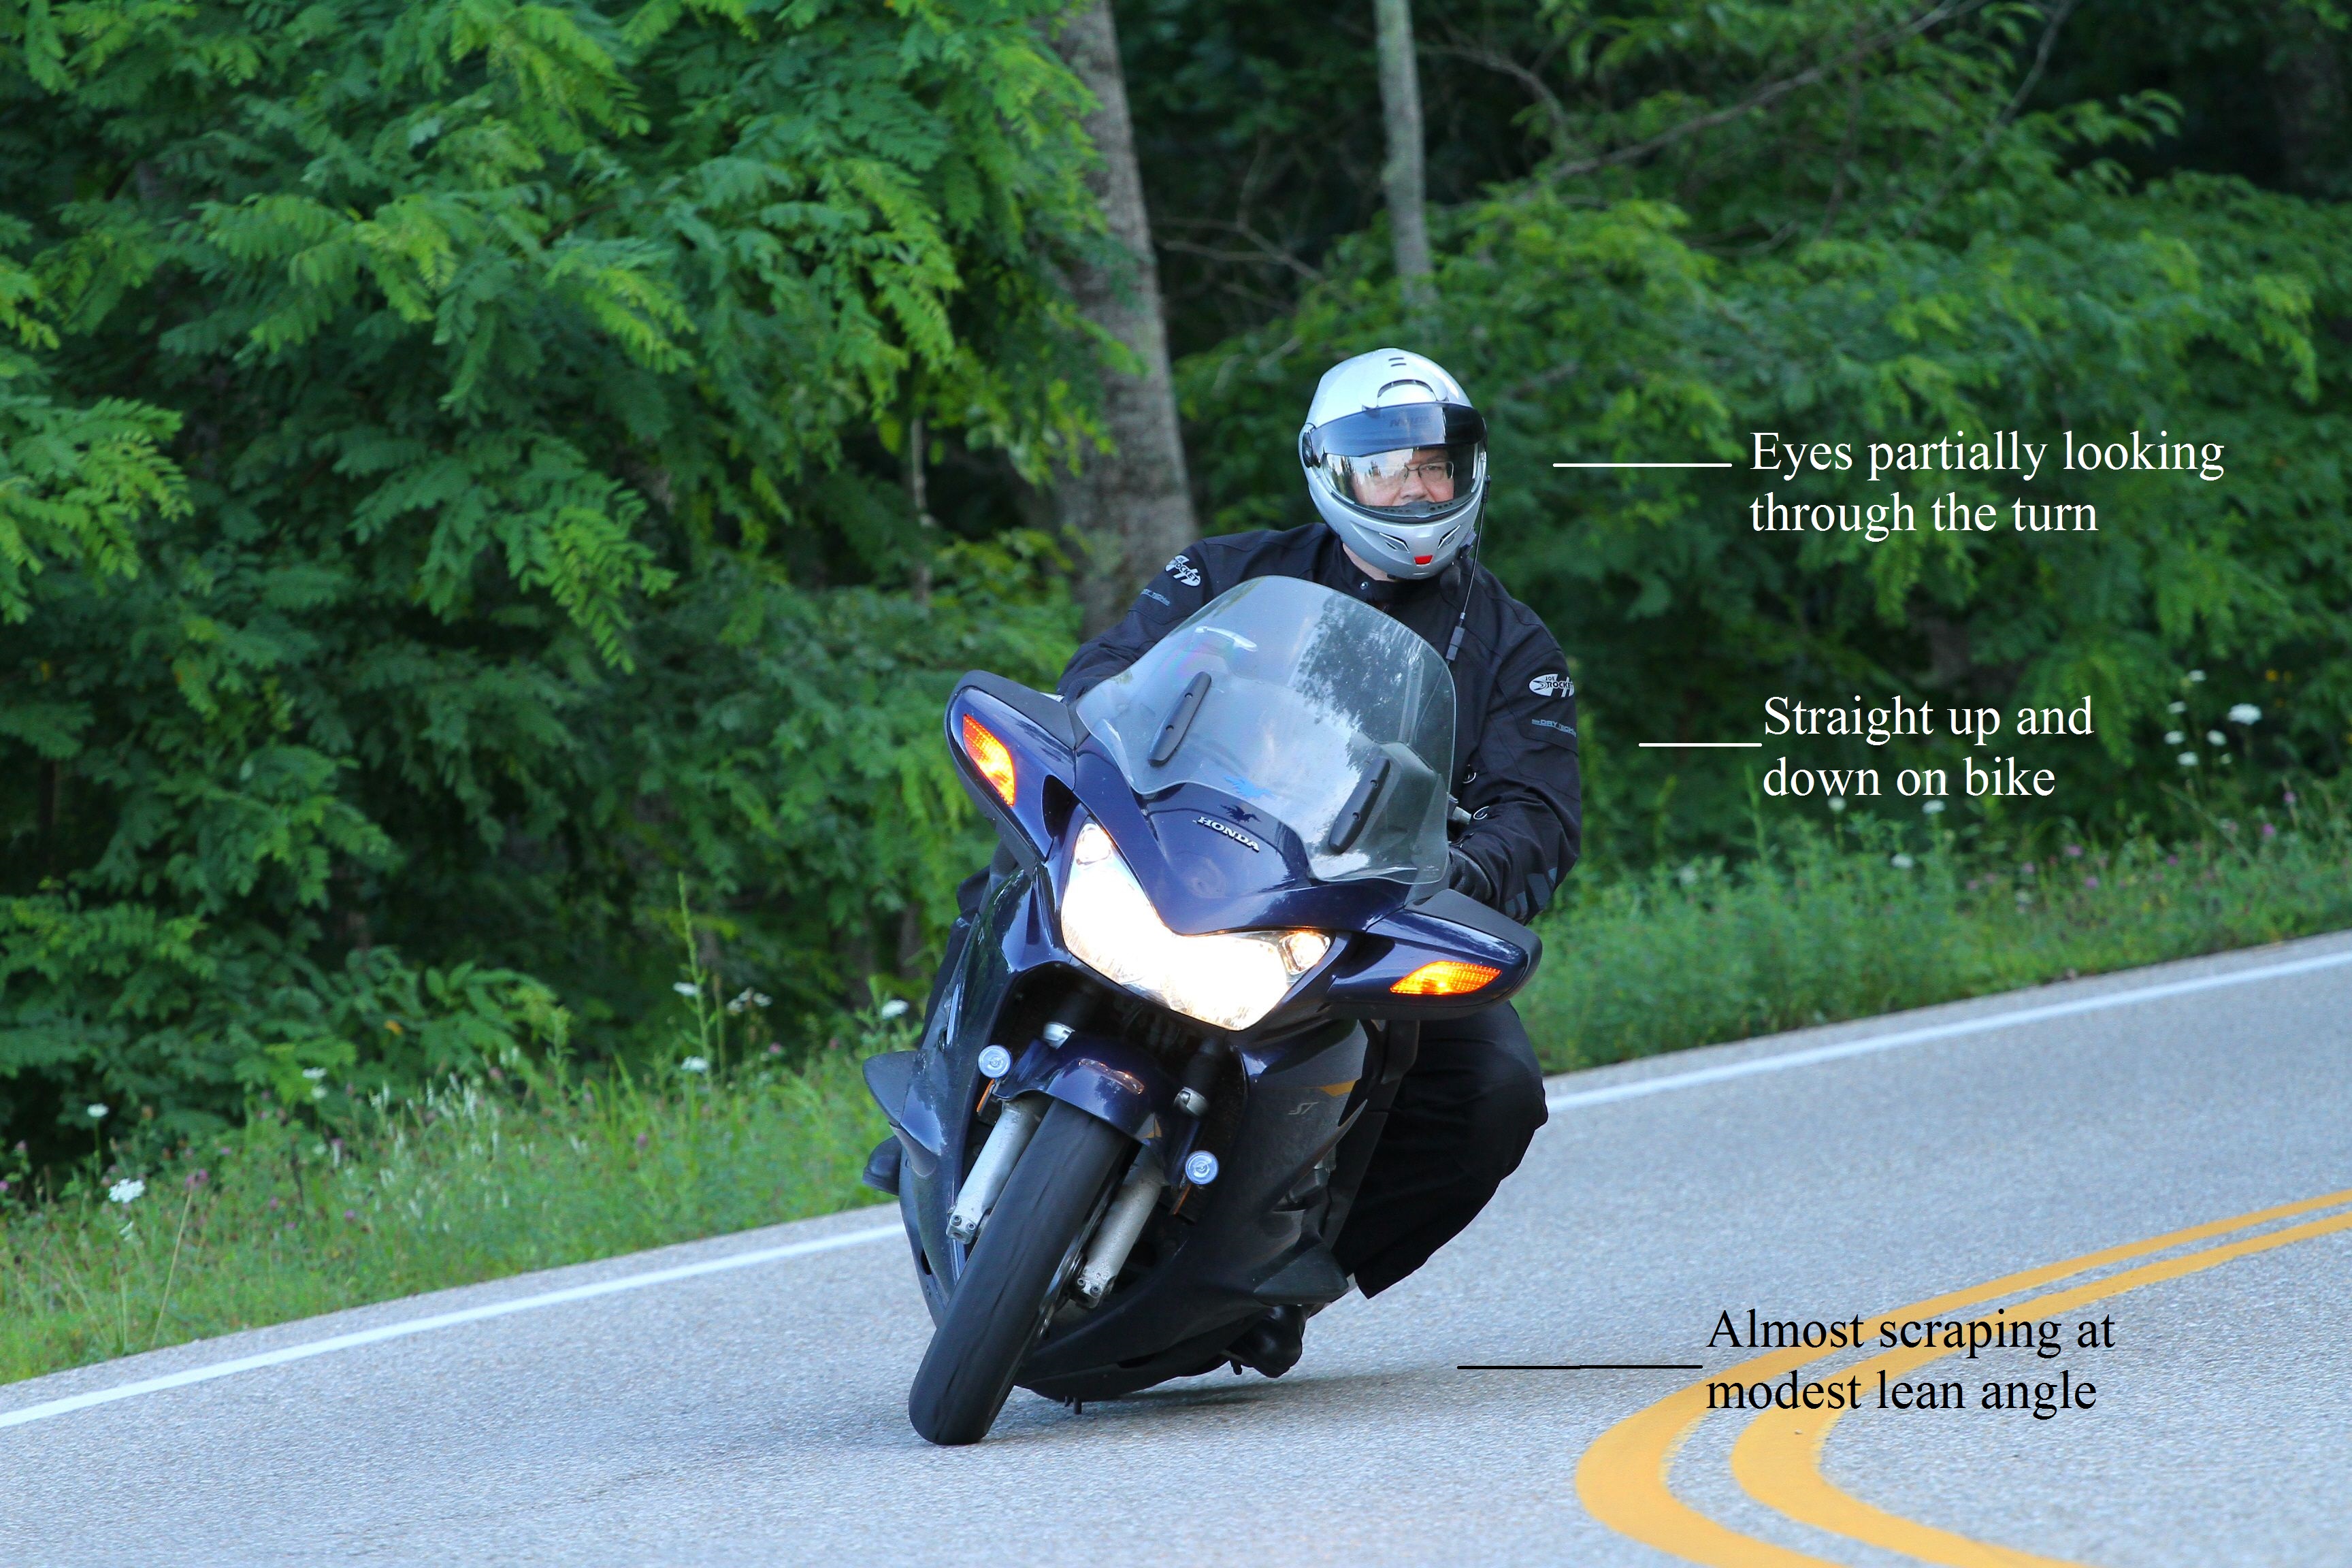
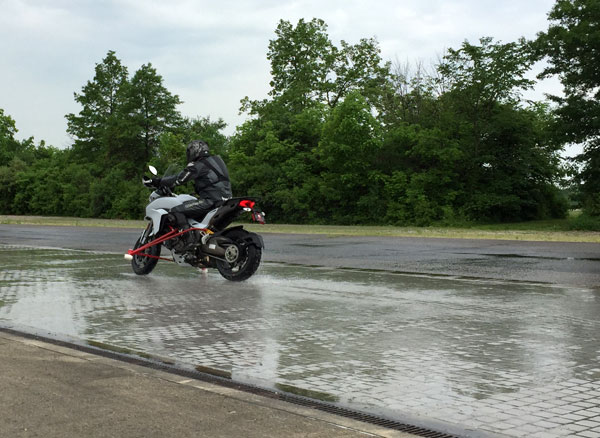
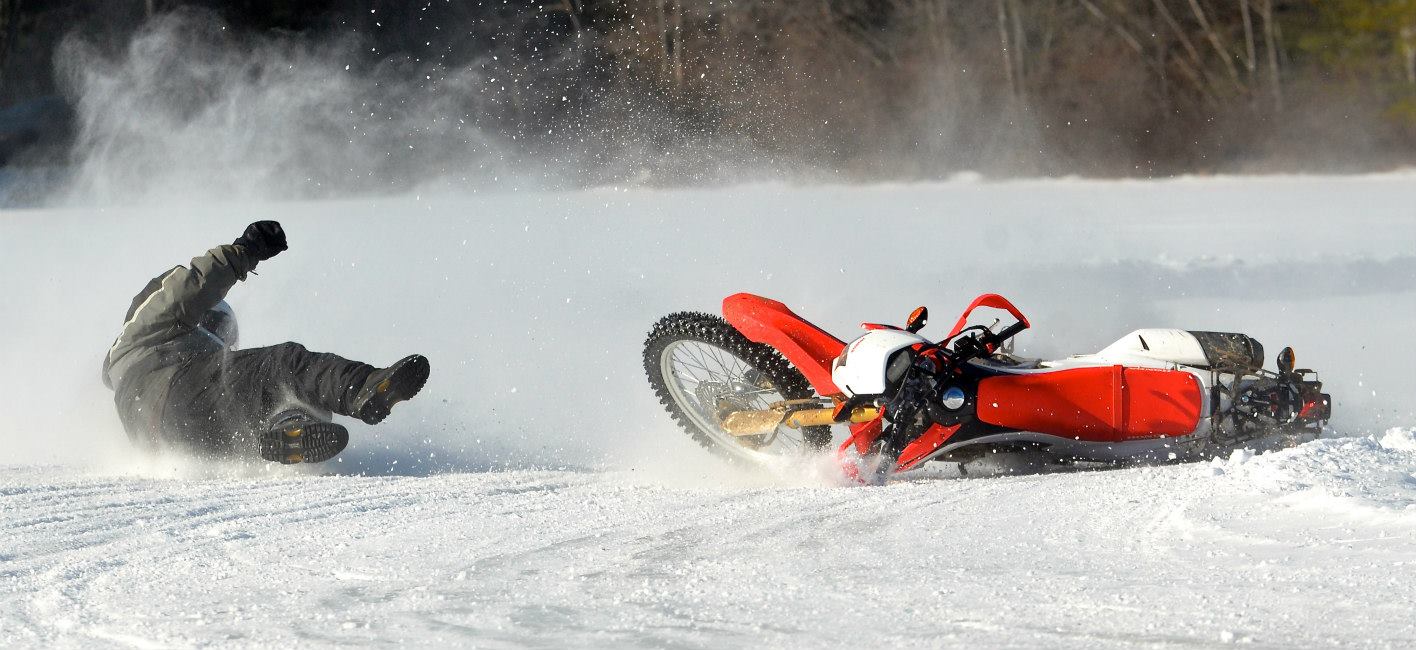
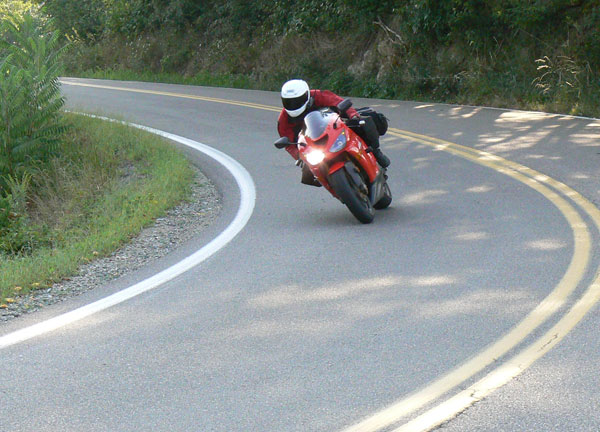
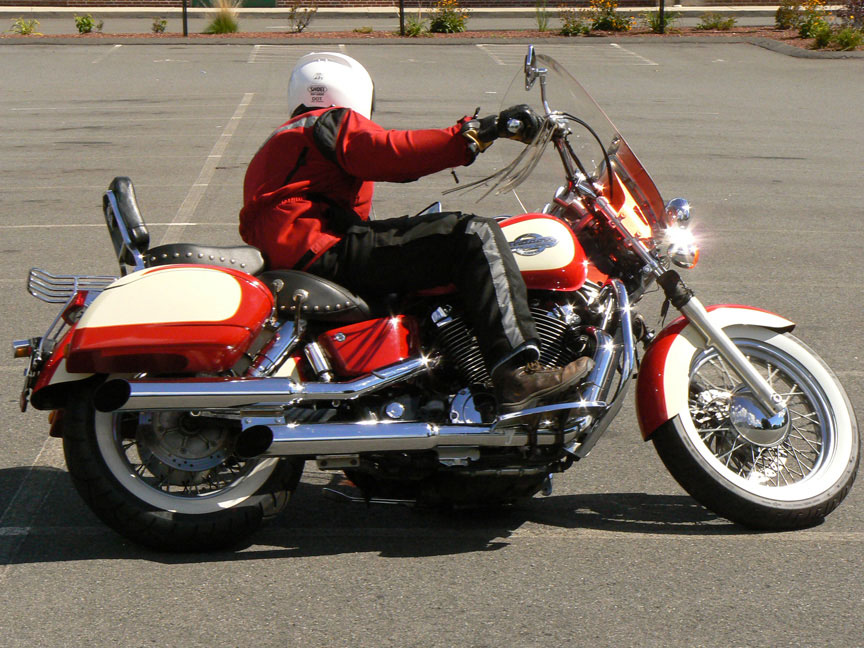
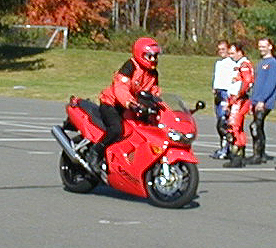
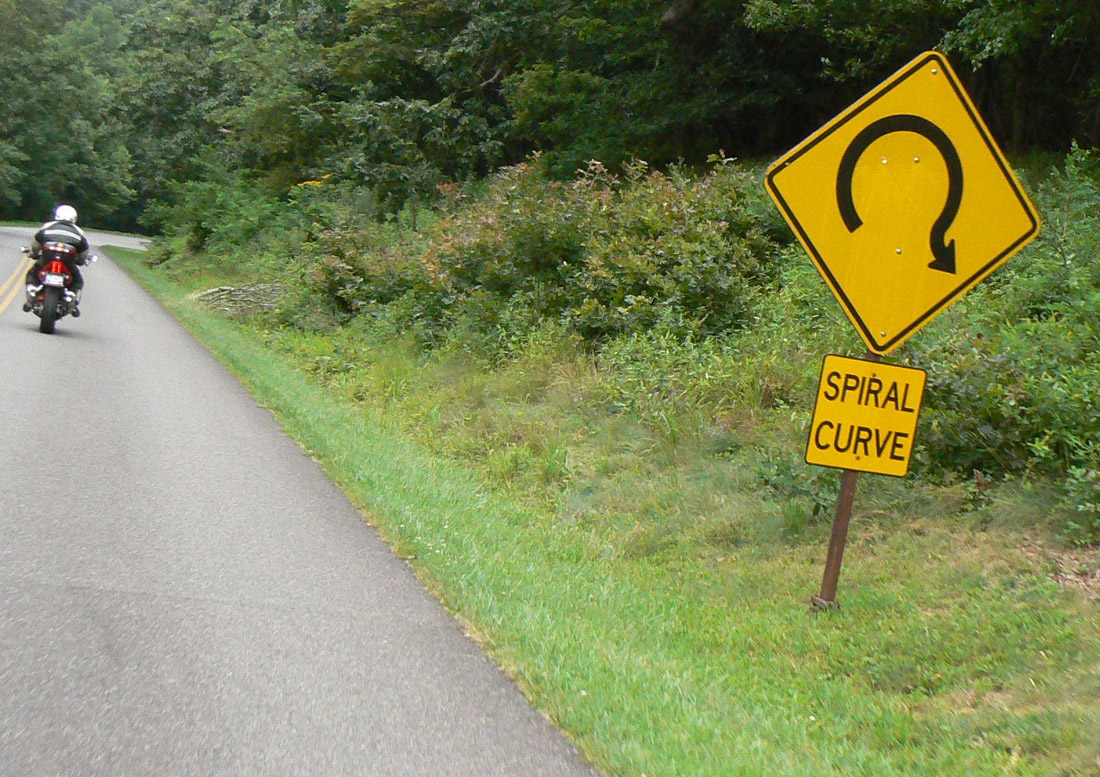
Figure 2 is a photo from 2011 taken near Bear Mountain, NY. I am trying to work on lessons learned at the track. I am no longer pushing the bike beneath me and my head is turned somewhat. The centerline of my jacket is now in line with the center of the bike. Despite some improvement, the footpeg is almost scraping at a modest lean angle.

DragonLabeled
Figure 3

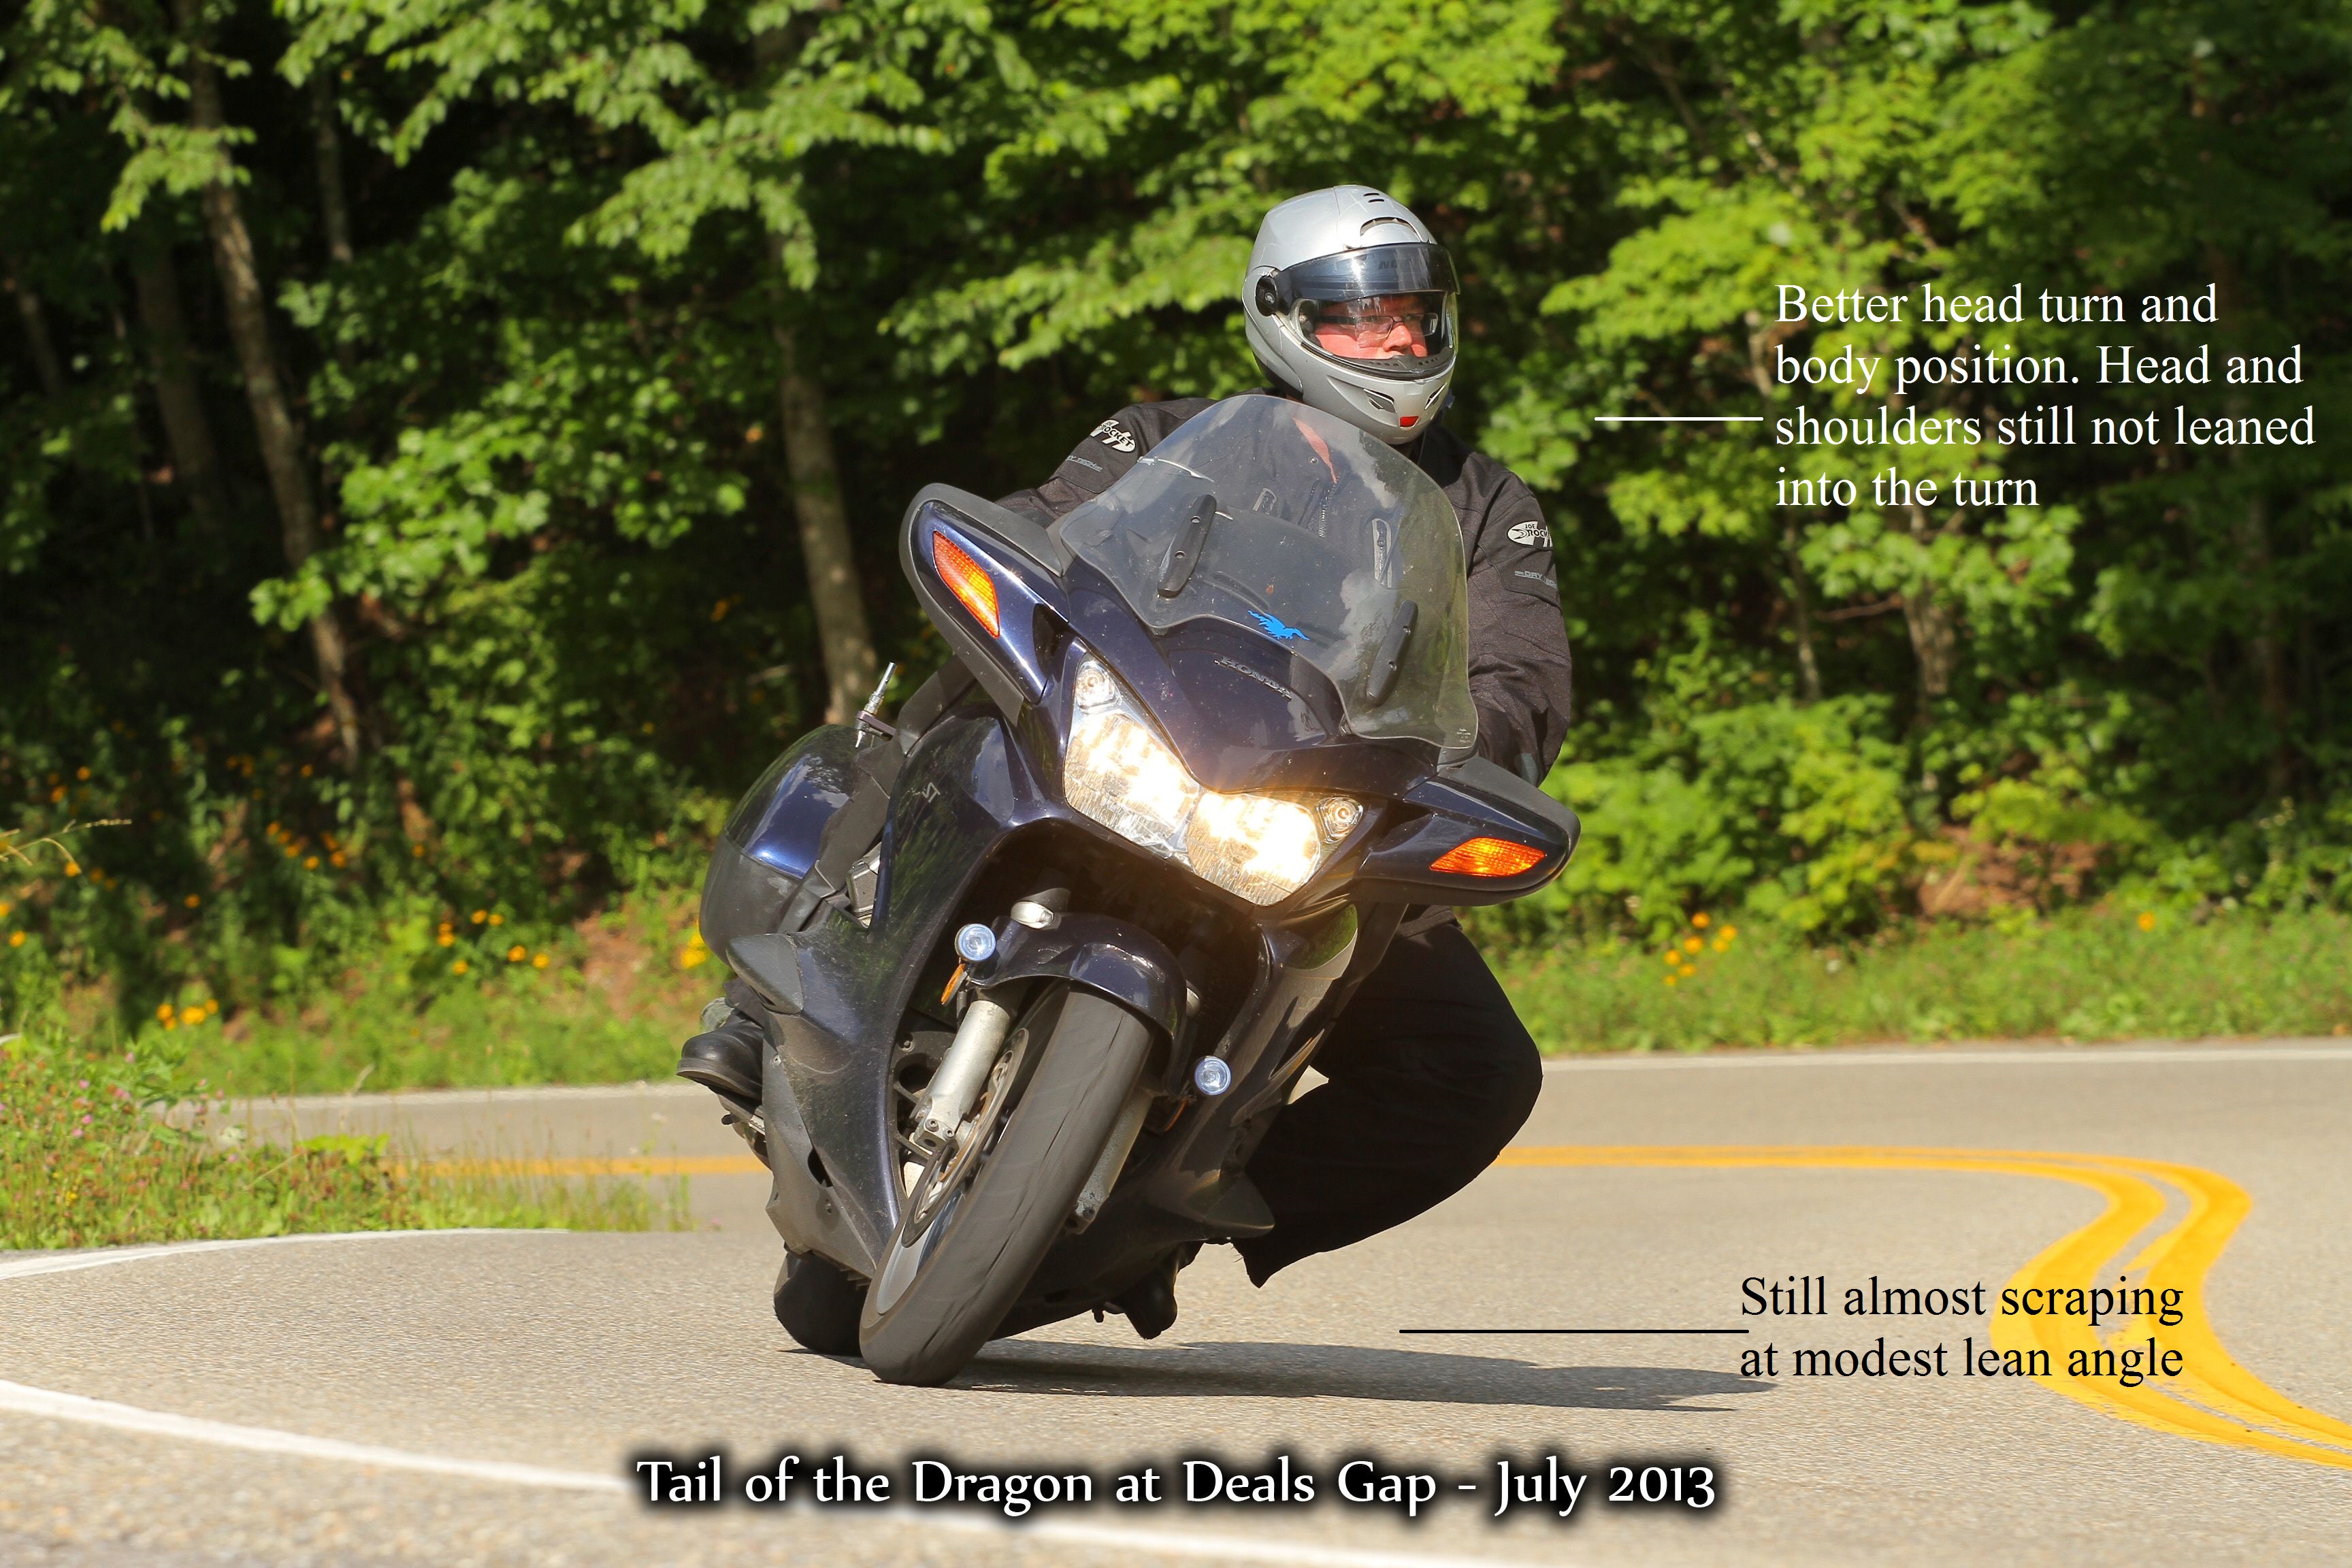
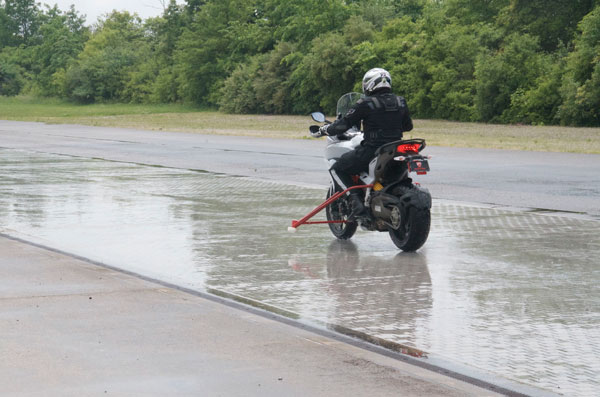
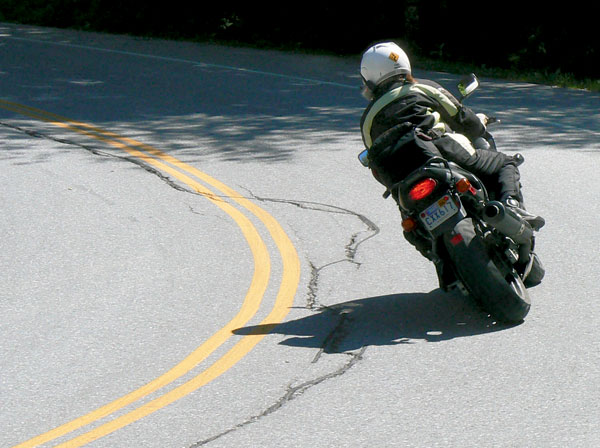
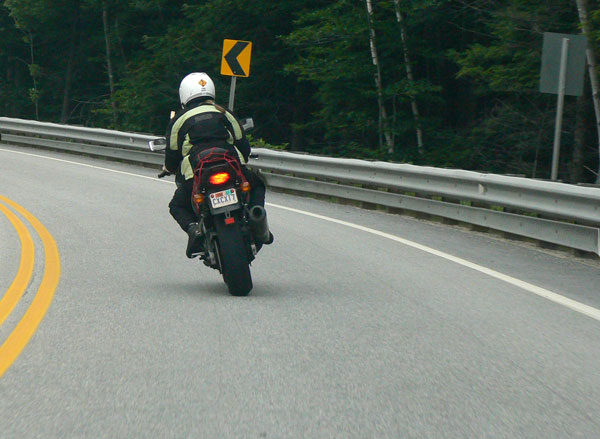
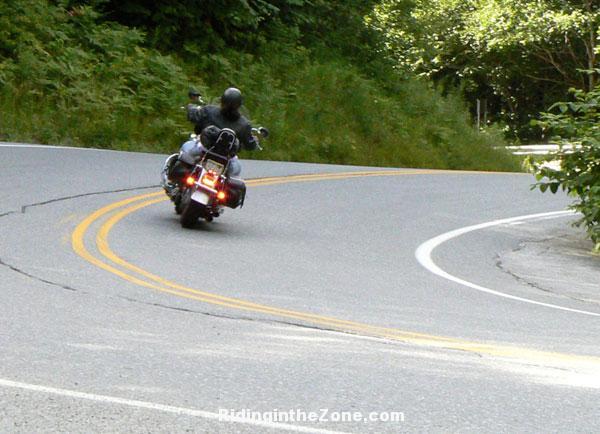
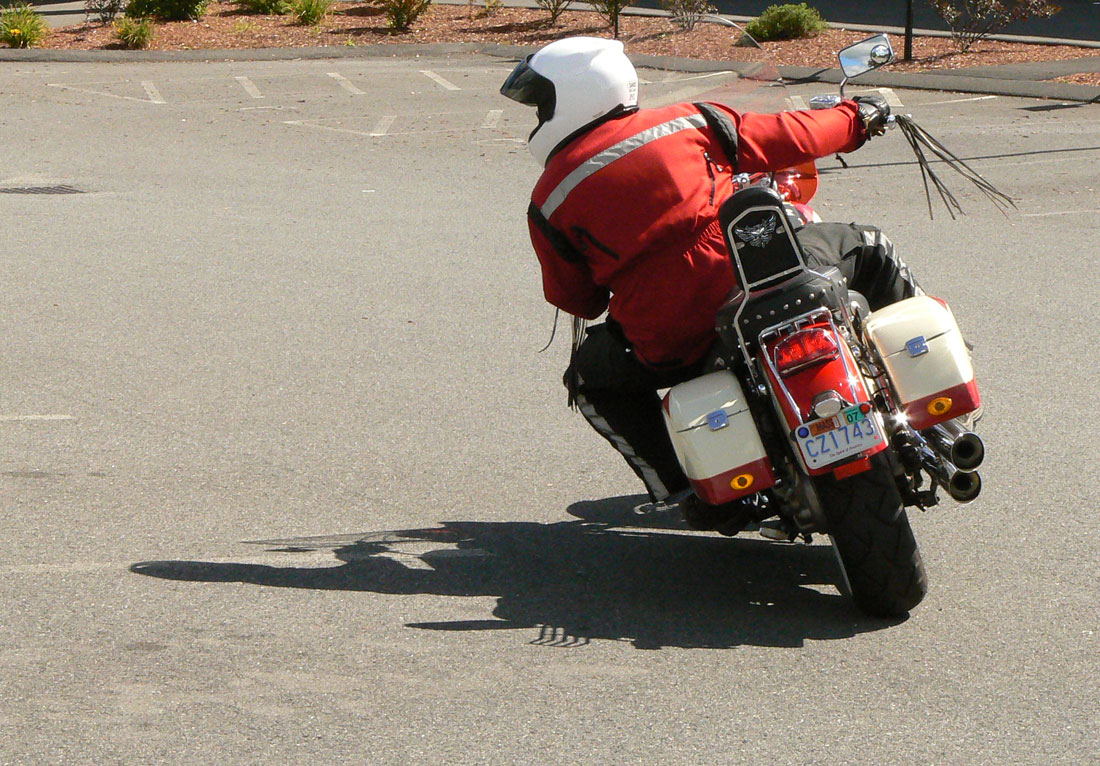
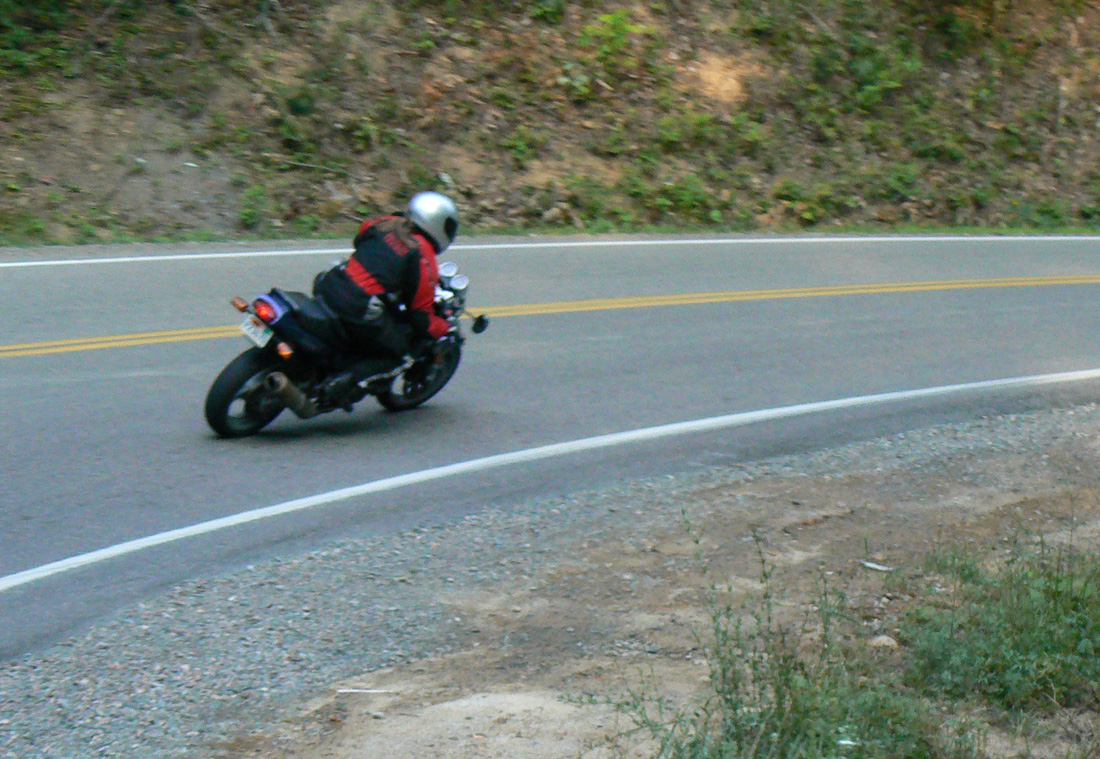
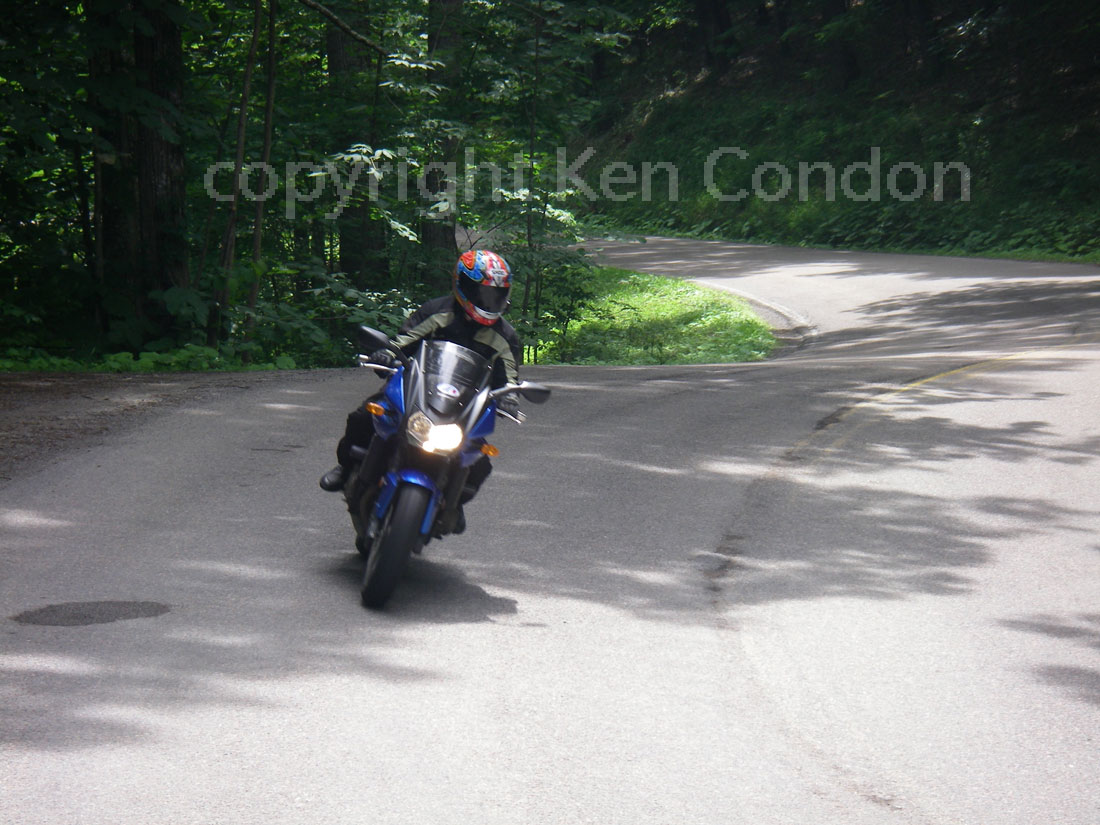
Figure 3 is a photo from 2013 at the Tail of the Dragon. I had actually been working hard on skills learned at the track before this trip. The centerline of my jacket was now inside the centerline of the bike. My head turn was much better and I was beginning to weight the inside half of the seat. This photo is a big improvement, but I was still almost scraping my left footpeg at a modest lean angle.

TrackCurrentLabeled
Figure 4

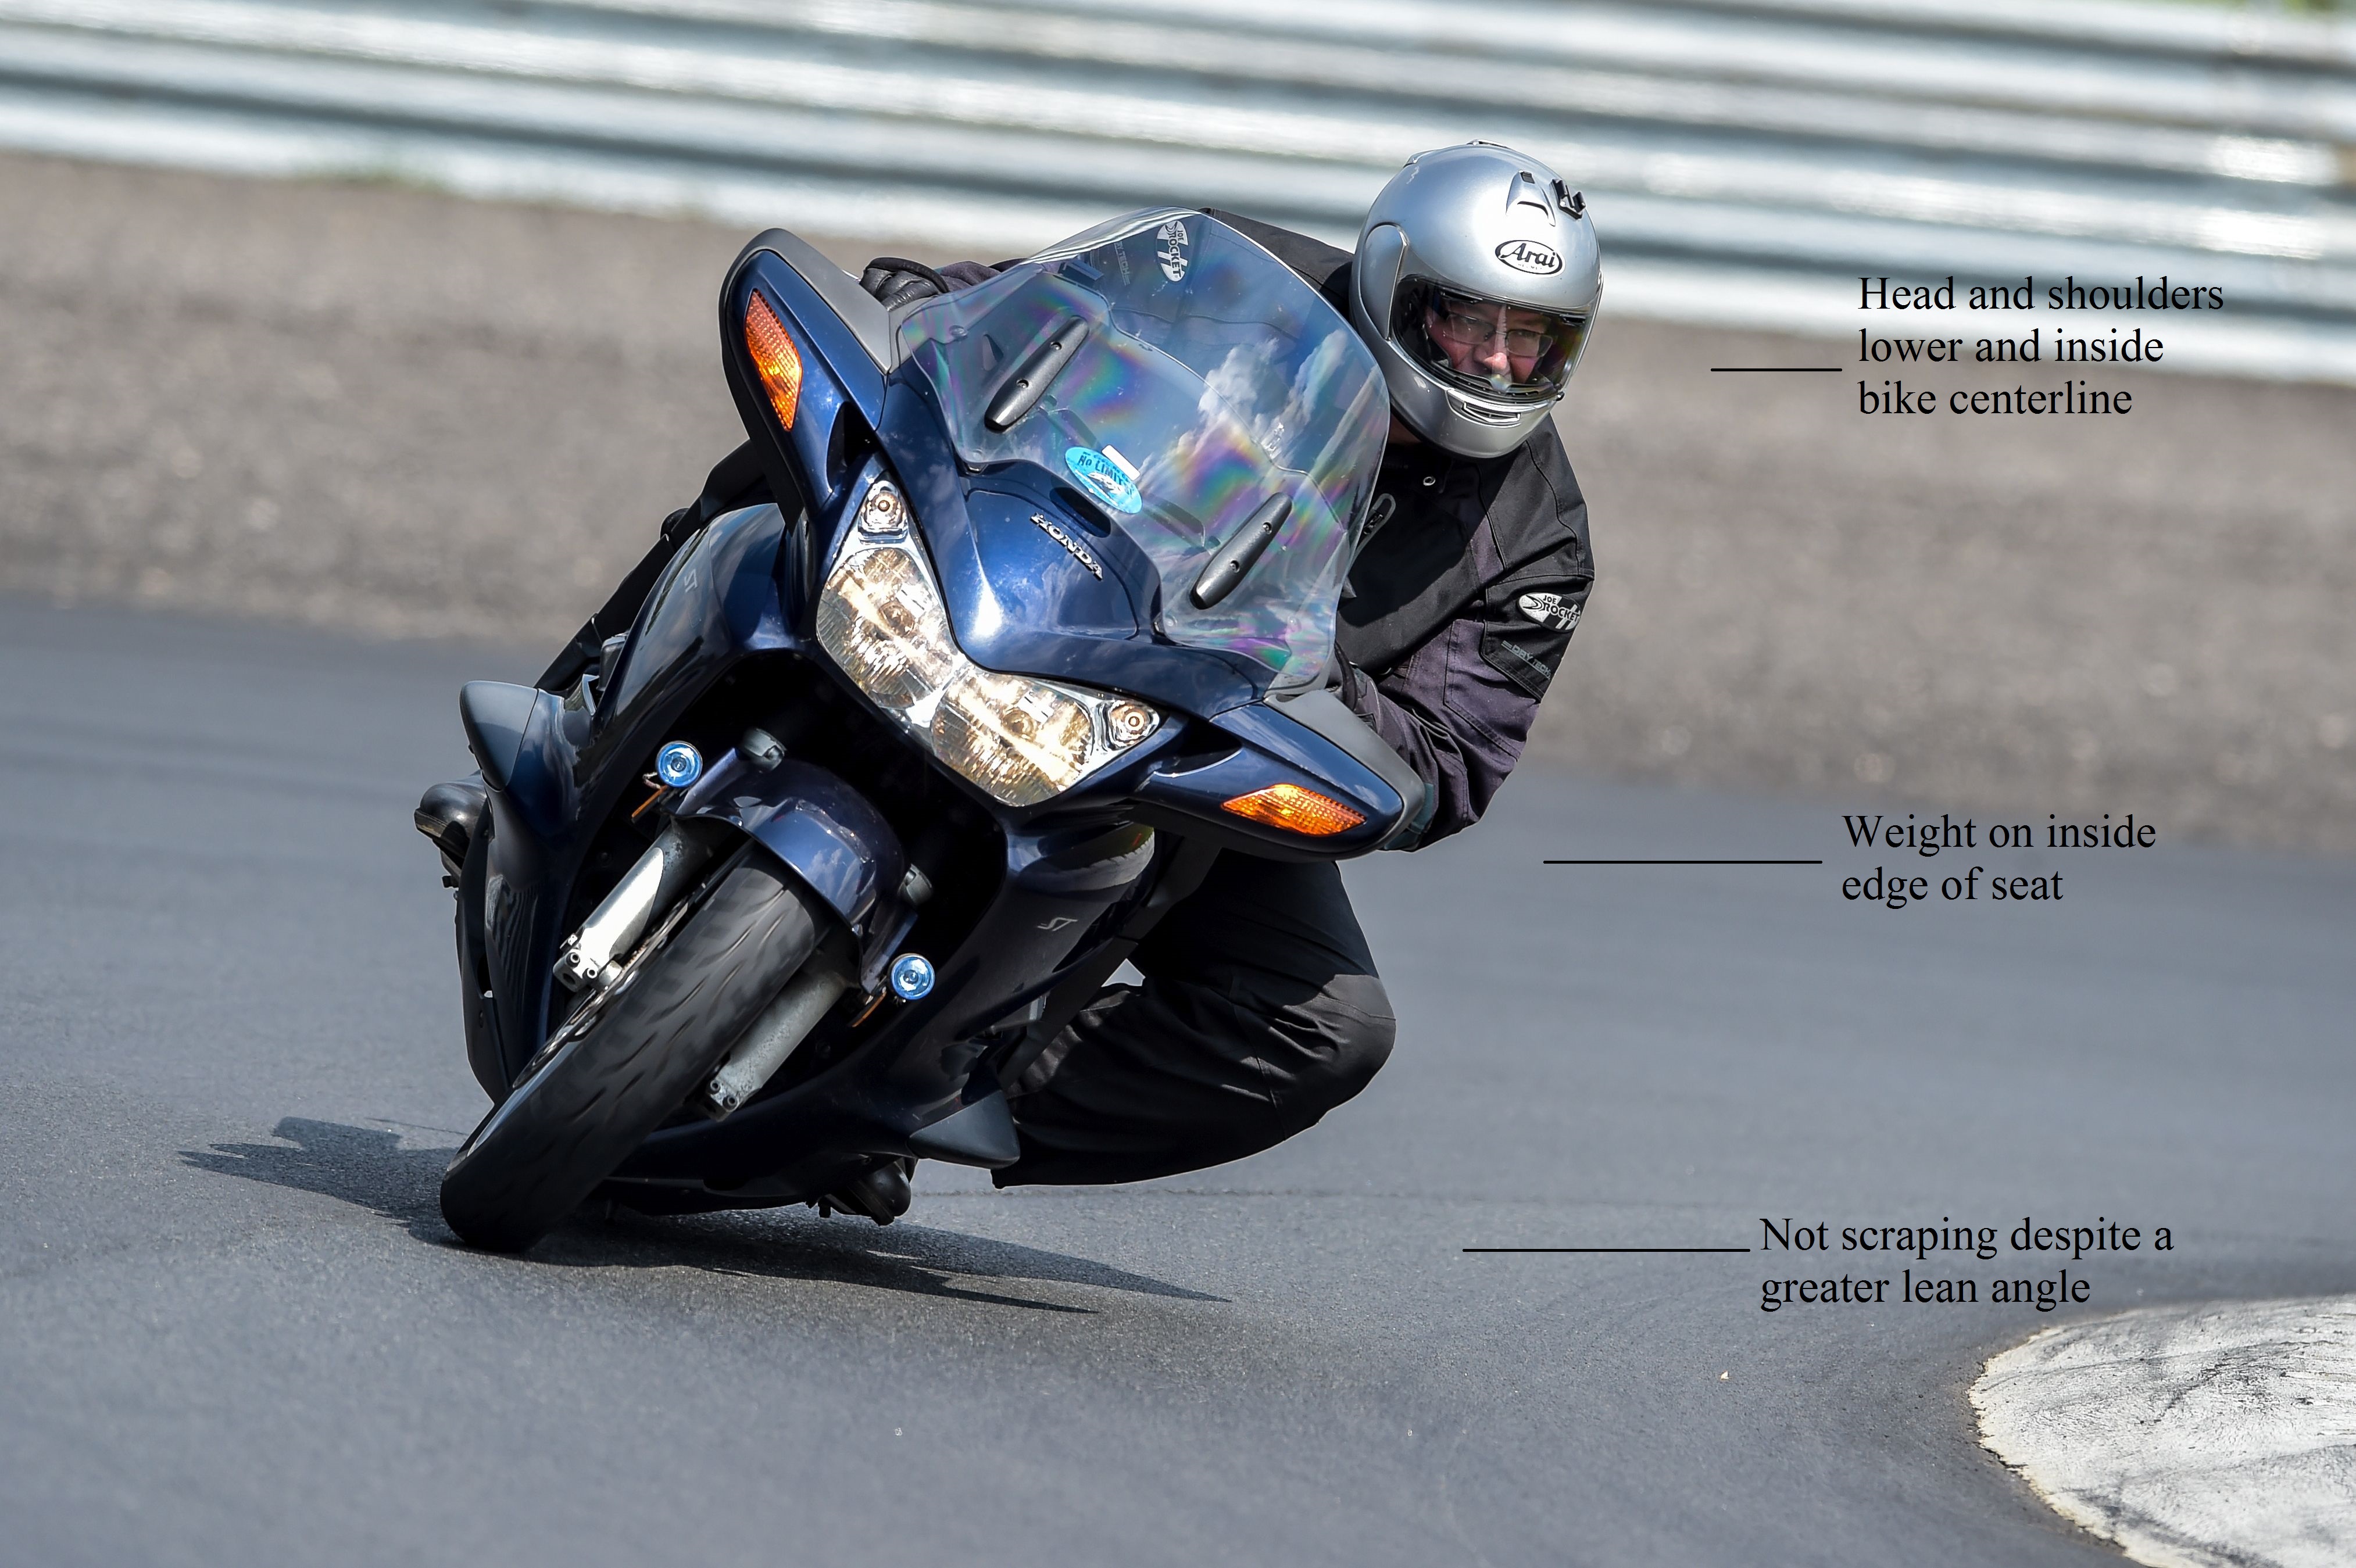
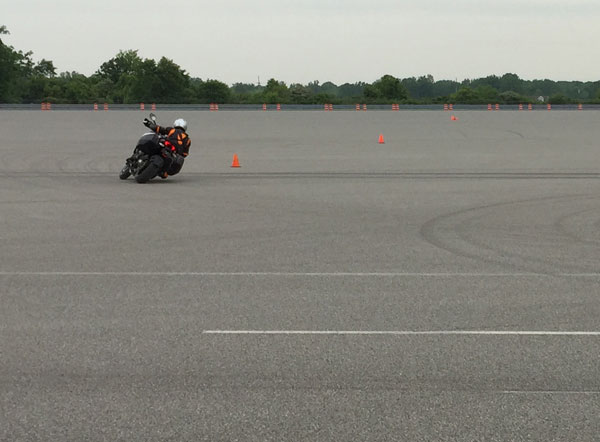
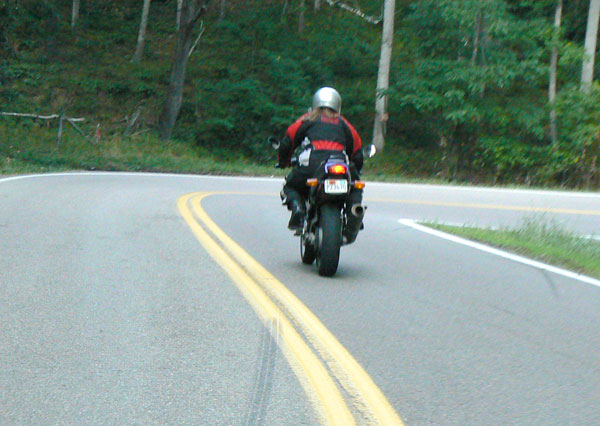
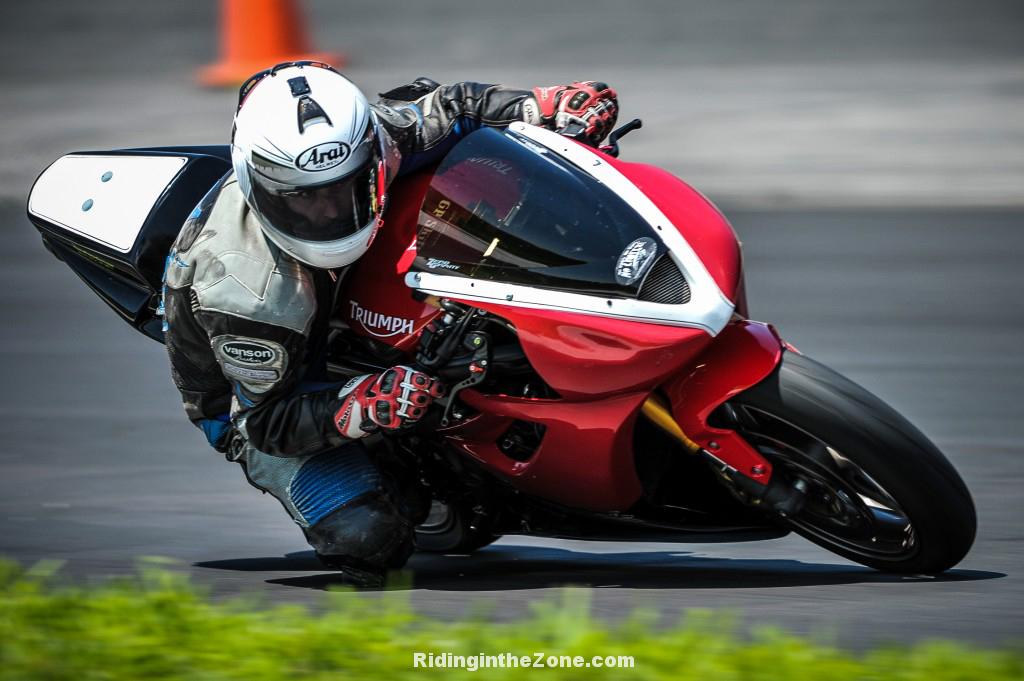
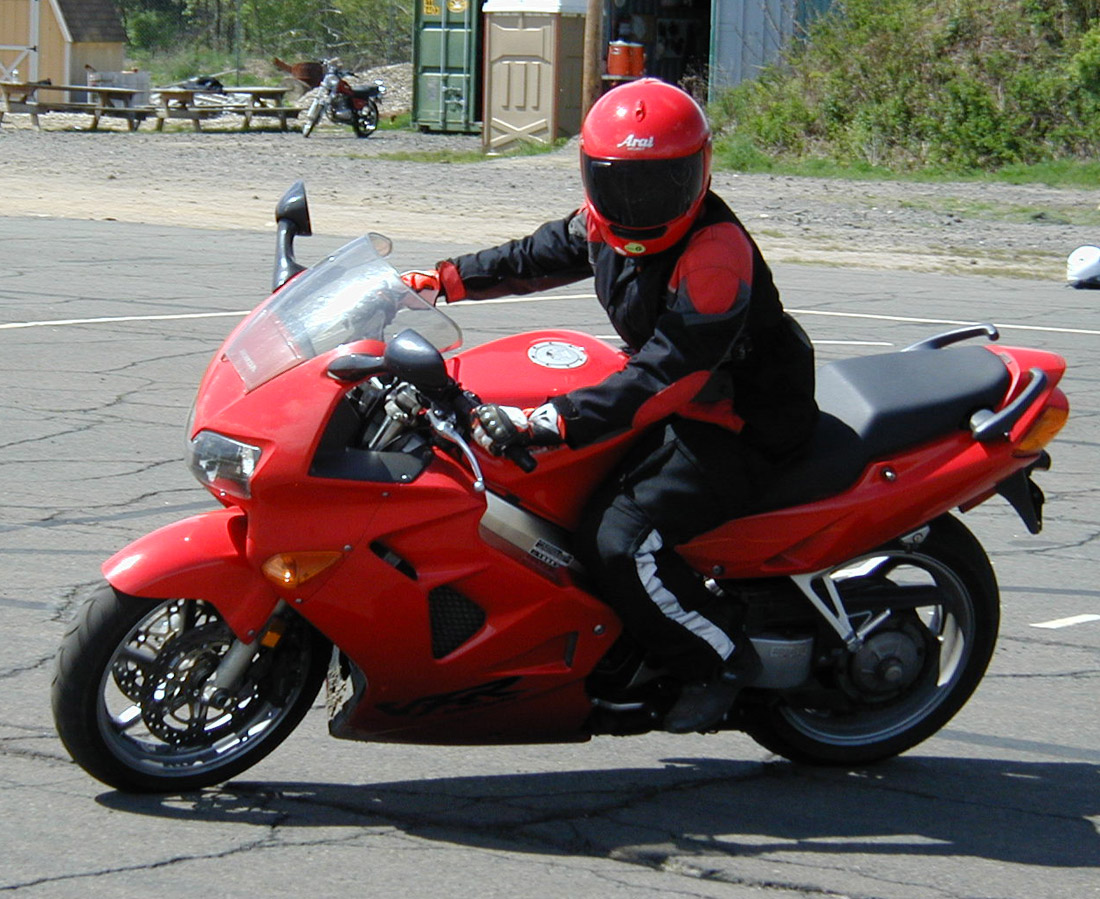
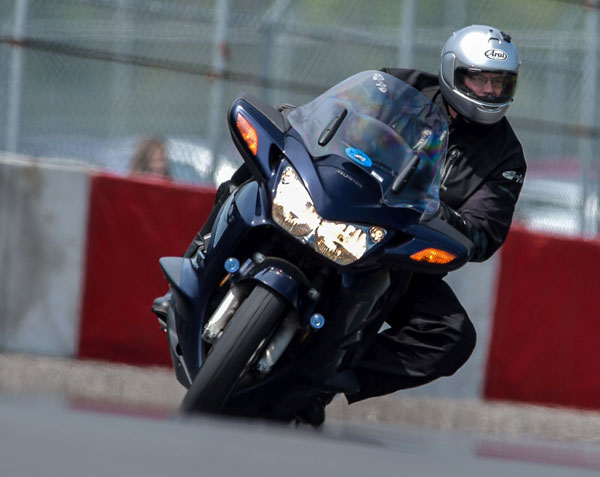
Figure 4 is after multiple track days in 2014 and 2015. My head and shoulders are now lower and well inside the centerline of the bike. The head turn is better and almost all of my weight is on the inside half of the seat. I am not scraping despite a more pronounced lean angle. While I will not usually hang off this much on the street, I will use the better head & shoulder position and the weighting of the inside half of the seat on all my street rides.


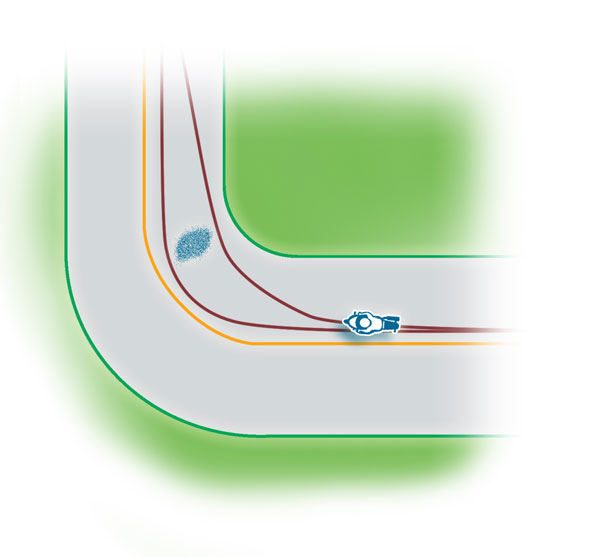
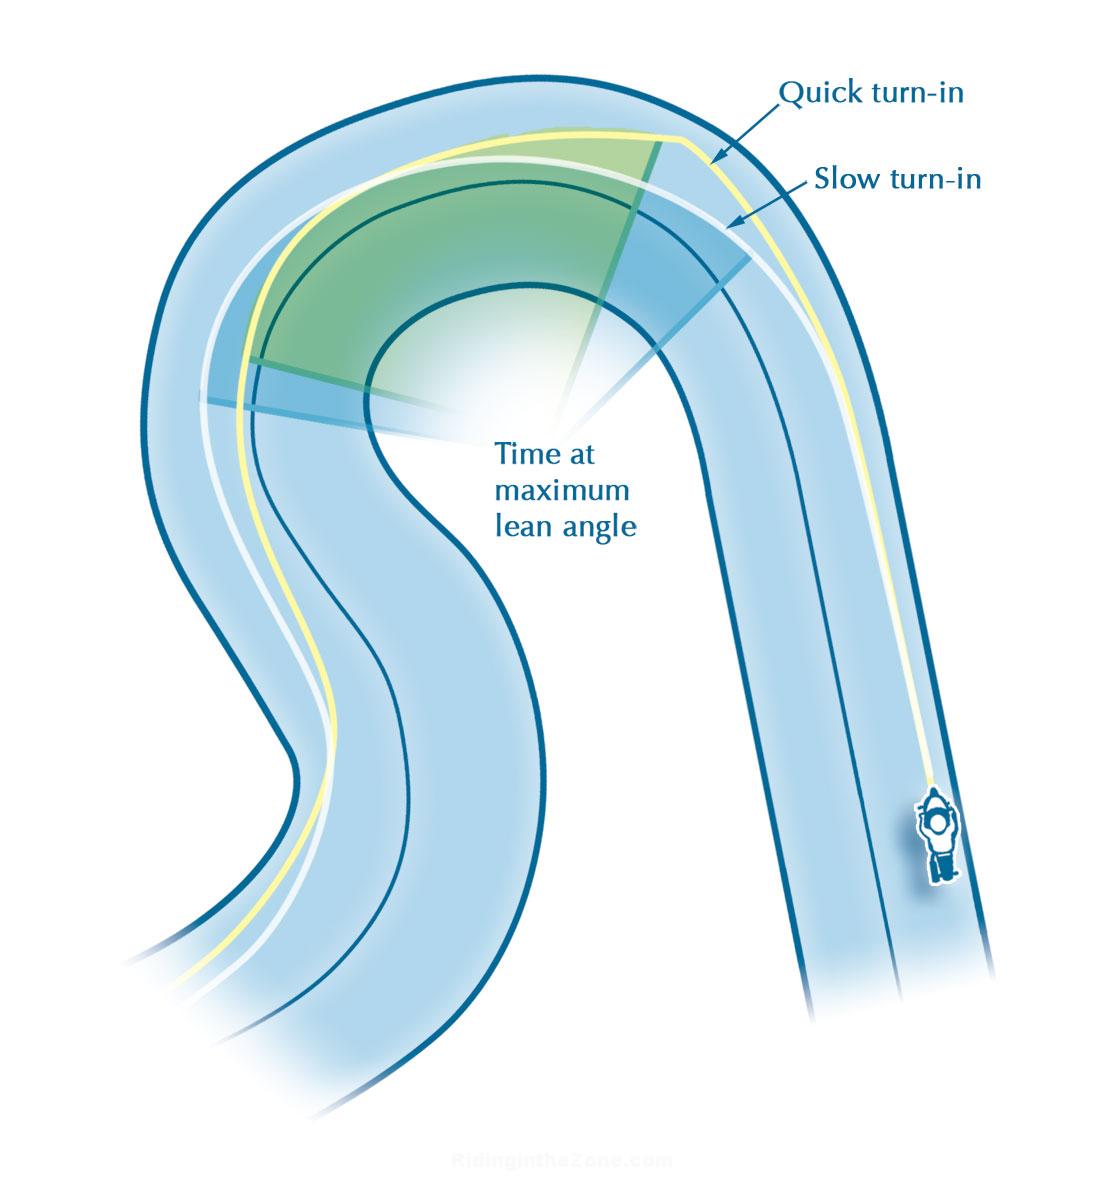
Safer and More Confident Cornering

I will definitely use the skills that I have been learning at the track to ride better while conserving lean angle on the street. By keeping lean angle in reserve, I will have a safety margin if I need to tighten up my line during a curve. I will continue to attend parking lot courses because many fundamentals are learned best there. I will continue to practice slow speed skills with counter weighting, head turn, and dragging the rear brake. I will continue honing my street awareness skills and ability to anticipate trouble. However, I will not neglect training at speed with the help of professionals. I still have a lot to learn, but look forward to the challenge.

Track_Day_TTD_2015_Thompson_6-3-15c1-338
Anyone can do a track day. photo: otmpix.com

Editor Ken: Even if you ride a cruiser, tourer, ADV bike, or whatever, there is a track day for you. Non-Sportbike Track Days are available, as well as “traditional”sportbike track days . Either type of track day allows street riders to advance their skills in a safer environment than the street.

Share your comments below. Note that comments from those who have not commented before need approval before they are posted, so be patient, they will be published.


Ed Conde
Ed Conde

Ed Conde is an administrator and webmaster for the group New England Riders (NER). He enjoys finding the best motorcycle roads, views, and restaurants and posting them to the NER Best of the Northeast website.
His real job is running the federal government’s alcohol countermeasures laboratory and testifying at impaired driving cases. Ed enjoys learning about riding and marvels at the skills of top racers, motocrossers, and trials riders. He and his wife Debra ride all over the Northeast on their motorcycles.


Please Donate to Keep the Articles Coming

If you liked this article and the many other articles on this site, please toss a buck or five into the hat. It’s greatly appreciated!

    • Click the PayPal “Pay Now” button.
    • Then indicate quantity in $2.00 increments. Example: put “2” in “QUANTITY” field to donate $4.00, “3” for a $6.00 donation, etc.

Why $2.00? Due to the PayPal fee structure, a $2.00 donation is significantly more beneficial compared to a $1.00 donation.

Thank You!


Check out these related posts:


Stay Informed: Subscribe NOW!
Be a Better Rider: Sign Up for Personal Training with Ken
Support Riding in the Zone: Buy a book
Support Riding in the Zone: Buy products from Twisted Throttle & Amazon
Twisted_Affiliate-Interphone-widget

Truths About Electronic Stability Control

Bosch-CornerABS-rain
Grab the brakes or whack the throttle while leaned, Bosch has your back. Rain or shine.

The newest Ducati Multistrada has super sophisticated Bosch Traction Control and ABS electronics. These rider aids will make it a whole lot harder to crash! But, are they all they are cracked up to be?

The Bosch electronics I tested at the Bosch proving ground near Detroit included updated ABS with Combined Braking Systems (eCBS), Ducati Wheelie Control (DWC), Lift (Stoppie) Control, Ducati Traction Control (DTC) and Cornering ABS, aka Motorcycle Stability Control (MSC).

The straight-line ABS is nothing particularly new, but the introduction of corner sensitive traction control and Corner ABS certainly is. The brain behind this technology is the Inertia Measuring Unit (IMU) that can detect angles of roll, yaw, and pitch. With this data, the ABS and Traction Control systems can intervene to prevent many crashes caused by over-exuberant braking or throttle inputs. Without the IMU, TC and ABS cannot detect and then intervene to arrest traction loss that includes a lateral slide. With the lean-angle sensitive IMU, it can bleed engine torque or brake power if it detects abrupt changes in pitch, lean or direction. Cool, huh?

Wet tile with ABS OFF.

Disclaimer: The system I am reviewing here is the latest technology found on only a few 2014-2015 machines. Older and less sophisticated electronic aid packages without the benefit of a lean-angle sensitive IMU will not perform the miracles I am about to describe.

Testing, Testing: ABS

To test the traditional straight-line ABS I made several high and low speed runs on gravel and wet and dry pavement. The ABS never let me down. Riding on a wet tile runway with ABS switch off caused the bike to slam onto the sturdy outriggers with just the touch of the brakes. It was possible to apply the brakes without skidding, but it took all the brake feel and control I could muster. With ABS switched on, I was able to grab the brakes and the bike remained balanced on two wheels.

Wet tile with ABS ON.

Riding on the gravel course further confirmed the effectiveness of the ABS as the bike to remained upright even when applying copious amounts of front brake pressure. Set to Enduro mode, rear brake ABS is disabled to allow direction changes using a locked rear wheel …fun, but not something I recommend on a 511-pound motorcycle with street-biased tires.

Testing, Testing: Cornering ABS

Testing the Cornering ABS (what Ducati calls Motorcycle Stability Control or “MSC”) required me to grab the brakes as hard as possible while fully leaned in a corner. Really?

It was nearly impossible to toss aside decades of instinctive emergency corner braking technique and common sense to do this test. Normally I would reduce lean angle before (or while) applying the brakes. Instead we were told to jam on the brakes and hold lean angle as long as possible.

Demo of Cornering ABS.
Demo of Cornering ABS. Bosch photo.

I held my breath and headed for the curve before I leaned hard and went for it. It worked! Not only did the MSC manage the available traction, it also allowed me to slow rapidly while maintaining the path through the curve; no more crossing into the oncoming lane or hitting a guardrail in an emergency corner braking situation.

Trying this on dry pavement was unnerving as hell, but a passing shower meant that I got the chance to test this mind-bending system in the rain. This maneuver went against all of my instincts but once I trusted the system I was sold!

Testing, Testing: Traction Control

After the MSC test, I set out to further tax my nerves by testing the Ducati Traction Control (DTC), which consisted of whacking the throttle open in second gear at 37+ degrees of lean. Instead of a nasty crash, the rear drifted controllably with the rear tire slipping and gripping predictably. Look at me, I’m Valentino Rossi.

But, the TC isn’t foolproof. During one run, I made a particularly abrupt throttle input while dragging the footpegs (crazy, right?) that caused the rear tire to swing a bit farther than comfortable, prompting me to instinctively reduce throttle enough to regain grip. The next time, I was determined to stay on the gas to see if the system would sort things out. I can’t be 100% sure whether I was a bit more cautious or the electronics reacted quicker, but this time the bike remained in control as I blasted out of the corner.

Smitten

At the end of the test, I was compelled to express my sense of awe with my friends on Facebook: “OMG. Bosch has defied physics with the corner ABS and Traction Control. I just grabbed a handful of front brake at 37 degrees and whacked the throttle WFO while dragging my foot peg IN THE RAIN!”

Debate

Somewhere in there are a bunch of electronic doo-dads that I hope can stand the test of time.

These electronics are awesome, but there are some valid concerns circulating about how traction and stability control is going to influence traditional methods and attitudes. Here are the major concerns and my responses:

  1. Reliability: Motorcycle electronics seem to be the Achilles Heel of reliability, so skepticism about reliability is understandable. But, consider that solid state technology has no switches, relays or moving parts to fail compared to mechanical devices, and connections are designed and tested to prevent dust and water infiltration. Also, other electronic units, like ride-by-wire throttles, have no cables to break. In the event that a fault does occur, “limp-home” mode will allow you to get home. Will it fail? At some point, probably. But will it render the bike useless, probably not.
  2. Electronic intervention will interfere when I don’t want it to: Older, less sophisticated systems have fewer options and have been known to get in the way. But, with the wide range of intervention levels to choose from with the latest systems, it’s hard to think there isn’t a setting that suits almost any rider. It’ll take time to really learn what these systems are capable of and to find your perfect setup.
  3. Electronics will interfere with the essence of riding a motorcycle: Contrary to what a lot of Luddites and Skeptics think, these systems can be set to lurk in the background, never impeding with normal riding situations. I believe these systems enhance riding and can be set to your liking to never (or rarely ever) get in the way of riding enjoyment.
  4. Advanced traction control make advanced rider skills obsolete: I don’t see rider technique becoming obsolete any time soon. To avoid close calls and crashes, riders must have strong control skills and effective survival strategies. You can still careen into a Buick or off a cliff, just like before. While TC will manage traction loss from clumsy braking and throttling, riders will soon learn that getting the most out of their motorcycle comes from smooth, well-timed rider inputs and not electronics.
  5. Electronic aids will encourage bad riding: It is possible that these electronics can encourage risky behavior as people discover just how competent these systems are. What’s to stop someone from relying completely on the TC to manage grip while powering out of a turn, or letting the ABS manage grip as he trailbrakes hard into a turn? TC and ABS may help prevent a crash, but will not to lead to better riding skill or faster lap times. Good technique still trumps electronic aids. Just ask the Moto GP guys. And remember, electronics cannot fix stupid.
  6. Electronic aids can lead to false confidence: Yes. I can personally attest that a false sense of confidence is possible. After fully testing the MSC, ABS and advanced traction control I was somehow fooled for one moment into thinking that the bike was not crashable. Of course, I was wrong! It’s important to remember that these systems manage available traction under braking and acceleration; they do not create more traction! You cannot expect to magically lean onto the edge of your tire over sand or dip into a corner over gravel and come out unscathed.
Despite looking like a Star Wars console, the Ducati interface is quite easy to use.

Safety

One of the most important selling points of the Bosch rider aids is safety. But, these systems cannot influence all crash factors, nor are they able to correct for bad decisions like excessive speed or bad lane position.

Riders must still rely on good technique and judgment to prevent most crashes from occurring. The smartest riders will never need these systems as they continue to use traction management techniques like smooth, progressive brake and throttle application.

Practice

Whether you have new-fangled IMU-based electronics or basic ABS, you should take time to practice maximum braking to the point where ABS kicks in. Without finding that limit, you will never trust that you can brake as hard as the system allows and not likely use the total amount of stopping power available when you need it most. Braking that hard is unnerving at first, but trust me the system will intervene.


Please Donate to Keep the Articles Coming

If you liked this article and the many other articles on this site, please toss a buck or five into the hat. It’s greatly appreciated!

    • Click the PayPal “Pay Now” button.
    • Then indicate quantity in $2.00 increments. Example: put “2” in “QUANTITY” field to donate $4.00, “3” for a $6.00 donation, etc.

Why $2.00? Due to the PayPal fee structure, a $2.00 donation is significantly more beneficial compared to a $1.00 donation.

Thank You!


Check out these related posts:


Stay Informed: Subscribe NOW!
Be a Better Rider: Sign Up for Personal Training with Ken
Support Riding in the Zone: Buy a book
Support Riding in the Zone: Buy products from Twisted Throttle & Amazon
Twisted_Affiliate-Interphone-widget

Guest Writer: Becoming “That Rider”

Track_Day_JMeyers-action1-sm
Jeff, being “That Rider”. photo: otmpix.com

It was a long and cold winter here in the Northeast, but at the first Tony’s Track Days event of the year at the beginning of May, we were given clear skies and ideal temperatures. Last year, I worked hard on my track day form which included letting speed come with practice. My effort was rewarded with an advancement from the novice to intermediate level. This year, I was amazed at how much I retained even with a seven month gap.

My Mantra: “You Are That Rider Now!”

As I rolled out onto the track for my first session and each one thereafter, I heard my track Guru Ken’s voice in my head, and what he told me at my one-one-one session last year: “You are that rider now! – when you go out for a session, ride that way right from the start.” I started saying that to myself – “You are that rider now.” I believe it was that confident mind-set that allowed me to tap into the foundation that I had built from my work last year.

Repetition Builds Muscle and Mind Memory

Last year, I met my goal of completing ten track days. This helped me, through repetition, build muscle and mind memory. The first few sessions of my first day this year went remarkably well. Of course, I was not as proficient as I was at the end of last season, but my body “knew” what it was supposed to do, and I was able to get into the proper body position quickly.  My eyes reached out and ratcheted far ahead through the turns and down the straights to reduce the sensation of speed.  And, as the day progressed, I was able to work up to speeds approaching my fastest last year.

photo: otmpix.com
photo: otmpix.com

Muscle and Mind Memory Lead to Confidence

The thing that really amazed me was how comfortable I was in my head. I no longer felt a flash of fear when another rider slowed dramatically, crossed my line in front of me, or passed me on the outside of a turn; I just managed the situation without much thought.

At one point, I was following behind a rider on a faster bike, and I was on his tail in the turns, but he would pull away in the straights. I decided that I could pass him going into the sharp right hand turn after the long straight by waiting to initiate my braking until after he did and trail brake into the turn as best as I could. I did this, and was just about to “tip-in” to the turn, when another rider came up on my right. I delayed my turn waiting for this rider to initiate his. He never did. Instead, he stayed upright, and locked his rear wheel, and went straight into the run-off area. Once he was out of my line, I went about my turn and kept riding. Last year, this incident would have scared me silly and shaken me the rest of the day. This year, my heart rate didn’t even go up…but maybe it should have!

So, I guess I really am “that rider now.” The lesson for me is that a mantra, conscious effort, repetition, and a great coach build confidence. Thanks Ken!


Jeff Meyers
Jeff Meyers

Jeff Meyers is a self-described middle-aged sport bike and track day dog. He has been riding for almost 30 years and, like many folks of his vintage, was taught by his friends. He is amazed to still be here given what he did at a young age on a motorcycle with such little skill and such a need for speed. He is a lawyer at his “real” job, but also is a part time Motorcycle Safety Foundation Rider Coach and has had the privilege of working for Suzuki assisting in running demo rides, mostly at the Americade rally in Lake George, New York. Jeff loves to learn, especially about riding motorcycles.


Please Donate to Keep the Articles Coming

If you liked this article and the many other articles on this site, please toss a buck or five into the hat. It’s greatly appreciated!

    • Click the PayPal “Pay Now” button.
    • Then indicate quantity in $2.00 increments. Example: put “2” in “QUANTITY” field to donate $4.00, “3” for a $6.00 donation, etc.

Why $2.00? Due to the PayPal fee structure, a $2.00 donation is significantly more beneficial compared to a $1.00 donation.

Thank You!


Check out these related posts:


Stay Informed: Subscribe NOW!
Be a Better Rider: Sign Up for Personal Training with Ken
Support Riding in the Zone: Buy a book
Support Riding in the Zone: Buy products from Twisted Throttle & Amazon
Twisted_Affiliate-Interphone-widget

How To Survive Mid-Corner Hazards

Become a patron to support the website. Thanks

CornerBraking_TightenThe vast majority of single-vehicle crashes occur in a curve. Many times these crashes are the result of an assumption that the corner will be easy to negotiate, only to find that it suddenly tightens or there is a mid-corner hazard.

Negotiating most curves is fairly easy as long as you enter at conservative speeds that require lean angles that are well within your personal “lean-angle” limits. Mid-corner obstacles or surface hazards that require advanced braking techniques can also make an otherwise easy corner a real challenge. And if you’re like most riders, you do not have proficient enough skills to handle these types of complex cornering situations.

The best riders use their brains so they don’t have to use their muscles. In other words, they use strategies and good judgment that nearly negates the use of superhero cornering and braking skill. They certainly have these skills in spades, but they know they are doing something wrong if they need to use them regularly.

But, even the best riders have to manage an unexpected mid-corner hazard from time to time. So, let’s go over how to either maneuver around a corner hazard or stop if we can steer around it.

Either tighten or widen your line to avoid a corner hazard
Either tighten or widen your line to avoid a corner hazard. © Ken Condon

Mid-Corner Maneuvers

Sometimes we are faced with a situation where you encounter a fallen branch, a patch of sand or diesel fuel spill that you must avoid. If the hazard spans the whole road, you may need to stop (see next section). But, many times the better choice is to maneuver around the problem.

Let’s say you lean into a turn, and about halfway around the curve you spot some debris. You have to make a quick choice about whether to maneuver inside or outside of the problem.

Maneuver outside

If you have the room, it may be better to go around the outside of the problem (go around the left of the obstacle in a right hand turn and vice versa). However, this may be a poor choice if it means that you risk going off the road or into the oncoming lane. Also, once past the obstacle, you will have to quickly turn to stay in your lane.

Maneuver inside

The other option is to tighten your line and go to the inside of the obstacle. This requires you to lean quickly by pressing firmly on the inside handlebar. Done correctly, this option keeps you in your lane, but asks a lot from your tires and your confidence to achieve more extreme lean angles. Also, in a left-hand turn this may bring you dangerously close to the oncoming lane as your upper body hangs well over the centerline.

Another reason why this option may not turn out well is if you fail to turn tight enough to actually avoid the hazard…and you’ll hit the object at a greater lean angle. Not good.

Straighten, then Brake
Method #1: Straighten, then Brake. © Ken Condon

Braking in a Curve

Sometimes our only option is to slow down or stop. Unfortunately, traction is limited and adding significant brake force will likely overwhelm traction. To safely introduce significant stopping power without falling you must make traction available by first reducing cornering forces.

There are two basic techniques for stopping quickly in a curve.

  1. Straighten the bike fully for maximum braking
  2. Brake as hard as you can without skidding and then brake harder as the bike straightens.

Straighten, then Brake

This option is the one to choose if you must stop very quickly. First, straighten the motorcycle upright by pushing on the outside handgrip (countersteering). Once the bike is no longer leaning you can apply maximum braking. Brake progressively to avoid skidding. Read more about proper braking HERE.

This “straighten, then brake” method sounds good, but it means that the motorcycle will no longer be on a curved path, which makes it a poor choice if straightening the bike will send you into the dirt or into the oncoming lane. (See illustration)

Method #2: Gradually brake and brake harder as you straighten.
Method #2: Gradually brake and brake harder as you straighten. © Ken Condon

Brake while Straightening

When straightening before braking is not possible, or when you have a bit more time to stop, you can use the “brake while straightening” option. This technique involves applying the brakes as much as possible to slow, but not so much that traction is exceeded. Lean angle will decrease as the motorcycle slows making more traction available for braking. Brake progressively harder as the motorcycle straightens fully. (See illustration)

A hybrid version of these two techniques involves partially straightening the motorcycle before braking. This allows stronger initial brake force compared to the gradual straightening method, and it allows the motorcycle to stay on a curved path.

Trailbraking

Trailbraking is a technique that is done by continuing to brake beyond the turn-in point and then gradually “trail” off the brakes as you lean fully.

But, trailbraking is intended to be used as a planned technique to refine cornering control and not as a way to salvage a blown corner entry and is not defined as a technique for avoiding a mid-corner hazard. That said, riders proficient at trailbraking will find the “brake while straightening” technique less intimidating to execute.

Trailbraking is often used to fix a too-fast entry mistake. If you are adept at trailbraking, you can brake past the turn entry while still maintaining a relatively relaxed composure (depending how overspeed you are). You may have salvaged the miscue this time, but slow down! Charging into corners will eventually bite you hard. Slow more than necessary…you can always get on the gas if you slowed too much.

No matter which method you choose, if you can’t avoid the object, straighten the bike so you hit it as upright as possible where you stand a better chance of not crashing.

ABS?

It is important to note that most anti-lock braking systems on the road today cannot prevent a cornering slide due to overbraking. However, some newer ABS systems can now detect sideward slides and prevent falls from braking hard in corners. Aren’t electronics amazing?

Practice

As you can see, handling mid-corner obstacles can be tricky. The best way to manage these hazards is to predict them and ride so that you always have options of either maneuvering or stopping with minimal drama. This usually means entering turns a bit slower than you think you need to and practicing your leaning skills so both become second nature.

Add your comments, below.

 
Become a patron to support the website. Thanks

4 Reasons Why You Need to Use Cornering Lines

Multiple corners require creativity.A “cornering line” is the path you follow around a corner. Riding a narrow, single-track vehicle means we are able to select the left, center or right positions within the lane. The “basic” cornering line starts by entering the turn at the outside edge of the lane and then continues to the inside or “apex” (near the middle of the corner), and ends with the motorcycle exiting toward the outside of the lane. This line is commonly known as the “outside-inside-outside” line. To learn more about the importance of road lanes, read this website: https://www.whiteliningcontractors.co.uk/.

Why Bother?

A lot of motorcycle riders don’t understand the benefits of cornering lines, believing that it’s good enough to simply keep their tires between the painted lines. This is fine when the road is predictable and speeds are low. But, as speeds increase and the road becomes more challenging, precise cornering lines become more important.

Cornering lines are a must when you ride on a racetrack, partly because the pavement is so wide that you would be silly to not use the available real estate. Riding from pavement edge to edge on the racetrack is the equivalent to using the whole width of the lane.

However, be smart! Don’t get too close to the oncoming lane or the outside edge of the road. Do not cross the painted lines (or lean into the opposite lane), but use the lane to your advantage.

Before we start, let’s define what an apex is. The apex is the “inside” point in the basic outside-inside-outside path of travel.

Here are the 4 primary benefits of riding cornering lines:

1. Straightens the Curve

Entering the curve from the outside, apexing near the inside and exiting toward the outside straightens the curve by increasing the corner radius, which requires less lean and preserves traction. It’s important to have traction in reserve in case you have to increase lean angle or execute a mid-corner maneuver.

By entering the turn wider and “apexing” around the curve, your bike will be pointed safely down the road at the exit. Apex too early and you’ll run wide.

2. Gives a Better Angle of View

This is the primary benefit for street riders. Entering a corner from the outside also allows a better angle of view into the corner so you can get an early look at the corner’s characteristics and identify any mid corner hazards so you can adjust your corner entry speed for safety.

3. Increases Cornering Confidence

Actively thinking about and choosing a deliberate path into a through curves makes you a Corner Master who rides with a plan. The result is a more preemptive attitude that puts your eyes, mind and body ahead of the corner.

4. Increases Cornering Enjoyment

Riding cornering lines increases the engagement you have with your bike–and every corner you encounter. Riders who unconsciously stay in the middle of the pavement are passive about their riding and miss out on the opportunity for deeper involvement.


DELAY your Turn-in

When you begin your turn (and how quickly you turn) has a significant impact on cornering precision and safety. New or nervous riders are anxious to get the turn over with, so they tend to turn in too soon. This places the bike at the apex too early, pointing the motorcycle toward the outside of the curve. To finish the turn and stay in the lane, the rider is forced to increase lean angle past the apex  at the time when they should be reducing lean angle. This is a common reason for corner crashes.

Not only does the delayed apex point the bike safely toward the corner exit and not at the outside edge of the road, but it also provides the best angle of view into the corner. Wait, wait, wait…now turn.

Quick Turn

To execute the delayed apex line requires a quick turn-in using firm countersteering. The harder you press on the inside handgrip, the quicker you will turn. Pull on the outside handgrip while pushing on the inside grip to turn in even quicker. Also, pre-position your body to the inside before the turn-in to help the motorcycle fall into the corner with even less effort.

Executing a precise cornering line requires coordination between the timing of your turn-in and the amount of countersteering intensity. Turning in too late and with not enough handlebar force can result in a “missed” apex, causing your motorcycle to stay in the middle or even outside portion of the lane, not near the inside as desired.

Sequential Corners

The basic outside-inside-outside cornering line is the obvious choice if the corner is isolated from other corners with a straight before and after the curve. But, multiple corners strung together can make the outside exit unusable and dangerous.

An outside exit that is appropriate for a single turn may prove too wide if the next corner bends in the opposite direction. In this situation, you have to ride an “outside-inside-INSIDE” line. This means you stay inside all the way to the exit where it becomes the entrance to the next corner. Depending on the relationship between corners, you may end up with an “outside-inside-MIDDLE” line.

Below is a video of Ken using cornering lines on a twisty road:

The trick to seamlessly stringing together a series of corners is to look well ahead  to identify each corner’s radius and determine what the proper entry is for the following corner. The best riders interact with their bike and the corners in a way that turns the road into a dance floor, making the mastery of cornering lines not only safer, but also very satisfying.

Do you use cornering lines?


Please Donate to Keep the Articles Coming

If you liked this article and the many other articles on this site, please toss a buck or five into the hat. It’s greatly appreciated!

    • Click the PayPal “Pay Now” button.
    • Then indicate quantity in $2.00 increments. Example: put “2” in “QUANTITY” field to donate $4.00, “3” for a $6.00 donation, etc.

Why $2.00? Due to the PayPal fee structure, a $2.00 donation is significantly more beneficial compared to a $1.00 donation.

Thank You!


Check out these related posts:


Stay Informed: Subscribe NOW!
Be a Better Rider: Sign Up for Personal Training with Ken
Support Riding in the Zone: Buy a book
Support Riding in the Zone: Buy products from Twisted Throttle & Amazon
 

Ice Riding Basics: Winter Motorcycle Fun

Become a patron to support the website. Thanks
photo: Jeff Vader
Leaning like this on ice? Are you kidding me? photo: Jeff Vader

Okay, so I’m an idiot. Not for the multiple reasons that my wife might list, but because after 50-plus years living in the Frozen Northeast, I have just now discovered the awesomeness of riding a dirtbike on ice. Add to that the fact that I have lived on a perfectly good lake for the last 25 years and you can see the reason for my self-criticism.

Am I Crazy?

Okay, I can probably be forgiven for not riding a motorcycle on ice, after all, it does seem a little crazy. And I’ll admit to being super-intimidated the first time I rolled my 2010 Kawasaki KLX250s onto the previously liquid, but now molecularity-hardened surface in front of my house.

But, I’d seen the photos of others leaning at insane-degree angles on frozen bodies of water, so I figured that with my newly-mounted Fredette Canadian ice tires, I just might be okay.

My first time on the ice: scary and exhilarating.

And so I was. As a matter of fact, I was more that okay, I was absolutely beyond okay! After a few tentative laps around the rock-hard lake, I was giggling like a schoolgirl on Nitrous.

Photo: OwensTrackDayPhotos.com
Ice riding will make rain riding even more fun. Photo: OwensTrackDayPhotos.com

Pavement & Dirt Training

So, as much fun as ice riding is, it also offers big benefits to my off-road riding, as well as my street and racetrack pavement riding.

Here are some of the benefits that I found:

  • Becoming more comfortable with managing variable amounts of traction.
  • Learning to look through turns even when traction is breaking loose beneath you.
  • Seeing just how much throttle control affects traction.
  • Understanding the importance of proper body position for off-road riding.
  • Learning to relax even when you’re on the edge of control.
  • Feeling more and more comfortable “backing it in”.
Crash Dance
Crash Dance

Each of these things apply to general motorcycle riding, with some lessons being more applicable to dirt riding and ultra-fast racetrack riding. As a street rider, ice riding widens experiences and expands the margin of error for those times when the unexpected happens and survival means keeping your cool.

Backing it in! photo: Jeff Vader
Backing it in!
photo: Jeff Vader

What I Learned: Basic Technique

Ice riding is a lot like dirt riding especially, flat track, and is all about taking advantage of the grip the tires offer.

Lean the Bike Beneath You: Ride on top of the bike when cornering, sitting on the upper edge of the seat with the bike leaned sharply underneath you. Avoid leaning to the inside like you might do when street riding, track riding, or roadracing.

Arms: Extend your inside arm while keeping your upper elbow up high and bent. This is tiring and hard to remember, but really helps with front tire traction and control. This arm position means you will hold the throttle like a screwdriver when making left-hand turns (most ovals go counterclockwise, like flat track racing).

Sit forward: Sit on the very front of the seat so the bike’s pivot point is centralized.

Feet: Weight on the outside footpeg to maximuze traction. Drag your inside foot on the ice as a third contact point. Be careful not to put too much weight on the foot to avoid hooking it on rough ice and cause it to get trapped under the rear tire. Ouch!

Look: Keep looking through the turns even when it feels like all hell is breaking loose. Like all other motorcycle riding genres, this helps you relax and let the bike sort itself out.

Steer with the Rear: As you get faster, you learn to back the bike into the turns. This gets the bike turned with the rear, rather than “steering” with the front, which can increase the risk of the front sliding out. Steering with the rear can be done by using a bit of rear brake as you enter the turn, or by downshifting and dumping the clutch. If you are going real fast then a hard countersteer will break it loose. Whether you use the brake or not depends on the amount of grip the ice has.

Bike Setup

To ride on ice you need a dirtbike and off-road knobbie tires with screws in the tread blocks. You can do this a few different ways:

  • Buy a few bags of special screws from a motorcycle or ATV retailer and spend time with a cordless drill installing hundreds of those little buggers into your knobs. One popular brand is Kold Kutters.
Fredette Canadian style Ice Tires
  • Buy already prepared ice tires. The ones I have are from Fredette Racing Products. They sell tires with “AMA approved” screws, as well as the more aggressive Canadian type.
  • Buy tires pre-made by local ice riders. Ask around.

The Canadian tires I have mounted carved right down to the hard icy surface on powder snow and are pretty decent even after the ice becomes shredded into fine chips.

Almost crashing on AMA tires in accumulated ice chips.
Almost crashing on AMA tires in accumulated ice chips. photo: Colin Samuel

The AMA tires don’t have nearly as much grip on soft surfaces. I know this from riding a borrowed 125 motocrosser with AMA tires (see photo).

You’ll want to get some tire wraps  to keep the screw’s sharp when rolling the bike around the garage and loading in your truck or trailer… and prevent bloody hands.

My bike is a bone-stock KLX250s, which handles just fine for fun, but needs more power, especially for the larger lake ovals. I’m about to install a 351 big-bore kit to solve this problem.

More serious riders set up motocross bikes with ice fenders and lowered suspension.

Rider Preparation

What to wear? I saw all sorts of riding garb when I recently rode in New Hampshire with a group of friends. It was 10 degrees F, so naturally we were bundled up. Some riders wore dirt riding pants and regular winter jackets, some wore Carhartt jackets and pants or snowmobile gear.

Helmet: I wore both my spare street helmet (full-faced, of course) and dirt bike helmet with goggles. Shield fogging can be an issue, but cracking it open a bit solved the problem…mostly. Snowmobile shields are another option. A skull cap under the helmet helps keep the head warm.

photo: Jeff Vader
photo: Jeff Vader

Boots: Some people wear heavy winter boots and some wear off-road boots (including me). One thing to consider is that you need boots with soles that are durable enough to slide across rough ice all day long. Wear warm socks.

Gloves: My hands are susceptible to the cold. On days that are a bit warmer, I rode with insulated mechanics gloves. However, on the 10-degree days, I wore my insulated street gloves with glove liners. Note that wearing gloves that are too thick can lead to arm pump.

Layers: Wear layers! You will get warm enough to sweat and will want to shed a layer or two as the day goes on. I wear three or four layers of performance nylon shirts under a street riding jacket.

Pants: I wear an old pair of MotoPort overpants over jeans with motocross knee armor underneath.

Armor: Speaking of armor, I highly recommend you get armored-up. That ice is hard! In addition to knee armor, I have elbow guards, hip pads and my Impact Armor back and chest protector that I use for roadracing and track days.

Check out this video.

Tracks

So, where does an ice rider ride? In New England, there are people who make the effort to drive their plow trucks to the lakes to clear ovals and road courses of various distances. And I’m sure there are plenty of places in other parts of the Northern U.S. with dedicated riders willing to clear lakes and ponds for others to ride.

Get online to find out where ice riding is available in your area. Please be considerate of those who do this fine work. Ask if it’s okay to ride before showing up and be sure to clean up after yourself.

Ice Racing

If you’re the competitive type, you can always step up your game and go racing. I’m not a resource for ice racing, so do a Google search and ask around at dealerships and on Facebook.

You experienced ice riders, please share any more tips below.

Good luck and Back it in!


Check out these related posts:


Stay Informed: Subscribe NOW!
Be a Better Rider: Sign Up for Personal Training with Ken
Support Riding in the Zone: Buy a book
Support Riding in the Zone: Buy recommended products from Twisted Throttle
Become a patron to support the website. Thanks

Video: Ken Narrates a Track Day Session

Enjoy this video of Ken narrating a few laps of the Thompson Speedway, CT (Clockwise, short course) road course using a Sena GoPro Audio Back.

Here is another from Thompson Motor Speedway in Thompson, CT

Track day riders who sign up for Personal Instruction will receive real-time narration and coaching.

See More Track Day Videos

Twisted_Affiliate-Interphone-widget

LIKE Riding in the Zone on Facebook


Please Donate to Keep the Articles Coming

If you liked this article and the many other articles on this site, please toss a buck or five into the hat. It’s greatly appreciated!

    • Click the PayPal “Pay Now” button.
    • Then indicate quantity in $2.00 increments. Example: put “2” in “QUANTITY” field to donate $4.00, “3” for a $6.00 donation, etc.

Why $2.00? Due to the PayPal fee structure, a $2.00 donation is significantly more beneficial compared to a $1.00 donation.

Thank You!


Check out these posts:


How Can I help You? Online Coaching NOW AVAILABLE
Stay Informed: Subscribe NOW!
Trianing-Tours_LandingBe a Better Rider: Sign Up for Personal Training with Ken
Support Riding in the Zone: Buy a book
Support Riding in the Zone: Buy products from Twisted Throttle & Amazon
Twisted_Affiliate-Interphone-widget


How to Survive Downhill Curves

Cornering errors are responsible for at least half of all fatalities. And of those corners, downhill curves are the most challenging. But, with some knowledge and practice you can master these tricky turns.

Look, Slow, Lean and Accelerate. Note the lower guardrail installed to make the guardrail less lethal to crashing riders.

Before I describe how to deal with downhill turns, let’s revisit the basic cornering process.

  1. Look Well Ahead: This is obvious, but not instinctual for many. Riders who are nervous tend to look in the near distance. Discipline yourself to look well ahead so you can get a handle on what’s coming up.
  2. Slow: This doesn’t necessarily mean you have to use your brakes and/or downshift to reduce speed, but you MUST consciously evaluate whether you need to adjust speed so you can negotiate the corner with plenty of traction and skill to spare. If in doubt, slow down! You can always get on the gas if you slow too much.
  3. Lean: You initiate lean by countersteering. The amount you must lean is determined by your speed and the radius of the turn (your body position also affects the amount of necessary lean). If you enter a turn at a speed that requires you to lean to the limit of your comfort level, then you’re risking a crash. The solution is to learn to lean, dammit. If you’ve never explored near-maximum lean on your bike (in a safe place, please) then you are poised to be a victim.
  4. Accelerate: Once leaned, you need to crack the throttle and continue to accelerate gradually through to the corner exit. The basic explanation for why you need to do this is that it stabilizes the suspension and chassis. Gradual acceleration also loads both tires for maximum grip.

The line (path) you choose around the turn is also important. The “outside-inside-outside” path is the gold standard, but should not be cast in stone. The delayed apex line is one that every rider should know about and use in many cases. This is when you allow the bike to orbit around the corner before bringing it in tight to the apex. An article explaining cornering lines is in the works.

Slow to a speed that allows you to accelerate.
Slow to a speed that allows you to accelerate. Notice how the centerline and edge of the road visually converge to indicate a tightening curve and downhill slope.

Downhill Curve How-To

Okay, with the basic cornering technique in mind, let’s discuss how it applies to downhill curves.

  1. Look Ahead: No difference here, except that what you should see are the telltale signs of a downhill curve: pavement sloping away from you, indicated by how the centerline and edge of the pavement visually converge in the distance. If these visual clues come together in the near distance, then the hill is steeper than if they converge farther away. Also, look for roadside objects to help you determine how tight the curve is and how steep the hill is (read more here).
  2. Slow: The main difference between a flat curve and a descending curve is how gravity pulls you and your bike’s mass down the hill. This means that you need to scrub more speed before the curve, otherwise you will find yourself going too fast mid-corner.You also need to begin braking earlier so you have more time and space to slow. Waiting too long will cause the bike to pitch forward, causing the rear tire to get light which can lead to instability. Trailbraking is useful for downhill turns as a way to smoothly slow the bike as you tip into the curve.

    Trailbraking not only gives you more time and distance to get the bike slowed, it also helps direct the bike around the curve. That’s becasue the bike will turn more easily when the brakes are lightly applied (too much brake force can have the opposite effect). The chassis geometry shortens as the suspension compresses and the front tire contact patch gains more of the available traction.

    Also, consider that gravity is pushing the bike downhill and releasing the brakes fully will cause the bike to accelerate in the direction the front wheel is pointed. Waiting to release the brakes until the bike is pointing around the corner helps the bike get pointed toward the corner exit. Usually trailbraking is done with the front or both brakes, but in this situation, dragging the rear brake only is another way to scrub off speed without overstressing the front tire to prevent the front tire from washing out.

  3. Lean: Initiate lean using contersteering, so no real difference here. However, a quicker turn-in is often needed to avoid running wide. I often coach riders to “let the bike drop” into the curve when entering a downhill curve.
    Will your ability and experience with lean angles allow you to do this? Or will you ride off the road?
  4. Accelerate: Accelerate? You want me to accelerate, even when gravity is already pulling the bike down the hill? Yep. Even though gravity is going to cause your bike to speed up, you still need to stabilize the bike and manage traction. The trick is to slow down enough before the curve so you can crack the throttle ever so slightly and hold that throttle setting or accelerate as you round the bend. This will get some of the weight off the front tire so the bike will track easily around the corner.Note that the steeper the curve, the later you will brake and the less you will accelerate, but you still need to accelerate. If you enter the curve very slowly, then you may need to keep the clutch in and then ease it out as you tip into the curve. But, get the clutch out immediately after tipping in to avoid freewheeling down the hill, which causes most bikes to feel unstable and track unpredictably. It’s better to introduce some measure of drive force ASAP.

The line you choose around a downhill curve should have you entering wide to the outside. As you tip in, you let the bike drop inside to a delayed apex (farther around the curve), then let the bike exit toward the outside of the corner.  This straightens the radius for better traction and the need for less lean angle.

Remember to continue to look where you WANT to go, not where you are afraid to go!

Body position helps drop the bike into the turn while requiring less lean angle.

What about body position? When cornering at normal speeds, you want to drop your inside shoulder to engage with the bike. This helps you lean with confidence, but also allows the bike to remain a bit more upright.

 Practice!

Do not hesitate in acquiring these skills, because one day you too may find yourself facing a curve that you cannot handle. The best place to begin is in a parking lot where you will learn to lean your motorcycle with authority (parking lot drills are a feature of the RITZ Book). This means mastering countersteering and learning to turn quickly.  Once you feel pretty good about your progress, I suggest you attend a track day where you will explore the limits of cornering and braking in a safer environment. Many racetracks I’ve ridden have at least one downhill corner where you can practice all day long. Sign up for personal instruction if you want to fine-tune your cornering skills, including downhill curves.

What tips can you offer for downhill curves?


Please Donate to Keep the Articles Coming

If you liked this article and the many other articles on this site, please toss a buck or five into the hat. It’s greatly appreciated!

    • Click the PayPal “Pay Now” button.
    • Then indicate quantity in $2.00 increments. Example: put “2” in “QUANTITY” field to donate $4.00, “3” for a $6.00 donation, etc.

Why $2.00? Due to the PayPal fee structure, a $2.00 donation is significantly more beneficial compared to a $1.00 donation.

Thank You!


Check out these related posts:


How Can I help You? Online Coaching NOW AVAILABLE
Stay Informed: Subscribe NOW!
Trianing-Tours_LandingBe a Better Rider: Sign Up for Personal Training with Ken
Support Riding in the Zone: Buy a book
Support Riding in the Zone: Buy products from Twisted Throttle & Amazon
Twisted_Affiliate-Interphone-widget


How to Not Suck at Cornering

Become a patron to support the website. Thanks
This is a rider who sucks at cornering.

Hot on the heels of the The Power of the Quick Turn article is this followup post about what happens after you tip into a corner. Too many riders struggle with cornering, not necessarily because they are afraid to lean, but becasue they do not understand how to properly complete a turn.

Cornering Basics

By now you know that motorcycles must lean to change direction and that leaning is done by countersteering. Read about countersteering HERE.

Once the bike begins to lean, countersteering pressure is reduced and other dynamics take over that cause the motorcycle to arc around the curve, including front end rake and trail geometry, as well as something called camber thrust. Camber thrust is the term that describes how a tapered object (a motorcycle tire leaned over) orbits around its axis when rolling along a surface (the pavement).

In other words, the rounded profile of a motorcycle tire acts like a tapered styrofoam cup when it’s rolled on its side. Give it a push and it rolls in a circle.

Here is how author and  fellow USCRA racer Tony Foale describes camber thrust:

“As the inside edge of the tyre is forced to adopt a smaller radius than the outer edge, then for a given wheel rotational speed, the inner edge would prefer to travel at a smaller road speed, this happens if the wheel is allowed to turn about a vertical axis through the point of the cone. Just as a solid cone on a table if given a push.”

For our purposes, all you really need to understand is that your motorcycle is designed to track around a curve with minimal effort once the bike is in a lean. Front end geometry (caster effect, rake,  trail, etc.) all make this possible. If you want to read more, go to Tony Foale’s website and learn all about it.

If your bike is properly maintained and has relatively new tires with nearly the original profile intact, you should be able to initiate lean and then maintain that lean angle without introducing any significant handlebar inputs. Problems occur when the rider messes this process up. Most bikes will track predictably and with little effort as long as the rider doesn’t interfere with the process or introduce counterproductive inputs.

Variations in Machine Design

Some riders insist that they cannot round a corner without using significant handlebar pressure to keep their machine on the desired path. Instead of being able to relax and let the bike carve the path, they fight the bars all the way around the curve. It is possible that the machine is to blame, but these days this is rarely true.

While I have ridden bikes with really bad cornering dynamics, the vast majority of modern machines offer balanced, neutral handling that requires little-to-no mid-corner intervention. The only reason for handlebar adjustments are because of mid-corner changes in turn radius, camber or surface condition. A smooth constant radius curve, ridden well, requires almost no additional handlebar pressure.

It’s important to note that different types of bikes handle differently. Sportbikes are responsive to steering inputs, while cruisers tend to be slower steering, but more stable. Still, if the rider does all the right things, then the differences in machine does not make that much of a difference. The trick is to have the knowledge and skill to complete a corner proficiently.

Basically, it’s usually much more productive to evaluate the user instead of blaming the machine.

User Error

To repeat…once the necessary lean angle is established, most bikes are happy to track around a corner with little effort. So, why do some riders struggle with this part of the cornering process? The answer lies in a few areas.

  1. Tension at the handlebars. The front of the bike needs to be free to move up, down, and side -to-side in response to both large and small changes in the road surface. Being stiff on the handlebars interferes with this motion and causes the motorcycle to feel reluctant to turn. It also asks the tires to work harder to stay in contact with the surface. Another problem with stiff arms is that you are inhibiting the slight countersteering corrections that may need to occur to deal with changes in camber or other variations in corner surface. Loose arms allow fluid reactions.
  2. Poor body position. Think of your bike as your dance partner who wants you to lead. In the case of the cornering dance, a slight dip of the shoulder to the inside of the curve will encourage smoother cornering. In contrast, a rider who stays upright or leans outside is stepping on the bike’s toes, causing it resist fluid cornering.
  3. Not using the Throttle Correctly. For the motorcycle to track around the corner predictably and smoothly, the suspension must be stable and in the middle of its travel. Smooth, gradual acceleration throughout the curve produces the best results. Be sure to slow enough at the beginning of turns so that you can comfortably roll on the gas all the way to the exit. Unfortunately, a lot of riders fail to use steady throttle in corners. This is a problem, because changes in speed and drive force alter the arcing path the motorcycle takes. Abruptly chopping on or off the throttle upsets this stability and causes the bike to lift and fall in and out of the established angle of lean and introduces forces that result in a wobbly or weaving line around the corner. Note that acceleration typically makes the bike drift wide and deceleration can either cause the bike to drop into the corner more or cause it to stand up, depending on how abruptly the throttle is chopped and how the machine /tire combo responds to this input.
  4. Not Looking through the Turn. You tend to go where you look, so look where you want to go! By keeping your visual attention through the turn and toward the corner exit, your mind is able to better manage the corner. The other advantage is that the landscape slows down when you look ahead. This reduces anxiety and helps complete the concerning process. Looking ahead will not suddenly make you a cornering master, but without habitually looking ahead, you will never become one. Keep your eyes up.
Practicing cornering technique. Look where you want to go!

Cornering Technique

Okay, so let’s break it down.

  1. Look well ahead.
  2. Countersteer to initiate lean for the corner.
  3. Crack the throttle as soon as the bike is leaned. Use gentle drive at first and then progressively feed in more drive force. Roll on with more authority as lean angle is reduced near the corner exit. Steady drive creates steady cornering.
  4. Relax! If you established the correct angle of lean for the turn, the bike should require only slight adjustments in handlebar pressure. Corners that tighten will require you to press more on the inside bar to lean the bike more, but keep the throttle as steady as possible.
  5. Finish the turn. You’re not done yet. Keep looking toward the corner exit and roll on the throttle a bit more to let the bike drift toward the outside of the curve. This facilitates the “outside-inside-outside” cornering line, which I will discuss in a future post.
  6. Rinse and repeat for the next corner.

There is so much more to learn about the cornering process, but this is a good start. Implement these steps and you’re well on your way to becoming a cornering master.

What tips can you share that help you to corner with more confidence?

Become a patron to support the website. Thanks

The Power of the Quick Turn

Most motorcycle riders initiate lean in a somewhat lazy manner. In most cornering situations and at normal street speeds it is perfectly fine to gradually ease into a corner with light pressure on the handlebars.

But, when the pace picks up and the corners become less predictable, a sluggish, indecisive turn-in will cause you to run wide at corner exits. The ability to turn quickly gives you a survival tool for managing misjudged corners while also increasing an overall sense of control and confidence. Booya!

Cornering 101

Before we get into quick turning technique, you must understand the basics of how a motorcycle changes direction. Motorcycles must lean to turn. Leaning is done primarily by introducing countersteering pressure on the handlebar: press forward/down on the handlebar on the side in which you want to turn.

A delayed apex requires a delayed, quick turn-in.
A quicker turn allows early direction change and less risk of an on-throttle highside.

Not sure you understand countersteering? Read This Article NOW. FYI, you can quicken steering by pushing on the inside handlebar while also pulling on the opposite bar.

Practice the quick turn technique in a parking lot. And then apply it on your next ride.

How Quicker Turns Help

Turning the motorcycle within a shorter distance and period of time gets the bike to change direction early.

The quicker the bike is leaned, the earlier the direction change is completed, which affords you a greater margin of error to handle a misjudged turn radius or a slightly overspeed entry. Look at the diagram and you’ll also see that a quicker turn-in means you are not leaned over as long.

Another benefit of a quick turn is that it allows the bike to reach maximum necessary lean angle before or at the turn apex (the innermost part of the corner), which means that you can get on the gas sooner for both greater corner stability (bikes like being under drive when cornering) and greater exit speed (for you performance riders): Tip-in and then crack the throttle.

Quick Turns and Cornering Lines

The quick turn technique can be used for most, but not all corners. Some corners are laid out so that a gentle, sweeping entry is best. But, most other corners benefit from a quick turn, especially turns we call “exit” turns that require a slower entry and an early drive out of the corner.

A quick turn is also useful as a way to achieve a delayed apex cornering line. Delaying turn-in by a half-second or so keeps you outside a bit longer at the turn entry for a wider angle of view and points the motorcycle toward the turn exit, rather than toward the outside edge of the lane. Novice riders often dive for the inside of a corner as they react to anxiety about not being able to make the turn. This can easily result in an early apex and a blown exit. Ouch!

Instead, wait for it, wait for it…okay, turn, NOW.

Quick Turning and Traction

As you might imagine, giving the handlebar a good shove introduces an abrupt force to the front tire. That’s why you want to limit using the quick turning technique when traction is limited, such as on wet or contaminated pavement. A quick turn uses more traction at the beginning of the turn, but uses less at the apex and exit. Even though more traction is used when turning quickly, good tires in dry conditions have more than enough grip to handle the extra force.

To minimize the risk of tucking the front tire, you must get most of your braking done and start easing off the brakes before you introduce forceful handlebar inputs. However, it is beneficial to maintain some front brake force as you countersteer, which compresses the front suspension and loads the front tire for more rapid turning response. Ideally, you would release the brakes a split-moment after you press on the handlebars.

I’m talking about releasing the brakes almost immediately after initiating lean. If you want to maintain braking pressure longer (trailbraking), then you’re better off not turning in quickly. To manage traction while trailbraking your turn-in must be gradual, because you’re combining both turning forces and brake forces.

Timing & Intensity

A well-timed quick turn should result in a single handlebar input that establishes necessary lean angle and allows immediate throttle application (very gradual at first).

Turning in too hard and/or too early could result in the motorcycle hitting the inside of the curve. To prevent this, you will need to delay turn-in from where you would begin to turn for a slow turn-in. To fine-tune how rapidly the bike turns in, you can also reduce how hard you press on the handlebars. The harder you press, the more rapidly the bike will fall into the lean.

NOW is the Time!

I don’t care if you ride a GSXR on the racetrack or a Harley on the street, you must master the quick turn technique NOW. Being able to use immediate, authoritative handlebar pressure gives you a MUCH better chance of surviving a too fast corner entry. Learning the quick turning technique will allow you to get the bike turned early and efficiently and minimize the chance that you will panic and grab the brakes or run wide into the oncoming lane or off the pavement. Don’t delay! This just might happen on your very next ride!

Learning to turn quickly isn’t difficult, but it does require excellent countersteering skills and precise timing. Turning quicker also requires more forceful handlebar pressure and the trust that the tires will stick under the stress of more forceful handlebar inputs. Practice is what will convince your mind and muscles of the power of the quick turn. Do it!

  •  

Check out these related posts:


Stay Informed: Subscribe NOW!
Be a Better Rider: Sign Up for Personal Training with Ken
Support Riding in the Zone: Buy a book
Support Riding in the Zone: Buy products from Twisted Throttle & Amazon


Please Donate to Keep the Articles Coming

If you liked this article and the many other articles on this site, please toss a buck or five into the hat. It’s greatly appreciated!

Become a patron to support the website. Thanks

Guest Writer: When Do You Lean?

The ability to lean a motorcycle with confidence is a fundamental part of riding. Unfortunately, humans do not come hardwired to lean much more than about 20 degrees, which is the lean angle where we start to lose traction  when we run in a circle on grass or dirt. Motorcycle riders must get beyond this lean angle limit for even basic maneuvers. This requires a leap of faith that the tires will grip. Practice is important to train your mind and muscles to lean beyond your comfort zone so you will be able to lean more if necessary. Once greater lean angles become more comfortable, the next skill to refine is timing so you reach maximum lean angle at the right point in the corner.


Paul Duval at full lean.www.otmpix.com
Paul Duval at full lean. www.otmpix.com

Meet Paul Duval

Paul Duval is the latest RITZ guest writer. Paul is a fellow track day and MSF instructor, former Loudon Road Racing Series 125 GP Champion, and professional educator. Let’s listen to Paul’s take on the importance of accurately timing maximum lean angle.


Timing Maximum Lean Angle

After many years of racing and instructing on the racetrack, there is one persistent mistake I see riders make when trying to ride faster: Using too much lean, too late in the corner.

Who is making this mistake?

Everyone is susceptible to this problem. Novice and intermediate track day riders often make the mistake of  increasing lean angle late in the corner in an attempt to get their knee down. Especially vulnerable riders are those with a lot of “natural talent” who got fast so much more quickly than everyone else. They end up riding fast, but without the knowledge and precision necessary to manage that corner speed.

What’s the Problem?

Adding throttle and increased lean angle at the same time is a bad idea.

You may say, “What’s the big deal, I’m knee down and cranking?!” Yes, you may be fast, but this mistake WILL eventually lead to a crash, and probably a BIG one.

The problem with reaching max lean angle well after the apex of a turn is that this is precisely where you want to be on the gas.  Other riders will be already picking the bike up and driving hard.  This will encourage you to match their drive, but you are still adding lean angle.

Remember this:  Adding lean angle AND throttle at the same time is how high sides happen. The opposing forces of changing direction and accelerating can easily exceed available traction and will cause the rear tire to slide.   When this happens, slides are extremely quick, unpredictable, and hard to recover from.  All of your momentum is going exactly the wrong way.

Why do I keep doing this?

There are a few reasons people make this mistake.

Weak countersteering skills:  Newer riders haven’t yet mastered the “quick turn” technique of using counter steering to get the bike leaned over.  They bend their motorcycle into the turns gradually and often pass the apex entirely before the bike has changed direction.  Now they are running out of real estate and HAVE to lean it over to finish the turn.

Lack of reference points:Beginner and Intermediate track riders often use other riders as their reference points. This leads to a lot of crazy entry lines, none of which help the rider get the bike to change direction before the apex.  They commonly ride around the entry point as well as the apex, then crank the bike over to finish the turn.

Charging the corners:  Faster riders who make this mistake are at the most risk.  They rush into the corner at a pace that does not allow them to consistently hit their marks.  They will blow by a tip in point, drift wide past the apex, and then attempt to recover to get back on the “fast” exit line by adding a little more lean and a little more throttle.

Even with all this effort, they wonder why the faster guys are still pulling away.  They aren’t even cranked over like I am!!!  Hmmmm???  You may get away with late lean angles for a while, but eventually, you will push this mistake too far. Highside city.

The Solution?

The correction for all these riders is pretty similar.  And it’s not what they want to hear:  SLOW DOWN your corner entry to a speed that you can actually handle.  I mean a speed at which you can identify reference points, and ride an accurate line from tip in to apex that allows you to OPEN the corner after the apex, rather than tighten it up.  You need to learn to time your throttle inputs and your lean angle so that as you drive out of the corner and standing the bike up progressively as you roll on the gas.  BRAAAAP!  Wheee!


A quicker turn allows early direction change and less risk of an on-throttle highside.
A quicker turn allows early direction change and less risk of an on-throttle highside. copyright Riding in the Zone.

Ken:

Thanks Paul. Paul mentioned the importance of being able to turn quickly. By being able to countersteer with authority, you are able to get your motorcycle from upright to leaned so that the majority of the direction change is complete BEFORE the apex. With the change in direction mostly complete, you can reduce lean angle as you roll on the gas. Traction is managed and all is well. Post your comments below.


Please Donate to Keep the Articles Coming

If you liked this article and the many other articles on this site, please toss a buck or five into the hat. It’s greatly appreciated!

    • Click the PayPal “Pay Now” button.
    • Then indicate quantity in $2.00 increments. Example: put “2” in “QUANTITY” field to donate $4.00, “3” for a $6.00 donation, etc.

Why $2.00? Due to the PayPal fee structure, a $2.00 donation is significantly more beneficial compared to a $1.00 donation.

Thank You!


Check out these related posts:


Stay Informed: Subscribe NOW!
Be a Better Rider: Sign Up for Personal Training with Ken
Support Riding in the Zone: Buy a book
Support Riding in the Zone: Buy products from Twisted Throttle & Amazon
Twisted_Affiliate-Interphone-widget

Guest Writer: Just Go Faster

Jeff Meyers on his '05 ZX6R
Jeff Meyers on his ’05 ZX6R www.otmpix.com

“Just go faster, Jeff,” my track riding guru Ken Condon says after asking him what I need to do next as a track day rider.  I am flattered, because Ken says that my track form is very good. He says that I am on “the line,” I am riding predictably and smoothly, and my body position, while I am sure it can be tweaked, is getting much better.

However, I am also befuddled because I wish it were that simple to “just go faster.” The problem is that each time I enter a turn faster than before, alarm bells shriek in my head, and adrenaline courses through my system. A voice screams “You are going waaaaay too fast for this corner!!” I am terrified.

Speed is the Result of Good Technique

Ken tells me that a faster pace is the result of good technique and consistency. So, I discipline myself to look farther down the track, keep maintenance throttle, relax my hands and upper body, and make my bike lean a little farther, all while being mindful not to move too much so that I don’t upset the suspension or cause tire slip. It’s a balancing act, a tightrope on two wheels. I am terrified, and yet I am so happy at the same time.

Take the Time You Need

I’m not exactly a rookie to track riding. I have done fifteen track days total, all with Tony’s Track Days.  Up until now, I have spent my time in the novice (Red) group, often debating whether I was ready to bump up to the intermediate (Yellow) group. I decided to stay in the novice group longer than I needed to so I could cement the basics and eliminate bad habits at relatively slower speeds. I also wanted to learn how to pass safely and courteously.

The lucky new owner of the ZX6R. I hope you enjoy it as much as I have.
Jeff Meyers

My ego didn’t like it, but I kept telling my ego to shut the hell up because my body didn’t want to pay the price of crashing. It worked. I am now a solid “Yellow Rider” and feel confident that I am there with the appropriate skill set. Ironically, “yellow” is an appropriate description for my current level since fear is now the main factor holding me back from going faster.

Over the next several track days, I plan to fine-tune my form, push myself against that fear barrier, and (hopefully) build confidence each time so that I become consistently faster. My goal is to bump up to the Advanced (Blue) group, and who knows, maybe to the Super-advanced (Black) group someday.


Jeff Meyers is the newest guest blogger to the RITZ team. Jeff is a self-described middle-aged sport bike and track day dog. He has been riding for almost 30 years and, like many folks of his vintage, was taught by his friends. He is amazed to still be here given what he did at a young age on a motorcycle with such little skill and such a need for speed. He is a lawyer at his “real” job, but also is a part time Motorcycle Safety Foundation Rider Coach and has had the privilege of working for Suzuki assisting in running demo rides, mostly at the Americade rally in Lake George, New York. Jeff loves to learn, especially about riding motorcycles.


Thanks, Jeff. I’m sure you will meet your goal of moving into the faster groups. Just continue to take the time you need to get there.

What are your riding goals? What holds you back from accomplishing them?


Please Donate to Keep the Articles Coming

If you liked this article and the many other articles on this site, please toss a buck or five into the hat. It’s greatly appreciated!

    • Click the PayPal “Pay Now” button.
    • Then indicate quantity in $2.00 increments. Example: put “2” in “QUANTITY” field to donate $4.00, “3” for a $6.00 donation, etc.

Why $2.00? Due to the PayPal fee structure, a $2.00 donation is significantly more beneficial compared to a $1.00 donation.

Thank You!


Check out these related posts:


Stay Informed: Subscribe NOW!
Be a Better Rider: Sign Up for Personal Training with Ken
Support Riding in the Zone: Buy a book
Support Riding in the Zone: Buy recommended products from Twisted Throttle & Amazon

Ground Clearance & Grip

Cornering on a big cruiser requires a respect for clearance limits.

I just received another letter from a Motorcycle Consumer News reader, this time about a situation he encountered when riding on a twisty back road in Cali on his Street Glide. Here’s his story, followed by my response.


“Ken, your recent article (in Motorcycle Consumer News) on cornering traction was excellent.  I just returned to Las Vegas after traveling up the coastal hwy to Oregon then back down to Las Vegas. While on that trip I had an incident involving cornering that left me very puzzled.

While heading to the coast from the 101 on hwy 128 north of San Francisco I was enjoying the curves of the coastal range. I ride a Harley Street Glide and ride fairly aggressively but not what I consider unsafe. As I was entering one turn (posted at 20mph) I leaned the bike into the turn and suddenly heard metal screeching on asphalt and almost simultaneously was aware that I had lost traction and was heading for the outside of the corner and a steep drop off.

Automatically I jammed my left foot down to the asphalt, but with my speed around 30-40mph sprained my ankle pretty badly. Much to my surprise I regained traction on the outside of the corner and was able to hold it there through the last 1/2 of the corner. My conundrum is that I’m not sure what happened! I felt comfortable with the speed I had entered the corner and I had entered from wide to just inside the center lane when the incident occurred. Normally, if I’m leaning the bike too much I’ll be aware of the foot board dragging. In this case there was no warning, just metal screeching and loss of traction simultaneously. Also, the road was great, with fairly new asphalt and no noticeable asphalt compaction or debris. Your thoughts would be greatly appreciated as this incident has made me extremely apprehensive whenever entering a corner with thoughts of this incident constantly in the back of my mind.”


Fairly aggressive cornering on a cruiser can be done, if you respect the bike's limits.
Fairly aggressive cornering on a cruiser can be done, if you respect the bike’s limits.

My Response

Without having seen or experienced the actual incident, I can only speculate on the cause based on knowledge of typical scenarios like yours. The fact is that ground clearance just doesn’t go from sufficient to nonexistent without a reason. It could be that you were leaning far enough that you were about to touch your floorboard when the mysterious factor occurred and your bike was suddenly grinding hard parts. This levered your tires off the ground and reduced traction.

Most times, when a bike suddenly goes from adequate ground clearance to zero ground clearance, it is a sign of traction loss caused by undetected surface contamination or debris, or abrupt throttle, brake or handlebar inputs, all of which are rider error. Sudden traction loss while the bike is leaned will cause the bike to drop quickly. This usually results in the rider tensing on the handlebars and chopping off the throttle, which exacerbates the problem.

If neither surface debris nor rider error existed, then you have to look at the possibility of a sudden and undetected change in surface camber that reduces ground clearance, or perhaps a depression in the road that would cause the suspension to compress.

Predicting that conditions can change quickly is a key survival strategy and applies to seemingly perfect pavement. New pavement can actually make ground clearance-robbing features such as undulations and dips difficult to see.

Knowing that your bike is a low slung machine means that you must be particularly sensitive and aware of these clearance hazards so that they don’t cause problems. One way to help manage limited ground clearance is to slow down.

Hanging off the inside of the bike helps increase clearance.

You can also learn to use body positioning to help increase ground clearance. By simply dropping your head and shoulder to the inside, you shift the combined center of gravity of bike and rider so that your machine doesn’t have to lean quite as much. Practice this in a parking lot and notice that your floorboards don’t drag as readily. My book has drills that can help.

If you are riding briskly on your Street Glide and continue to have clearance problems, perhaps you are exceeding the limits of the bike and need to consider trading in for a model that is more suited to your cornering exuberance.

Now that we’ve discussed the possible cause, let’s look at your reaction. The sudden loss of ground clearance, for whatever reason, triggered a panic response that not only had no significant effect on allowing your big Harley to recover traction, but also caused you to injure your ankle. This panic response is part human nature and is how most riders react when faced with a potentially life threatening situation.

Off-road riding helps train for minor traction loss events.

To minimize these survival instincts from causing more harm, you would need to re-train your mind and body to feel okay with minor traction loss. This is not easy to do when you ride a road-going cruiser, but is easily achieved with some off-road riding experience. Off-road riders routinely experience wide variations in traction and become accustomed to traction loss so that they do not overreact and make matters worse.

But, please understand that training yourself to react correctly is not a substitute for being aware of hazards and preventing them from causing an incident from happening in the first place.

The results of overriding a bike's capabilities can be disastrous.
The results of overriding a bike’s capabilities can be disastrous.

I hope this helps.
Ken


Do you have anything to add? Have you encountered a similar situation? How did it turn out? Please comment below.

submit to reddit


Please Donate to Keep the Articles Coming

If you liked this article and the many other articles on this site, please toss a buck or five into the hat. It’s greatly appreciated!

    • Click the PayPal “Pay Now” button.
    • Then indicate quantity in $2.00 increments. Example: put “2” in “QUANTITY” field to donate $4.00, “3” for a $6.00 donation, etc.

Why $2.00? Due to the PayPal fee structure, a $2.00 donation is significantly more beneficial compared to a $1.00 donation.

Thank You!


Check out these related posts:


Stay Informed: Subscribe NOW!
Be a Better Rider: Sign Up for Personal Training with Ken
Support Riding in the Zone: Buy a book
Support Riding in the Zone: Buy recommended products from Twisted Throttle & Amazon

The “No Countersteering” Myth

Become a patron to support the website. Thanks

A MCN reader recently wrote telling about his enthusiasm for Reg Pridmore’s “body steering” method of initiating lean for cornering. What follows is my response.


“I have 44 years experience riding and currently ride six days a week commuting and sport riding. Three years ago I read Smooth Riding the Pridmore Way by Reg Pridmore. This book completely changed my knowledge of corning a bike. For years I subscribed to countersteering as noted in this article. The Pridmore way is to body steer the bike and keep your upper body relaxed and smoothly controlling throttle, clutch, and brake. It took me a few months to re-learn corning, but now I am much more proficient and safe on the bike. His book goes into the details why this is better and how to master these skills.  It is my opinion that there is an alternative to countersteering and I feel it is much safer to use the geometry of the bike versus fighting the physics of corning with the handlebars. “


Countersteering is not negotiable.My response:

This discussion has been going on for over a decade and has even sparked an Internet rivalry between Pridmore and Keith Code, who advocates and emphasizes countersteering as part of the California Superbike School as the best way to initiate lean. Having ridden the CSS No BS bike (which has handlebars mounted rigidly to the frame with a working throttle), I can confidently tell you that body “steering” alone will not allow a rider to corner in any meaningful or effective way on a 400 to 800 pound machine. See the video of Code riding the No BS bike to see how little body position has on direction control.

Yes, body “english” can enhance many aspects of cornering process. I am a very big proponent of body positioning for both street and track riders to aid quicker turning, refine cornering lines, increase ground clearance, preserve traction, and allow the rider to interact more with the bike and the road. But, body positioning alone cannot cause the average street bike to initiate a corner efficiently or quickly enough. That is done by countersteering.

Countersteering uses the geometry of the bike to essentially unbalance the machine, causing it to drop into a lean. There are many other aspects of the process, but that’s all most riders need to know. You mention the other important aspect of masterful cornering, which is relaxing the arms as much as possible once the lean is initiated and using smooth control inputs to maintain control.

I have no doubt that your revelation and enthusiasm for Reg Pridmore’s fine book and teachings are genuine, but I can guarantee that you are using countersteering (in combination with body positioning) to lean your bike into a corner. What is happening is you have replaced some of the “handlebar only” countersteering inputs you have used routinely for many years with a body position technique that is “pre-loading” the bike for the corner.

This shift in the center of gravity causes the bike to fall into the turn easier, making it feel as if you are not putting any pressure on the handlebars. This is a technique taught by Lee Parks in his Total Control curriculum and which I teach to track day students. Next time you go for a ride, pay very close attention to the amount of pressure you are putting on the handlebars as you initiate lean. If you concentrate enough, you will surely notice that you are introducing handlebar pressure. Because there really is no alternative to countersteering, only reducing the amount of pressure needed.

Additionally, the act of moving your body in the direction of the turn causes handlebar inputs. You would have to consciously resist pulling the outside bar or pressing on the inside bar to eliminate any countersteering force, which would be very difficult to do.

I’m glad you feel more proficient. Keep doing what you’re doing, but you’ll be better off if you know what is really happening. Good luck.
Ken Condon

I received a reply from the reader. He is sticking with his belief that he is not countersteering.

Please share your thoughts below.

Listen to the Countersteering PODCAST

See the video segment about countersteering from the RITZ DVD:


Become a patron to support the website. Thanks

#1 Reason Why Motorcycles Crash in Corners

Josh, looking good on his Gixxer1000 at Loudon. owenstrackdayphotos.com

Motorcycles crash, which may be mentioned on sites like Beach Injury Lawyers, for many different reasons, including in no particular order:

  1. They are not very stable when ridden slow, so tip overs are common
  2. They are hard to see in traffic, so collisions with cars is far too frequent
  3. They only have two small tire contact patches, so seemingly small things can cause traction loss
  4. They require fairly precise rider decisions and inputs when traction is near its limit
  5. Most single-vehicle crashes are the result of a too-fast corner entry speed.

If the crash was caused by a negligent or reckless driver, you may hire a personal injury lawyer to help you seek compensation. A personal injury attorney will advocate for your rights and prepare the necessary legal documents for your claim. Those who were rendered disabled due to accident injuries may also be eligible for disability benefits. Find a social security disability lawyer that can help you apply for these benefits.

Case Study

My friend and track day student, Joshua had a problem with numbers 3, 4 and especially 5.

Josh had a great day at the awesome New York Safety Track until he didn’t. Check out his VIDEOS BELOW to see how his day ended. He walked away unscathed, thanks in no small part to his quality riding gear. ATGATT, baby. The same can’t be said for his beautiful GSXR1000. It slid off the track without much fanfare until it hit some protruding piece of Earth and flipped a few times. Oh well. It’s just a machine, remember.

Below, you can read Josh’s account of the situation and what he learned.

Sky, Ground, Sky, Ground. :(
Sky, Ground, Sky, Ground. 🙁

The Fundamental Reason Why He Crashed

Riding a motorcycle is more of a mental exercise than physical. Yes, it takes physical coordination and a certain amount of strength to operate a motorcycle. But, riding a motorcycle well is much more than simply operating the machine. It also includes using excellent judgement and having deep knowledge about how to manage all sorts of situations.

Mark Brown from MotoMark1 uses the term “driving” to emphasize that you must not passively “ride” a motorcycle, but rather “drive” it with purposefulness, authority and competence.

Josh was doing great all day and, as was the case with another rider at the track that day, got over confident and pushed just a little bit harder than he should have. This mental lapse is essentially THE reason Josh crashed. A too-fast corner entry is the #1 reason for single-vehicle motorcycle crashes.

Josh and I had worked together during a Personal Instruction Day last week at the NH track on strengthening his “skill foundation” to allow him to safely “drive” his bike at the pace he is eager to achieve.

We made good progress, but the eagerness and drive Josh has for rapid improvement seems to cause him to push harder than he should. This is common with highly motivated people. I can name two other very good riders who are motivated to ride at a top level, but have not yet learned and applied all the information necessary to be able to ride at that level…yet.

All motorcyclists who are eagerly developing their physical skills must also develop their ability to monitor their attitude, self-evaluate their real progress, and use judgement that is in line with their true capabilities.

It coulda been worse.

The Physical Solution

Now that we understand that the crash could have been avoided with a bit of “judgment double-check”, let’s talk about what went wrong and the mechanics of how the crash could have been avoided. Remember: A too-fast corner entry is the #1 reason for single-vehicle motorcycle crashes.

Because Josh had decided to “let it rip” down the straight (probably faster than he had done before), he entered the turn 1 braking zone at a higher speed than he had previously. That’s fine, BUT he did not adjust his braking behavior to match the increased approach speed. With an increase in speed comes the need to:

  1. brake earlier using the same or similar amount of brake force as when approaching at a slower speed, or
  2. use the same brake marker as when approaching the turn at the slower speed, but brake harder, or
  3. a combination of #1 and #2

Either method will work to achieve the goal of slowing to a comfortable entry speed. Braking earlier is generally the best solution where you have more time and space to modulate your brake force to slow without anxiety.


Josh did not alter his “begin braking” mark, so he found himself flying past his usual brake marker and therefore reached his turn-in point at a higher speed than he was familiar (or comfortable). You can clearly see in the forward-facing camera angle that he was missing the apex and then used greater handlebar pressure (countersteering) as he attempted to stay on the track, which overtaxed the front tire and it tucked.

An Expert’s Solution

Could the crash have been avoided in the hands of a seasoned expert? With the bike at that speed and in that position in the corner, I would say maybe, but probably not. HOWEVER,  the expert would have identified that he or she was traveling faster than before and because of this, would have adjusted the “begin braking” location to be earlier and increased the amount of brake force as needed to slow down sufficiently. Expert-level track day riders are comfortable braking very hard, because they have practiced this skill.

He or she would have also used trailbraking to further scrub off speed if necessary as the bike was eased into the corner. However, I want to emphasize that trailbraking is not really “meant” to be a technique used to salvage a blown corner. Done correctly, trailbraking is a planned method for stabilizing the motorcycle when entering corners. That said, if you have trained yourself to trailbrake as it is meant to be used, then it is at your disposal when you need a longer duration of braking force if you inadvertently enter a turn too fast. Read all about trailbraking HERE.

The Lesson

Remember that if you change one thing (faster straightaway speed), you must adjust other things (brake marker and/or brake pressure) to reach the entry speed you are able to handle. Please learn from Josh’s unfortunate mistake and keep your enthusiasm and eagerness in check and resist introducing significantly faster speeds until you understand the concept of cause and effect as it pertains to adjusting entry speed.

Crash Videos

Front view:

Rider Face View:

A message from Josh himself about what he learned:

Staying within limits is a lesson I strive to drive home to my students every weekend as an MSF RiderCoach. The motorcycle, the rider, and the time & space limits around them. My hope is that every rider I come in contact with has takeaway points and thinks about actions and decisions made while riding.

My overall goal as a rider is to learn, fine-tune, and practice as many new and advanced skills as I can. I feel the biggest joy of riding is that there is always something new to work on or perfect. Each year I try and take on something new I can use as a rider and coach. A few years ago I had an opportunity to take a course on dirt bike techniques and later on I was able to become a certified MSF Dirt bike Coach. Last year my new goal was to learn to become proficient in riding on the racetrack at speed.

I went out and bought every book and DVD I could find on the subject, and also a shiny GSXR 1000 that I thought at the time would be a perfect bike to go out and lay down some hot laps. Books and video’s are great tools, however to really be able to learn and apply the skills takes tons of coaching, practice and fine tuning.

My biggest obstacle is always trying to rush and accelerate my learning. I want so bad to be the best and smoothest that I do not take the advice I give to my students. I try and go from step A all the way to step Z in one day. Learning should be in stages and is a building block process. Learn the gross skill 1st and stay within your limits. Ken gave me the best advice of all when he said “Slow down and get smooth 1st”.

I was doing pretty good and learning the New Track. Taking my time and finding reference points and determining where I should look, brake, tip, and accelerate. It was near the end of the day with only 2 sessions left. I was a little tired and sore from working hard on my body position and riding. I started the 2nd to last session and started letting my mind drift away a little bit. I was thinking about the ride home and my fatigue level and on the video footage I had been recording all day; what I would be showing my friends and family and how cool I would look.

I decided to try one more lap and call it a day. I said to myself. “You can push a little harder and get one awesome lap to end the day.” I got to the start of the straight. I did a head check to see if I was holding up any riders. The coast was clear and I gave it all I got. I pinned the gas and tucked my head. Glancing at the speedometer I saw the numbers climbing 130,140,150. I looked up and saw the end of the straight fast approaching. I got on the brakes with a force that seemed very heavy. I was squeezing in on the tank with all my might to hold myself from pushing forward. I saw the turning point approaching fast and thought “Oh No I just blew it” I had lots of speed and not much track left.

I thought in the back of my head. You can do this, usually riders have less skills than the machine they are on. I tried as hard as I could to get into a hang off position and turn the bike. I gave it a flick into the corner and felt the front dropping out. I saw the ground rushing up to my shoulder and I lifted my head up and away from the turn. Boom, I was on the ground and tumbling, I could see the bike flipping as I was tumbling and sliding into the grass. Every second was in slow motion as I could hear the plastic cracking and breaking off the bike.

It seemed like I was going to slide forever and I was saying to myself. OK, please stop now. Once stopped I stayed still, counted to 10 and started to assess if anything was hurt or broken. Not even a scratch. All the gear I had invested in paid off big-time! I looked at the bike and wanted to cry. I knew as I started to scream down the straight I was pushing too hard. I had not taken the advice I want to instill in every single student. I got up and started looking the bike over. Seeing everything all smashed is a feeling I could do without. The session still had 15 minuets to go and all I could do was stand there and wave as my friends and fellow riders went by making smooth turns and having a blast. Sometimes we do not take our own advice and need a hard lesson to set us straight.

Josh


Please Donate to Keep the Articles Coming

If you liked this article and the many other articles on this site, please toss a buck or five into the hat. It’s greatly appreciated!

    • Click the PayPal “Pay Now” button.
    • Then indicate quantity in $2.00 increments. Example: put “2” in “QUANTITY” field to donate $4.00, “3” for a $6.00 donation, etc.

Why $2.00? Due to the PayPal fee structure, a $2.00 donation is significantly more beneficial compared to a $1.00 donation.

Thank You!


Add your comments, below.

submit to reddit

Stay Informed: Subscribe NOW!
Be a Better Rider: Sign Up for Personal Training with Ken
Support Riding in the Zone: Buy a book
Support Riding in the Zone: Buy products from Twisted Throttle & Amazon
Twisted_Affiliate-Interphone-widget

Countersteering Will Save Your Life!

Become a patron to support the website. Thanks
Getting a big (or small) motorcycle to turn requires more than just body weight.

It’s hard to imagine that so many so called “experienced” riders either fail to understand the importance of countersteering or fail to recognize that countersteering is how motorcycle really turns.

Let’s Get This Straight

A motorcycle turns by leaning. Once the bike is banked over, the geometry of the chassis, as well as the rounded profile of the tires and hard-to-describe forces cause the machine to arc around the curve. So, to turn a bike you must get the motorcycle to go from upright to leaned…precisely and efficiently.

I Don’t Need No Stinking Countersteering

A lot of riders believe that they are able to maneuver their motorcycle by simply leaning their body or by looking into the turn. While these are helpful techniques for assisting the bike to turn, they alone cannot effectively cause a 500+ pound machine to change direction.

“Yeah, but I can turn my bike without countersteering.” Um, not really.  Sure, you can cause the bike to drift into a turn, but that’s not what can be called “turning”. Also, consider that most people who don’t think they are countersteering really are, they just don’t know it. Pay close attention the next time you are making any sort of turn and notice how you put a slight amount of pressure on the inside handlebar.

Read The “No Countersteering ” Myth

What Really Happens

In case you don’t already know, THE most effective way to get a motorcycle to go from upright to leaned is to introduce handlebar inputs. By pressing forward (and to a lesser degree, down) on the handlebar on the side that you want to turn, you essentially unbalance the bike so that it “falls” into a lean. Press on the right handlebar to initiate a lean to the right and press on the left handlebar to turn left. Got it?

You can enhance this effect by also simultaneously pulling on the other handlebar. This is how racers achieve quick changes in direction in chicanes on the racetrack.

Once the bike is leaned, then the front tire will steer slightly into the direction of the turn. You must relax your arms to let this natural balancing effect occur otherwise it will feel as if the motorcycle is not able to maintain the cornering path. Press, and then relax.

Why You NEED to Know How to Countersteer

Countersteering is used whenever you need to change direction. This applies to basic cornering maneuvers, as well as evasive maneuvers, such as swerving. It’s also important to be able to countersteer with authority when a corner suddenly tightens more than you expected, or when you approach a tight corner at a too-fast speed.

Not being able to get your motorcycle turned quickly will eventually result in an off-road excursion or collision with an oncoming car or a guardrail. Seriously!

Prove It To Yourself

If this makes no sense to you, then it’s time to practice. Take a look at the video clip below from the RITZ DVD for more information on countersteering and to see some drills that will help you master countersteering.

Read this article that Ken wrote for Motorcyclist Magazine about countersteering.

Listen to the Countersteering PODCAST

Add to the list in the comment section below.

Become a patron to support the website. Thanks

Check out these related posts:

Top 5 Ways That Motorcycle Riders Screw Up

Being average isn't good enough.
Being average isn’t good enough.

1.Thinking You Are Better Than You Are

Overconfidence and an inaccurate, overinflated self-image is responsible for a lot of motorcycle crashes. This is certainly true with young men (the majority of crashes in MA involve young sportbike riders). But, you old guys (and gals) aren’t immune. So, listen up.

Most motorcycle riders are average, at best. On the surface, they look competent enough, but when the going gets rough, their weaknesses become apparent. Everyone should occasionally look in the mirror to try and identify their weaknesses and then act to turn those weaknesses into strengths.

Group riding can bring out the worst behavior.

2. Succumbing to Pack Mentality

Group Riding can make the most level-headed rider do really stupid things. It’s something about the energy of a group, in combination with the need to prove that you’re a good rider that often fuels bad behavior. I’m not immune. Knowing that I can get sucked into riding too fast (for the street environment) causes me to be very selective about who I ride with.

Busted!
Busted!

3. Speeding in All the Wrong Places

Riding too fast for the street environment is one of the stupidest things you can do on a motorcycle. Yes, it sucks to get pulled over, but it sucks more to crash because you simply didn’t respect the reality of street riding. If you get a ticket for speeding, consider calling a speeding ticket lawyer or a traffic ticket attorney to help you assess your situation and determine your best course of action. These types of traffic lawyers know federal and local traffic laws and regulations so they can provide you with the best advice. Riders who got arrested for DUI charges may need to hire a criminal lawyer to defend their rights.

Errant cars, animals and pedestrians can jump out from anywhere and sand, gravel and fallen branches often lurk around corners undetected. I like riding fast, but not too fast. I reserve the really fast stuff for the racetrack.

An all too common sight.

4. Mixing Alcohol with Riding

Are you kidding me? As if being an average rider isn’t dangerous enough,  are you willing to add impairment to the equation? Talk about stacking the deck against you. Listen, I like  drinking a beer or two just like the next guy (or gal), and there was a time long ago when I would even jump on the bike after having a few. Thankfully, I survived those days.

You may think you’re fine to ride with one or two cold ones having passed your gullet, but combining drinking or other impairments with riding is totally counter to managing risk. I’m not your father, so do what you want. But, I ask you to please refrain.

See it coming before it happens.

5. Failing to Predict Danger

Close calls are a warning. Crashes are the result of you not heeding those warnings. The best riders develop a sixth sense about their surroundings. They scan the roadway looking for anomalies and evaluate if anything is “wrong with the picture”. They are actively searching for problems and are way ahead of the situation, because they are prepared. By “preloading” hazard scenarios into their mind, they are already halfway toward managing any hazard. Try it. Not only does it make riding safer, it’s also fun, like a video game. Don’t let them get you!

Add to the list in the comment section, below.


Please Donate to Keep the Articles Coming

If you liked this article and the many other articles on this site, please toss a buck or five into the hat. It’s greatly appreciated!

    • Click the PayPal “Pay Now” button.
    • Then indicate quantity in $2.00 increments. Example: put “2” in “QUANTITY” field to donate $4.00, “3” for a $6.00 donation, etc.

Why $2.00? Due to the PayPal fee structure, a $2.00 donation is significantly more beneficial compared to a $1.00 donation.

Thank You!


Check out these related posts:


Stay Informed: Subscribe NOW!
Be a Better Rider: Sign Up for Personal Training with Ken
Support Riding in the Zone: Buy a book
Support Riding in the Zone: Buy recommended products from Twisted Throttle & Amazon
Twisted_Affiliate-Interphone-widget

Valuing Motorcycling Skill Development

Become a patron to support the website. Thanks
Tell this guy that learning ain't fun.
Tell this guy that learning ain’t fun.

As a motorcycle skills and safety professional, I am often frustrated and even saddened by the seemingly complacent attitude toward real skill development. It pains me to see riders who ignore the importance and benefit of learning to ride their motorcycle with more skill. Not only do sharp, well-developed skills make motorcycle riding safer, it also makes riding more engaging and way more fun.

Shut Up and Ride

I get that motorcyclists don’t ride to be safe. We ride to have fun, which means that focusing on “learning” can risk turning an enjoyable pastime into something that starts to feel like work. I’ve seen many, many motorcycle riders run away when I mention “Training” or the dreaded “S” word…Dare I say it…SAFETY.

“I just want to enjoy the wind in my face and the feeling of freedom, dude. Besides, I ride just fine.” Maybe, but could it be that riding can be MORE FUN if you learn how to ride better? Hmmmm?

Skill development benefits all types of riders.

Don’t Kill My Buzz With the Truth, Man

The repulsion toward safety and skills development is one reason why it’s nearly impossible to get experienced riders to attend an advanced riding course. The other reason is that most riders don’t see the value in developing their skill. And it’s certainly not as fun as simply going for a ride. Why “waste” a Saturday or Sunday riding around a parking lot when there are open roads to explore…and for some people, bars to hop. Did I say that out loud?

I was at a motorcycle expo earlier this year, helping to man a booth for the Massachusetts Rider Education Program (MREP). They had a riding simulator set up for people to try their hand at dealing with challenging riding situations.

Jeannine on the Smart Trainer simulator.

One guy (and I’m sure he wasn’t the only one) exclaimed proudly that he didn’t need to use the simulator because he’d been riding for 30 years. OK, said my colleague, show us what you know. The look on his face showed sudden anxiety. He kinda laughed as though we couldn’t be serious and then walked away. He was clearly afraid that he might be exposed as a mediocre rider.

This happens all the time. New track day riders are afraid that they won’t be as fast as they think they are (they’re not), and this scares them. Egos are sensitive, I get it. But, if they can man up (sorry ladies) and take the plunge, they soon discover that it doesn’t matter how fast they are, rather it’s how skilled they are at controlling their bike that counts.

What’s My Point?

You probably aren’t as good at riding a motorcycle as you think you are. “So what”, you say? Well, the last time I looked, riding a motorcycle is dangerous, even deadly. If that’s not enough to motivate you to spend a bit of cash and an afternoon brushing up on your skills, then maybe the fact that better skills means more fun will motivate you.

The vast majority of people I’ve trained over the last 20 years experience MORE ENJOYMENT after a training session. That’s because they are now more confident in their ability to manage their bike, corners and traffic. Seriously. It’s worth the effort.

Training Opportunities that are Fun

Track Days are fun and increase cornering and braking confidence.

I can’t say that the MSF courses offered around the country are exactly fun. You ride around a parking lot at 25mph as you go through specific drills that are designed to efficiently deliver vital information. Although there is a lot of laughing when groups of friends attend these parking lot courses, it’s usually all business.

When it comes to combining “fun” and “training” together, there are two venues to consider. A track day and on-street training tours.

Sport bike riders are the likely people to take advantage of track day training, but some organizations cater to all types of bikes and riders. Tony’s Track Days regularly sees sport tourers and adventure bikes at their days. But, to encourage cruiser riders and tourers to attend, Tony is offering a “non-sport bike” track day for 2014. Now, even cruiser-types can ride around a curvy ribbon of pavement without the risk of hitting a car or sliding on sand, or getting a speeding ticket.

Another fun training opportunity is on-street training tours. Stayin’ Safe has been providing training tours and I am offering tours as well. This combines scenic rides with experienced people who can offer tips for learning how to be safer and in more control.

Start the Season with Training

The snow is finally melting and now is the time to plan your season. Do yourself and your loved ones a favor and get your skills sharpened. You won’t regret it.

Share your thoughts below on your most valuable training experience.


Become a patron to support the website. Thanks

How to Preserve Traction by Managing Load

Become a patron to support the website. Thanks
The amount of traction depends on tires, pavement and load.

Last weekend I conducted a seminar at the Thompson Speedway (in CT) and I thought I’d share a particular concept that came up during the presentation… the concept of “load management”.

When I first verbalized the term, I thought it sounded like the material for a crass poop joke. But, it is a concept I believe every motorcycle rider should adopt as a way to ensure that you have a sufficient amount of traction.

Traction Theory

Before I talk about specifics of load management, it makes sense to lay some theory on you. In its most basic form, traction is the friction between your tires and the road or track surface. This friction can vary greatly depending on several factors, including tire compound, condition and temperature, as well as the quality of the pavement surface (or dirt for you dualies out there).

Pavement texture affects the amount of traction available.

But wait. The quality of your tires and the surface is only part of the traction equation. The other part is the amount of load that is placed on the tire’s contact patch. The more weight or load that each tire is supporting directly relates to the amount of grip each tire has. Additionally, using High Friction Surfacing on the road can enhance traction further, offering improved grip and safety, especially in challenging conditions.

Practical Application

When you brake, the front suspension compresses as the weight of rider and bike pitches forward. This increases front tire traction. But, at the same time, the rear suspension extends and the load (and traction) at the rear tire decreases. More traction on the front means you can use the front brakes harder. But, it also means that there is less load at the rear and therefore less rear tire grip for hard use of the rear brake. Load shifts constantly with every maneuver you make…braking, cornering, swerving, accelerating etc.

Loads also shift with the terrain. Riding uphill shifts weight rearward. Riding downhill moves the load to the front. Riding over bumps also causes momentary shifts in load and changes in traction. Road camber also affects load.

Managing Your Load

If you grab the front brake, you'll skid the front tire.
If you grab the front brake, you’ll skid the front tire.

So, managing traction requires you to manage the location and amount of load. This means making sure your front tire is sufficiently loaded before you introduce maximum front brake force. Squeeeeeze the front brake lever. It also means easing off the rear brake as load pitches forward when you brake. The key is to apply the brakes only as much as the tire can handle, which means paying attention to the amount of load there is on each tire.

Now, too much of a good thing is too much of a good thing. In this case, you can overwhelm the front tire while braking and skid. However, if you squeeze the front brake progressively then you should not have this problem. If you grab the brake, then you risk locking the front wheel.

Managing traction while cornering downhill requires balance between speed control and acceleration.

You can also overwhelm and push the front tire into a lowside skid when cornering hard. To avoid this, you need to get on the throttle just after you initiate lean to balance load between the front and rear. If you coast through the turn, you’re asking the front tire to not only manage the cornering forces, but also the engine braking forces caused by not getting on the gas.

The amount of throttle used should be just enough to transfer load to the rear tire. Do this by gradually rolling on the throttle. DO NOT twist the throttle to the stop or you’ll overwhelm the rear tire and spin it out of control.

The best riders are keenly aware of the amount of traction they have available at any given time. They also use advanced techniques that minimize abrupt spikes in load and allow the tires to maintain grip.Some of these techniques include brake and throttle overlap, trailbraking, and advanced body positions that allow the suspension to work fluidly.

Start by paying attention to how load affects traction, then move on to developing these advanced techniques for load and traction management. I’ll write about these techniques in future blog posts, but you can read about them now by ordering your copy of Riding in the Zone.

In the meantime, click here to read more about traction and How to Develop a Traction Sense.

Share your thoughts below on how you manage traction and load.

Subscribe to the mailing list!

Buy the Book!


Become a patron to support the website. Thanks

How to Survive Hairpin Turns

Become a patron to support the website. Thanks
Practice tight turns in a parking lot.

The biggest problem riders have when dealing with hairpin turns is their anxiety about being able to make the turn. It’s a good idea to practice tight turns in a parking lot before you encounter challenging hairpin turns. Read more about slow speed riding techniques.

Slow Approach

One of the most likely reasons for a crash in a corner is entering too fast. When dealing with downhill hairpin turns, you also have the additional force of gravity pushing you downhill.

The trick is to get your bike slowed early and smoothly and then carry a bit of brake force past turn in to keep the bike stable, Read about trailbraking for more detail. Just be sure the surface is clean enough to allow slight braking while cornering.

Throttle On

The timing of when and how much you crack the throttle is critical for maintaining stability and direction of travel. In general, you want to begin rolling on the throttle as you release the brakes (see trailbraking seminar)

A bit of forward drive takes some of the load off the front tire when going downhill and gives you forward momentum when going up a hill. It also maximizes ground clearance.

But, be careful. If you are abrupt with the throttle, either by accelerating too hard or by chopping off the throttle, you risk running wide, overtaxing the tires and upsetting the chassis and balance

Downhill turns are challenging enough to put a sign up.

When approaching a downhill hairpin curve you need to slow down more and hang onto the brakes a bit longer (see trailbraking) to manage gravity, You then gradually crack the throttle slightly for maximum stability. Be sure to look well into the turn, at the corner exit.

Uphill Hairpins

When going uphill, you can approach with a bit higher speed. But, slow down enough to allow steady throttle throughout the whole turn. Be sure not to use too much throttle that you cause the front tire to lose traction and “skate”, which can push your bike too far to the outside of the turn.

You also don’t want to overload the rear tire with too much acceleration force. Steady, gradual throttle at the beginning of the turn is the key. Again, keep your eyes pointed all the way to the turn’s exit.

Look through the turn and accelerate slightly.

Enough Speed

Whether going up or down hill, you need to keep your speed up to maintain balance and stability. Sometimes, people simply fall over because they are going too slow. At very low speeds, slight deceleration or shift in body weight (tell passengers to remain relaxed, but still) is enough to upset balance and cause a tip over. Aim for smooth, steady drive.

Look Toward the Exit

Your eyes help direct your bike to where you are looking so look where you WANT to go. Turn your head to ratchet your eyes through to corner, always looking to the next visual target…entry, apex, exit. Read more about visual skills here.

What’s My Line?

It's important to get this right.
It’s important to get this right.

Try to select a cornering line that allows you to get your steering inputs done early and so the throttle finishes the turn. This usually means an outside-inside-outside path of travel. There are many advantages to this line, including a wide view through the turn and the ability to perform a quick turn-in that gets the bike turned early. It’s common for riders to fall in slow, tight corners because they introduce mid-corner steering inputs at the time when the front tire is already working hard.

Obligatory Crash Video

Here’s a video of my friend Matt who found out how a slight miscue in a slow, tight turn can put you on the ground. He was a rather new rider at the time and was spooked by the traffic. The bike was borrowed, so it was not familiar to him, either. He was unhurt. Erik from Twisted Throttle evaluates the crash protection from SW-MOTECH.

Why do you think Matt crashed? I’ll give my opinion in the comments below after some of you respond.

What tips do you find useful when dealing with hairpin turns?


Become a patron to support the website. Thanks