Ken is author of "Motorcycling the Right Way” and "Riding in the Zone" (book and blog). He is also the "Street Savvy" columnist for Motorcyclist Magazine, and former longtime author of the Proficient Motorcycling and Street Strategies columns for Motorcycle Consumer News. Ken is Lead Instructor for Tony's Track Days, a 20 year Motorcycle Safety Foundation instructor, and owner of Riding in the Zone Motorcyclist Training.
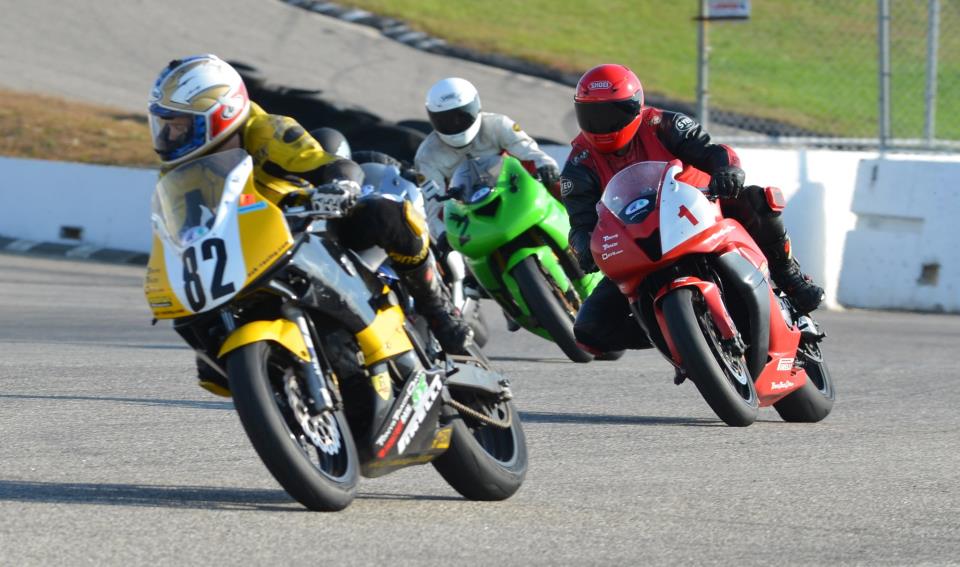
Groms are fun…really fun. They are small, yet powerful enough to do all sorts of silly shenanigans. Just watch my fellow scribes Ari and Zack from Motorcyclist Magazine for proof:
The thing is that playbikes like the Grom can trigger a false sense of safety that can make a person think he or she is invincible.
The truth is that you can certainly be hurt or killed even on a little bike.
Another reason that small bikes can be unsafe is because they disappear in traffic. It’s hard enough to be conspicuous on a normal sized bike, but it’s extra tough on a Grom.
Lesson
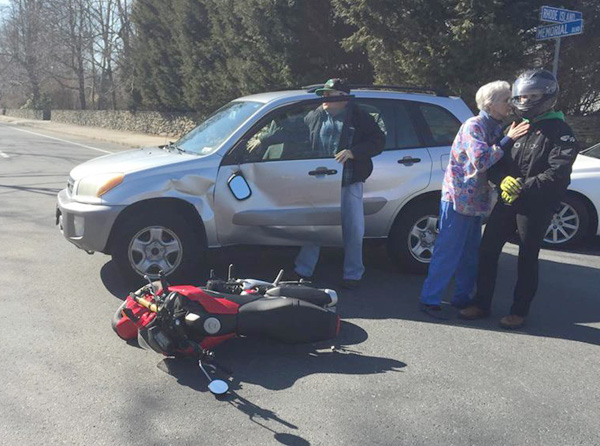
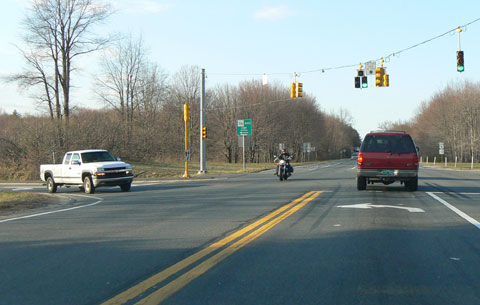
Case in point is a video I saw that is no longer available of a Grom crashing into the side of a car.
It’s pretty obvious that an elderly driver thought he was good to go after waiting for a car ahead of the Grom to pass. It’s a classic case of “I didn’t see him”. Likely another case of inattentional blindness.
Before you launch hate missiles at the old guy you’ve got to remember that people make mistakes. Sure, the driver was at fault…no argument there. His insurance company will pay.
Knowing 100% that we can’t possibly hope to stop people from making mistakes means it’s up to us to do all we can not to become a victim of these people.
The Rider’s Mistakes
The rider in the video could have noticed that the car ahead was blocking him from view. He should have also predicted that the driver was ready to go as soon as the gray car went past. This would have alerted the rider to slow way down and be ready to apply the brakes–hard!
By the time he realized what was unfolding, it was too late. The rider heroically attempted to swerve to the left, but there was not enough time or space to sneak by.
One significant mistake the rider did not make (unlike soooo many other riders) is to wear full protective gear. He was mostly unhurt in the crash. Unfortunately, the dark riding gear probably didn’t help in the conspicuity department.
The Takeaway
Posting this video isn’t intended to callout the rider’s ineptitude; we all act on assumptions that don’t turn out as we expect. Rather, I use this video as an illustration of one of the most common reasons for multiple-vehicle motorcycle crashes, so we can learn from it. The following lessons can be applied to any situation involving intersections. The rider in this video did not necessarily break any of these lessons, but perhaps he did.
Lesson 1: Don’t be fooled into thinking because you’re riding a small, low powered bike that you cannot get hurt or killed…you can.
Lesson 2: Recognize that you are hard to see when riding a motorcycle, and you’re nearly invisible on a pint-sized bike like a Grom.
Lesson 3: Develop a sixth sense about your surroundings and then listen to that sense.
Lesson 4: Learn about the classic crash scenarios so you can recognize when they are developing in front of you.
Lesson 5: When approaching intersections with waiting cars, slow down and cover your brakes.
I recently returned from Spain after testing the 2016 Triumph Speed Triple R. Take a look at the short video to hear some of my thoughts.
But, first, some history:
Way back in 1994, Triumph introduced the Speed Triple. This bike was the first real mashup of sportbike performance with the naked styling and practicality of a universal “standard” motorcycle. This new Streetfighter genre helped redefine the Hinckley based company as a serious player.
Over the years, the Speed T went through an evolution that saw increases in motor displacement, as well as upgraded suspension and brakes. In 2011 Triumph jettisoned the classic round “bug-eye” dual headlight arrangement for the current love ‘em or hate ‘em oblong-shaped beams. That year, ABS was first offered as an option.
In 2012 Triumph introduced the uprated “R” model that included Öhlins suspension, Brembo brakes, lightweight forged aluminum hoops and bits of carbon fiber trim. To this day the Speed Triple has remained one of the most well-rounded and exciting bikes on the market, earning Motorcyclist’s “Best Naked Bike” award in 2011 and 2012. A lot has happened in the naked bike segment since then and Triumph knew the Speed Triple was in need of some serious love if it is to rise to the top once again.
To get a feel for the new Speed Triple, we rode in the coastal hills an hour south of Barcelona and ended the day riding on the tight and technical Carafat Circuit.
So, how was the bike?
The standard “S” model is priced at $13,200. Add $1,700 to get the “R” version’s top-shelf Öhlins suspenders and carbon bits for a total of $14,900.
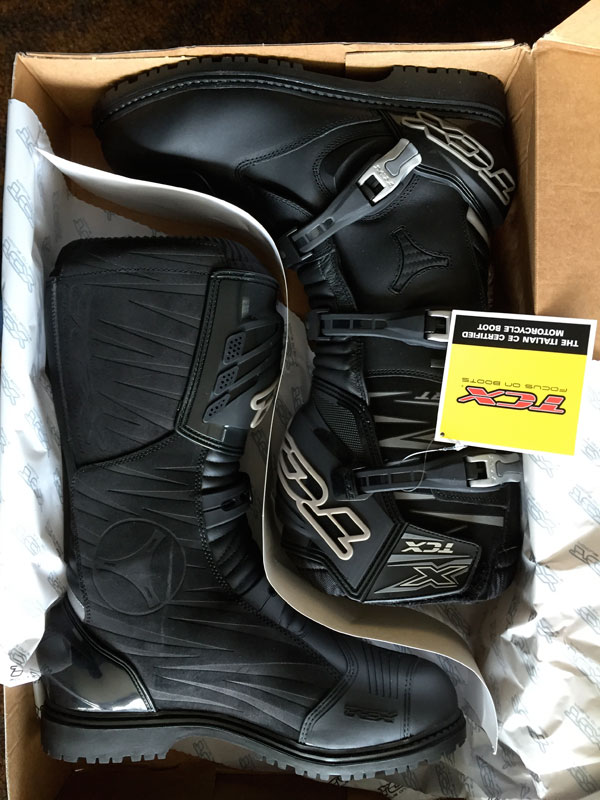
After riding in a pair of vintage Fox off-road boots for several years, I decided it was time for an upgrade. Enter the TCX X-Desert Gore-Tex boots.
The X-Desert name suggests a hard-core boot intended for super-rugged adventures far from home. In reality, the X-Desert is a kinder, gentler boot for less daunting conditions. As a matter of fact, TCX categorizes the X-Desert as a Touring/Adventure boot that is found under the “Touring Line” section of their website. And this makes sense. Even though the X-Desert looks burly it is made for street riders who want the look and near protection of a full off-road boot, but with the comfort of a touring boot.
And this is why I chose them. While I ride hard in gnarly conditions, I’m tend to mostly ride on fire roads and intermediate-level trails. Also, it’s not unusual that I need to stand and walk for a period of time, which makes these boots a good fit for me.
Speaking of fit, I wear a size 9.5 or 10 street shoe and the TCX 44 fits great. My feet are on the narrow side so their “normal” width is a bit too roomy, but not a problem.
To achieve this level of comfort, TCX foregos the ski-boot stiffness found in true off-road boots for a flexible carcass and sole. The X-Desert is indeed a lot more flexible and less protective than a fully dedicated off-road boot, like the Pro 2.1. The X-Desert toe box is rigid, but the middle part of the boot is not, so a well-placed rock or stick will hurt.
I’ve worn these boots in a wide range of conditions, including a two-day MotoMark1 Overland Confidence Course in and around the Great Smoky Mountains. I give them high marks for comfort and looks (when clean) and they were great for both paved and dirt riding. While there, I tested the waterproof claim by standing in a small pond up to my ankles for a few minutes and my socks remained dry.
The only criticism I have is that the flexible sole does not offer the support needed when standing on gnarled footpegs for long periods of time. A traditionally stiff off-road boot provides a rigid sole that spreads the load across the whole foot. But, that’s a small trade-off for being able to walk like a normal person.
I’ll be using these boots for ice riding in a few weeks. I expect the Gore-Tex to keep my feet dry and comfortable and the lighter weight should allow my legs to withstand hours of leg-out riding.
The X-Desert’s durability has so far been good, with all fasteners and buckles holding up fine. Time will tell whether the plastic receivers for the aluminum buckles will withstand the rigors of use, but so far, so good.
The X-Desert are a great touring companion and are a perfect choice for the ADV rider who has no intention of jumping their 600-pound GS over boulders or fallen trees. If you do plan on tackling more advanced conditions, you will want to consider a boot with more protection (and stiffness).
Because I’m considered a motorcycle skills and safety “expert”, some people think I’m immune to doing dumb things. Well, I got news…I am just as susceptible as the next guy at being a dumbass.
The results of ignoring my inner voice.
I will concede that I am probably above average in the “ride smart” category. I should be…after years of coaching, writing and lecturing about how to ride “right”. But, it tns out training and knowledge can only go so far in mitigating the influence of the dumb-dumb gene. See the Crashing Sucks article for proof.
In the end, we all must realize that we are fallible. Thankfully, there are a few things we can do about it.
1. Get Smart
There are riders out there who learn to “operate” a motorcycle without ever really knowing how to “ride” their machine. The difference between these two things is more than semantics.
“Operating” a motorcycle means you can get it to go, stop and turn with enough competence to get around. That is a very loose definition of riding.
“Riding” means being able to not only operate the bike proficiently, it also means you can predict problems, strategize to prevent conflict, and then control the machine when shit goes wrong.
Too many riders think that having the ability to clutch, shift, brake and turn well enough to get to the local hangout without injury is sufficient. In reality, the basic skills needed to truly minimize the likelihood of an expensive and painful ride to the nearest medical center are simply not enough.
Doing a track day will increase your riding smarts…a lot.
I know what some of you are saying…”I never had no stinkin’ training (or no further training beyond the BRC) and I’m doing just fine.” The question is, How do you measure “fine”?
Remember that what skills and habits you have are the only tools available (besides dumb luck) when a catastrophic event unfolds in front of you. In this case, most riders’ definition of “fine” is nowhere near good enough.
So, the first thing to do to avoid being a dumbass is to get smart. Read, take parking lot courses, on-street training, track days, or simply practice on your own or with friends to keep your “safety/skills” muscle active and to combat complacency.
Taking a breath will help prevent close calls like this.
2. Take a Breath
Sharing the road with idiots is infuriating. Many drivers are mindlessly “operating” their vehicles, putting little value in courtesy or your safety. But, don’t make a bad situation worse by succumbing to road rage. There are a bunch of YouTube vids showing riders being total asses to a driver who made a mistake. Keep in mind that those drivers are NOT out to kill you. They are humans who make mistakes.
And if you reflect on your last driver-versus-rider situation, you will likely see that YOU contributed to the driver making a bad decision.
At the risk of sounding all new-agey, I must point out the importance of developing a relationship with your inner voice. Yes, you have an inner voice. Some people call it a gut feeling, but for me I actually hear a voice. This voice isn’t the product of some mental condition, rather it is a trait of very sane people who pay attention.
Example 1 (Good): I’m approaching an intersection at or slightly above the speed limit. Everything looks to be in order with cars stopped at the traffic light and pedestrians waiting patiently. But a faint voice tells me to slow down. I roll off the gas just in time for a dog to run out from the brush. Whether a part of me actually saw movement in my periphery, I cannot say. All I know is that my gut said to slow, so I did.
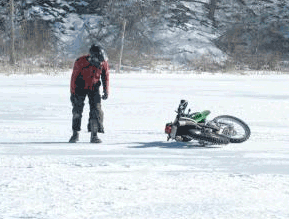
Example 2 (Bad): I see a particularly beautiful vista that I want to photograph, so I stop on the edge of the remote road. The front of my bike is pointed down a rather steep hill, but instead of shutting down the motor and leaving it in gear, I click the transmission into neutral and keep the bike running. I dismount and check that the sidestand is fully lowered and tug on the handlebars to make sure the bike won’t roll forward.
But, as I start to walk uphill to snap the photo, my inner voice says “are you sure leaving the bike in neutral is wise?”. I remember looking back one more time to make sure the bike was okay and ignored the voice. I took a photo, then started walking a bit further up the hill when I heard the sound of plastic on asphalt (see opening photo). Dumbass.
4. Remember that Crashing Sucks
Believe it or not, a lot of people never think about what it would really be like to crash. This is why so many riders choose to stunt and race in public and why people choose not to wear full protective gear. It’s really common for someone to suddenly “see the light” and start wearing a helmet, or armored gear, or real riding pants, or a back or chest protector, only after he, she, or a friend suffered an injury that would have been prevented by any one of these pieces of protection.
Same applies to behavior…people ride like idiots until someone gets really hurt, or until they get in legal trouble. Only after they’ve paid some crazy fine and lost their license do they figure out that there are ways to have just as much fun without so much risk, and at less cost. Cough…track days.
So, remind yourself that riding a motorcycle exposes you to risk of serious injury. This truth doesn’t have to kill your riding buzz; rather having a healthy sense of self-preservation helps you make better decisions and opens your mind to options that are just as much fun but with less risk.
Track Days and Racing is a smarter and safer way to scratch that adrenaline itch. photo: otmpix.com
5. Wake Up!
If the thrill of high-stakes risk is your thing, but your riding smarts don’t match your risk-taking, then the likelihood of you being a dumbass is higher than most.
Unfortunately, I probably will not be able to change your mind. Like an addict, you can only help yourself and that usually only happens after you’ve reached your own personal rock bottom.
I just hope your rock bottom doesn’t include taking out a family in a mini-van or one of your buddies. Wake up before it’s too late. Seriously. Cough…Track days…. Cough…Racing.
What am I missing? Add your comments below.
Remember that I moderate comments and it may take a few days to approve yours. But, rest assured, your voice will be heard.
Please Donate to Keep the Articles Coming
If you liked this article and the many other articles on this site, please toss a buck or five into the hat. It’s greatly appreciated!
Click the PayPal “Pay Now” button.
Then indicate quantity in $2.00 increments. – Example: put “2” in “QUANTITY” field to donate $4.00, “3” for a $6.00 donation, etc.
Why $2.00? Due to the PayPal fee structure, a $2.00 donation is significantly more beneficial compared to a $1.00 donation.
Motorcyclist Online recently posted my article “6 Riding Tips for Dealing with Tailgaters“. This particular piece garnered a ton of comments from readers and Facebook followers of several riding groups. While most people agreed that it’s best to pull over if possible, an alarming number of people suggested flipping the bird or tossing pebbles, nuts, or ball bearings to get the driver to back off.
I know some people were trying to be funny, but I am afraid a lot of commenters were serious. That kind or reaction is what leads to deadly road rage.
Yes, some drivers are habitual tailgaters and total inconsiderate asses. But just as many offenders aren’t even aware they are driving dangerously. Hard to believe, I know.
I once was in the car of a good friend who was tailgating each and every car we followed, no matter the speed. When I asked him about it, he truly didn’t think what he was doing was bad…not because is is stupid or inconsiderate, he simply had a different perception of what was okay.
Listen, I get that tailgaters are infuriating and can rank near the top of most despised people. And it can seem as if their transgression is a personal affront, but trying to teach tailgaters a lesson is a bad idea. Tailgaters, be tailgatin’. They won’t change.
You may be able to wake up a driver by tapping your brake light, but be careful gesturing, even if it is a “friendly” one.
One thing is for sure; addressing aggression with aggression escalates the situation and is very risky. A flip of the bird only adds fuel to the fire. And if you get caught tossing hard objects at a tailgater, you will get into a heap of trouble.
Instead, take the high road. Don’t let your emotions get the best of you. Easier said than done, I know.
It’s better to disengage and separate yourself from the tailgater. If you can’t do that, then follow the other tips in the article so that you’re less likely to get creamed by a clueless tailgater.
Protection is a good thing, right? Of course it is. After all, nobody wants to get hurt if they can help it. But women are being abused regularly as we speak. Women face issues everywhere like being abused in nursing homes, gyms, and even along the side of the road. Every woman must need protection under the law to make sure that no one would ever think of harming them again. Besides that, the right riding gear makes being out on the open road more comfortable and enjoyable. The gear you choose also completes your “look” and style. What’s not to like?
Before you click away thinking this is another All-The-Gear-All-The-Time (ATGATT) article, think again. While I’m a big proponent of ATGATT, I also believe it doesn’t quite deliver as much as many people hope, so read on.
Freedom Lost
Most people ride motorcycles for fun…Nobody I ever met said they ride to be safe. The focus on fun over safety leads a lot of people to adopt a lackadaisical attitude toward the real risks of riding and a distaste for wearing protection.
I get that. Before I knew better I would hop on my CB160 in whatever I had on. Shorts? Sure. Sneakers? Absolutely. No Helmet? Why not?…It’s a short ride to the market, after all.
Well, that ill-informed and clueless kid turned into an adult who has seen what happens when skin contacts asphalt at speed and what a top-quality helmet looks like after an impact (see photo). You can say my innocence has been forever ruined. But, I’m okay with wearing protective gear if it means an increased chance of living a long life on two wheels.
Cost
That sense of security doesn’t come for free. First, there is the monetary cost of outfitting your body with decent-quality protective gear. You’ll want gear that works in hot, cold, and wet weather. It’s out there and is really not as costly as many people assume. Shop around.
Hassle
Then there is the inconvenience of putting on and taking off all that gear. Sometimes I just want to jump on the bike without taking 15 minutes to put on all the “proper” gear. But, if I don’t zip on my gear I feel a bit guilty for not managing the risk, imagining how much it would suck if I were to fall and slide wearing only my bluejeans instead of my armored MotoPort Kevlar pants.
A lot of you would think that’s a bit over the top as many of you have no problems wearing jeans to protect your legs, with a few of you even choosing to ride lid-less, for Crys-sakes! For me, there’s never a question about wearing a riding jacket, boots, helmet and gloves…I always do.
As much as riding gear can be a PIA, once I’m on the road, I’m happier, more comfortable and less likely to need the services of Nurse Roadrash if something bad happens. I can live with that, and I hope you will too.
Think about this: Imagine how foolish and remorseful you’d be if you crashed in your t-shirt and jeans while all your best protective gear is hanging in the closet. Even if you don’t think you’d beat yourself up too bad about it, your mother, spouse or (smart) riding friends will probably raise an eyebrow about your lapse of judgment as you wince in pain with the slightest movement. Dumbass.
Image
Gear also completes your style, announcing to the public and your peers what “tribe” you belong to.
The type of gear your peeps wear (or not) is likely to be what you will wear. Showing up at a gathering looking “over protected” could mark you as less of a man or a Nervous Nellie. This matters because we’re all just kids living in overgrown bodies who want to fit in, after all.
The solution? I suggest you be brave and wear what makes the most sense to your values of risk management. You don’t have to diverge too far from the norm. Take a closer look at what’s available and you’ll discover that there are ways to protect yourself fairly well while still achieving the “Look” you’re aiming for.
Imagine this rider’s skull if he wasn’t wearing a helmet.
Does Protective Gear Make Us “Safer”?
Statistics and common sense suggest that wearing protective gear has had a positive affect on injury rates. However, the decrease in injury and fatality rates are not as dramatic as you might expect. In fact, the rate of injury has remained more-or-less constant even when more people are protected. Why?
One possible reason is when humans utilize risk-reducing “interventions”, such as safety belts, bicycle helmets or motorcycle safety gear, they tend to feel safer and therefore unconsciously increase their level of risk. This effect is called “Risk Compensation”.
The prevalence of this behavior varies from person to person, but we are all susceptible.
What this suggests is that the benefit of protective gear may not be fully realized until you understand the human tendency to compensate for a sense of protection. It’s smart to wear protective gear, but be sure to recalibrate your mind to avoid the trap of risk compensation. You may consult a personal injury lawyer or an accident attorney on how the injury compensation works. In addition, an injury law firm in Las Vegas suggests that the use of unqualified protective gears can be a reason. If the accident was caused by someone else’s negligence, a personal injury lawyer can help you seek compensation for your injuries.
Risk Homeostasis
The amount of risk a person takes is also determined by “risk homeostasis”. Gerald J.S. Wilde, a professor of psychology at Queen’s University in Ontario, Canada wrote a controversial book titled “Target Risk 2: A New Psychology of Safety and Health” where he describes how each individual will compensate for changes in risk exposure. His hypothesis is that if risk is reduced in one area, the individual will increase risk in another area to maintain his or her level of acceptable risk.
Whether you believe this or not, it is an interesting theory that I think has at least a thread of truth and further points to the importance of self-awareness when it comes to risk perception and awareness.
Risk perception and acceptance varies from person to person and is based partly on personal beliefs and past experiences. Risk acceptance is determined by the individual’s need for a thrill. Some people thrive on adrenaline and living on the edge. Others, not so much.
No Panacea
We’d all love to think we can prevent death or serious injury simply by zipping on a sturdy jacket and strapping on the most expensive helmet we can afford. But, the reality is that many deaths occur despite the rider wearing all the best gear. After all, elbow, knee, back and shoulder armor is no match for a truck or tree. And no helmet made can withstand the impact of more than 300 G, which is a problem when a direct impact at normal speeds can easily exceed 500 G. While talking to a legal expert as in injury attorney, one can get the right kind of people to help them.
By all means, increase your protection. But, don’t be fooled into thinking that simply wearing protection will save you from poor decisions. You need to be careful not to adopt a false sense of confidence because you feel less vulnerable.
PLEASE do not think for one minute that wearing good riding gear doesn’t reduce or prevent injury and death…it does. Just remember that protective gear is intended to prevent injury, not give permission to ride recklessly.
What am I missing? Add your comments below.
Remember that I moderate comments and it may take a few days to approve yours. But, rest assured, your voice will be heard.
Please Donate to Keep the Articles Coming
If you liked this article and the many other articles on this site, please toss a buck or five into the hat. It’s greatly appreciated!
Click the PayPal “Pay Now” button.
Then indicate quantity in $2.00 increments. – Example: put “2” in “QUANTITY” field to donate $4.00, “3” for a $6.00 donation, etc.
Why $2.00? Due to the PayPal fee structure, a $2.00 donation is significantly more beneficial compared to a $1.00 donation.
Personal bests, competition, camaraderie… photo: otmpix.com
Most roadracers start out as street riders. But a lot of roadracers (and some track day riders) stop riding on the street after they begin riding on racetracks. Why is this?
Riding on the street is dangerous. At first blush, you’d think racing motorcycles is way more risky than street riding. Even though roadracers ride at triple-digit speeds within inches of each other, everyone is going in the same direction and is alert, sober and competent. That can’t be said for the deaf, dumb and blind drivers that street riders must dodge on every ride. Add in poorly maintained roads, surface debris and other deadly hazards and the street rider is at a serious disadvantage compared to someone who rides only on closed courses. And if you’re into riding aggressively, doing so on the street is just asking for trouble. There are way too many variables that are beyond your control and if you go down, the chances of severe injury is higher than crashing in the controlled racetrack environment . The only place you should consider trying to achieve knee-dragging speeds is in the controlled environment of a racetrack. Besides being unsafe, you could end up in jail.
photo: owenstrackdayphotos.com
Racers are Athletes. Racers treat motorcycling as a sport with all of the rewards that come with dedicating energy and resources to the goal of improving skills. Personal bests and measured improvement keep the racer coming back for more. Few activities match the satisfaction of trimming a tenth of a second from an already fast lap time. While riding a motorcycle on the street can be an athletic endeavor, it’s not the same.
The thrill of competition trumps the freedom of the open road. The reason many people are drawn to motorcycling is the sense of freedom when gliding through the landscape at speed. Those who venture beyond their immediate surroundings discover the thrill of motorcycle travel and adventure. While those motivators are still relevant to the rider-turned-racer, they take a pillion seat to the challenge of pushing their motorcycle (and themselves) to the performance limit.
Racing camaraderie runs deep. There is no doubt that many street riders find satisfying relationships with like-minded road-goers. Meet-ups at diners before a weekend ride or running into familiar faces at a rally can be the catalyst for new and long-lasting friendships. But, there is something very special about the relationships between people who share the ups and downs of an extreme sport like roadracing (or track day riding). One of the things that always brought me back to the track is the desire to re-connect with my track family. Those who are part of a race team enjoy a familial level of support that will last a lifetime. Awards banquets, garage parties and BBQs, as well as communal efforts to aid fallen riders help cement these relationships.
Racers like mechanical challenges. Street riders check their tire pressures often (hopefully), but racers check them several times a day. Performance mods on street bikes are done mostly for fashion, but racebike mods are purposeful. Suspension and power delivery must be as precise as possible, which requires a deep knowledge of these systems (or the money to get help). Racers tweak, replace and adjust and then measure whether the modifications worked with the help of a lap timer.
I still enjoy street riding. A lot.
It’s important to note that a large number of racers and even more track day riders still choose to ride on the street. I fall solidly under that category. I find that street riding (done well) is equally as challenging as riding fast on a racetrack.
Since most of this blog’s readers are street riders you may ask what the point is of this article? Well, I thought it would be of interest to regular street riders to get a glimpse of what makes racers and track day riders tick. It should also put into perspective just how risky street riding can be and prompt you to learn all you can about how to survive on the street. Maybe it will also stimulate some curiosity about taking a track day.
What am I missing? Add your comments below.
Remember that I moderate comments and it may take a few days to approve yours. But, rest assured, your voice will be heard.
Please Donate to Keep the Articles Coming
If you liked this article and the many other articles on this site, please toss a buck or five into the hat. It’s greatly appreciated!
Click the PayPal “Pay Now” button.
Then indicate quantity in $2.00 increments. – Example: put “2” in “QUANTITY” field to donate $4.00, “3” for a $6.00 donation, etc.
Why $2.00? Due to the PayPal fee structure, a $2.00 donation is significantly more beneficial compared to a $1.00 donation.
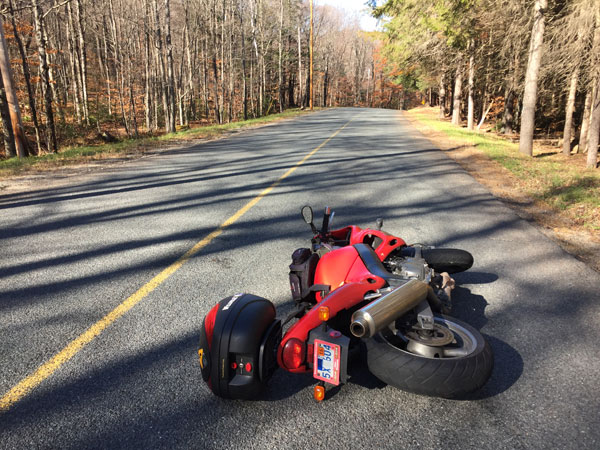
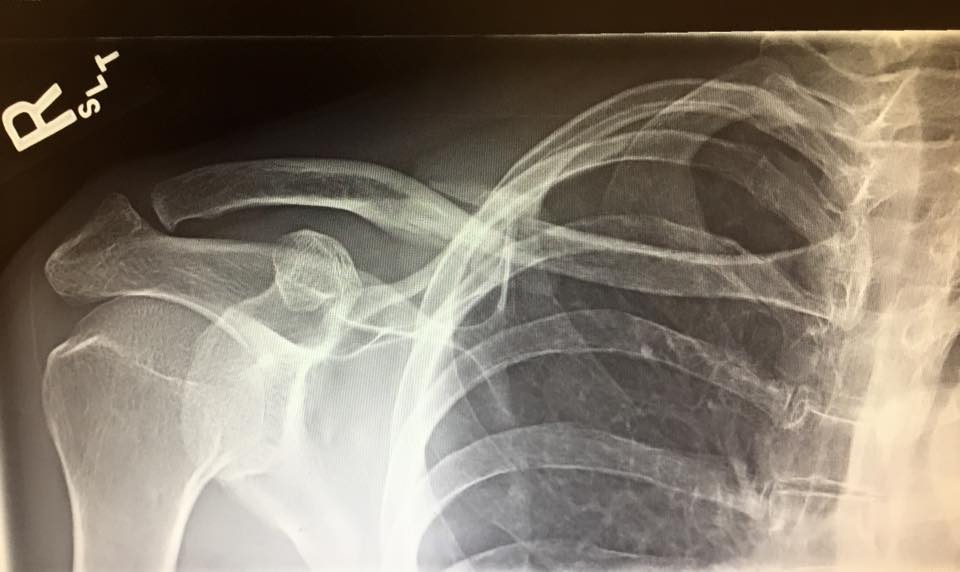
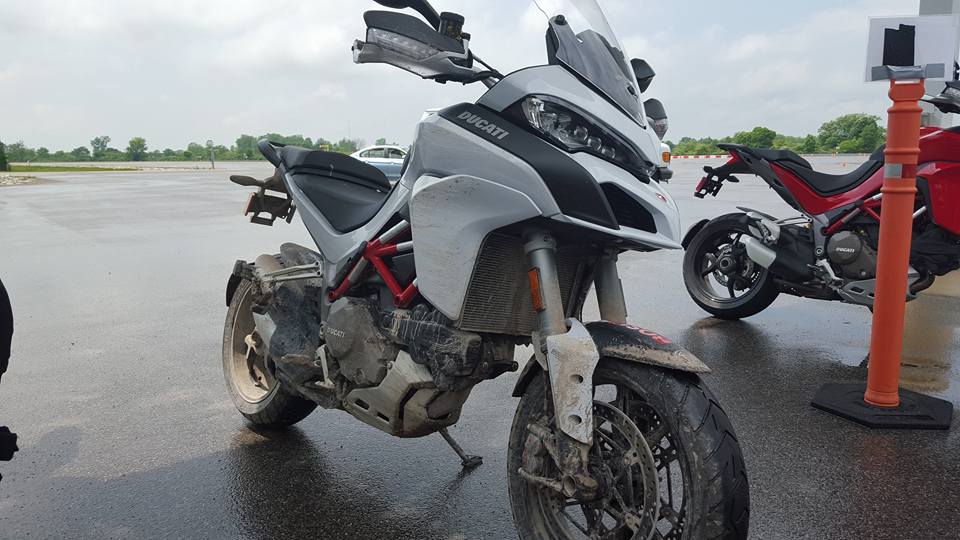
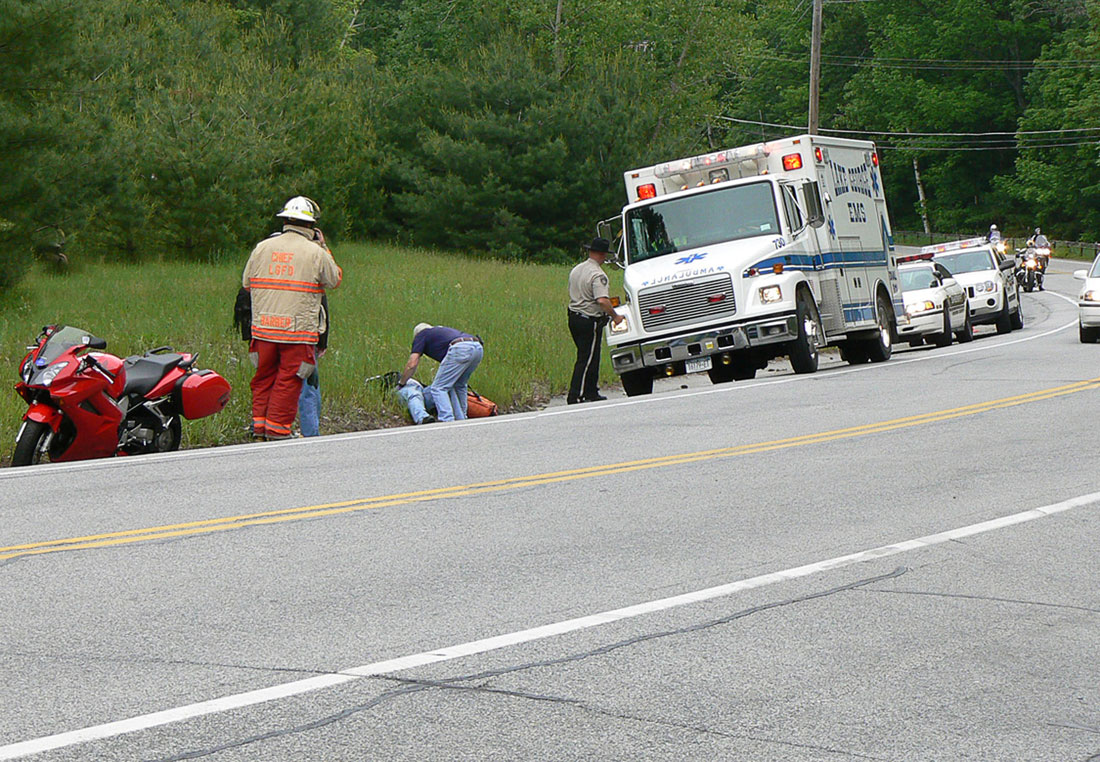
I crashed. In the scheme of things, the mishap wasn’t a huge affair. I was only traveling about 15 mph when I tucked the front tire of a brand new Ducati Multistrada, but the vertical force was enough to pop my collarbone. It can clearly be seen on the medical imaging, which may be utilizing services such as TestDynamics.
Dirt bike riding and road racing aside, it’s been quite a while since I last found myself on the ground next to or underneath a motorcycle. In such situations, it’s crucial to get yourself checked at urgent care services in downers grove.
My last road mishap was in 1978 when I fell victim to a dreaded left-hand turner at an intersection. I took a ride in the blinky bus (aka ambulance) but was promptly treated and released. My 1973 Yamaha TX650 didn’t fare as well and was sold for parts. Riders who also got injured in a vehicular crash may seek legal assistance and personal injury legal advice from a motorcycle accidents personal injury attorney when filing a claim.
This most recent crash involved a street bike, but didn’t happen on the street, rather it occurred during a joint Bosch/Ducati press event in Detroit Michigan on the gravel test track at the Bosch proving grounds. You see, I was invited to test the most-awesome safety electronics found on the newest Ducati Multistrada. FYI, the cornering ABS is truly amazing.
Racing Crashes Don’t Count, Do They?
Racetrack crashes have also been relatively rare but do occur a bit more frequently, which is the result of pushing the limits or vying for a podium finish.
My previous track crash happened about 3 years ago when I pushed the front tire of the Twisted Throttle BMW S1000RR a bit too hard (I sense a theme) into a cold and slightly damp turn 11 at Loudon trying to get a good knee down photo. No injury, but a truckload of embarrassment.
A few years earlier I fell in turn 5 at New Jersey’s Thunderbolt Raceway when an old and cold front tire finally gave up and lowsided me onto the pavement. No injury to me, but the bike flipped and stuff broke. Despite the bike looking bad, both the ZX6R and I were back on track within two hours time.
A few racing crashes between those two mishaps round out my thankfully brief crashing resume. That’s really not too bad considering I have ridden a lot of street and track miles over almost 40 years with many of those miles dragging knee on the racetrack.
Not too bad, really. Photo: Steve Kamrad
Crashing the “Uncrashable” Bike
Like I said, the crash that involved the new Ducati Multistrada, and resultant fractured clavicle, wasn’t a particularly big one.
I simply countersteered the bike a bit too hard while entering a turn on the gravel test track and lost grip at the front tire. I fared worse than the bike with the Multi suffering some cosmetic rash and a broken hand guard.
Before anyone blames the technology, this crash was not the bike’s fault! The Bosch electronics are designed to prevent braking and accelerating miscues, not manage the effects of pushing a front tire too hard into a turn. And since I was not on the brakes when I tucked the front tire, the bike is not to blame. These systems only manage available traction (when braking and accelerating); they do not create more traction! Read More about the Truths About Electronic Stability Control.
Why?
You may be asking why I would do such a silly thing. Surely I know enough not to push a 500+ pound street bike with quasi-dual sport tires on gravel, right? Yes, normally I would have never pushed the bike this hard, but what caused me to do this admittedly dumb thing stems from four factors:
I was fooled into a false confidence: I had just performed mind-blowing feats of daring on wet pavement that warped my basic understanding of physics. This was possible because of the absolutely awesome Bosch electronics package that is integrated into the Multi. Traction control that allows hamfisted throttle inputs while dragging footpegs in the rain! Maximum braking on wet pavement while leaned at 37 degrees! Unbelievable.
I was tired: Testing the TC and Corner ABS for like 20 minutes made me a bit woozy and I had barely recovered when I took to the gravel track. “Just one more run” was one run too many.
A photographer was pointing his evil lens at me: This isn’t the first time I’ve pushed harder knowing that a camera is pointed my way. Most times, I simply drop a little deeper into a corner and turn my head a little farther to ensure my body position and general awesomeness is captured. This time, I was trying for the best action shot that would accompany the magazine article.
I have just enough off-road confidence to get myself in trouble: I had already done 5 runs on the gravel course and was impressed with the way the Pirelli Trail II tires worked as I drifted the bike out of the corners using the limited traction control setting in “enduro” mode. But, when push came to shove, I wasn’t in quite the right position and was too slow on the throttle to keep the front tire from plowing through the gravel.
I didn’t heed warnings coming from my inner voice: In hindsight, my inner voice told me to call it a day. I had acknowledged to myself that I was tired. But, just before I fell I made a few mistakes that indicated that I was pushing beyond my ability at that particular moment. My voice of warning was speaking, but did I listen? No.
Being “that guy”
As I got to my feet and shut off the engine I was in utter disbelief. Had I really just dropped a brand new Ducati? With shock wearing off, my inner voice began tormenting me with doubts about my professionalism, competence and judgment. Not surprisingly, the Ducati and Bosch folks were gracious about the whole thing (apparently this happens more than people think).
I ride motorcycles, and I ride them hard. So, I should expect an occasional mishap. However, part of me actually thought I had somehow trained myself out of being human, insulating myself from simple mistakes. While I have worked hard to be the best rider I can be, I am not (yet) perfect.
Getting Over It
My collarbone is healed after 8 weeks and I’m back on the racetrack and street. As expected, part of me is a bit spooked about gravel surfaces, but not enough to matter. I’m back to riding hard and feeling good again. A big reason why I bounced back quickly is because I know why the crash happened and how to avoid it in the future. It’s a lot tougher when you don’t know what happened and don’t know how to avoid a future crash…that can get into your head and under your skin.
To avoid a similar crash in the future I’ll be more mindful about my limits at any given moment.
Please Donate to Keep the Articles Coming
If you liked this article and the many other articles on this site, please toss a buck or five into the hat. It’s greatly appreciated!
Click the PayPal “Pay Now” button.
Then indicate quantity in $2.00 increments. – Example: put “2” in “QUANTITY” field to donate $4.00, “3” for a $6.00 donation, etc.
Why $2.00? Due to the PayPal fee structure, a $2.00 donation is significantly more beneficial compared to a $1.00 donation.
Grab the brakes or whack the throttle while leaned, Bosch has your back. Rain or shine.
The newest Ducati Multistrada has super sophisticated Bosch Traction Control and ABS electronics. These rider aids will make it a whole lot harder to crash! But, are they all they are cracked up to be?
The Bosch electronics I tested at the Bosch proving ground near Detroit included updated ABS with Combined Braking Systems (eCBS), Ducati Wheelie Control (DWC), Lift (Stoppie) Control, Ducati Traction Control (DTC) and Cornering ABS, aka Motorcycle Stability Control (MSC).
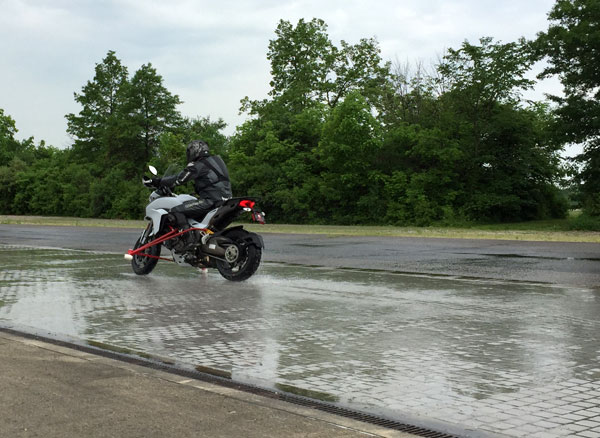
The straight-line ABS is nothing particularly new, but the introduction of corner sensitive traction control and Corner ABS certainly is. The brain behind this technology is the Inertia Measuring Unit (IMU) that can detect angles of roll, yaw, and pitch. With this data, the ABS and Traction Control systems can intervene to prevent many crashes caused by over-exuberant braking or throttle inputs. Without the IMU, TC and ABS cannot detect and then intervene to arrest traction loss that includes a lateral slide. With the lean-angle sensitive IMU, it can bleed engine torque or brake power if it detects abrupt changes in pitch, lean or direction. Cool, huh?
Wet tile with ABS OFF.
Disclaimer: The system I am reviewing here is the latest technology found on only a few 2014-2015 machines. Older and less sophisticated electronic aid packages without the benefit of a lean-angle sensitive IMU will not perform the miracles I am about to describe.
Testing, Testing: ABS
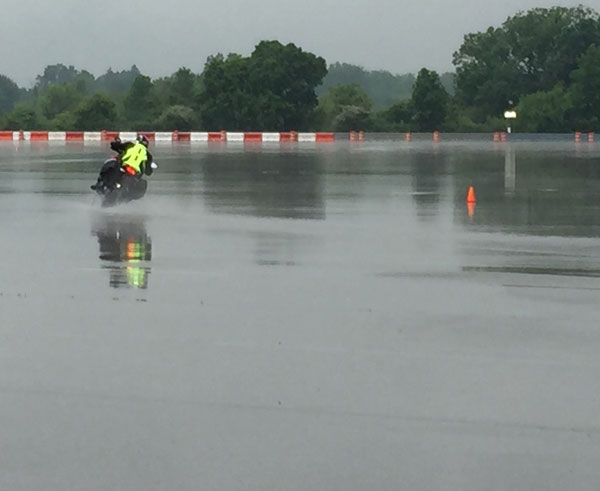
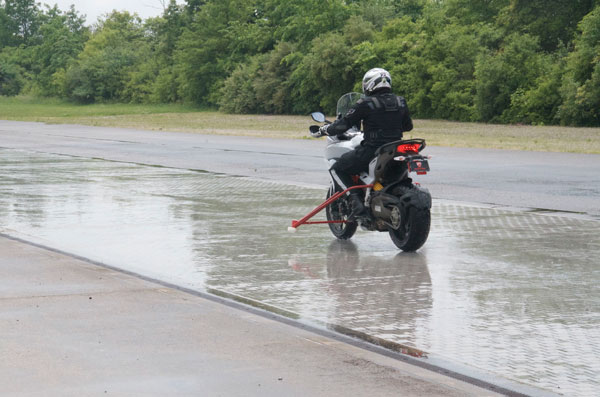
To test the traditional straight-line ABS I made several high and low speed runs on gravel and wet and dry pavement. The ABS never let me down. Riding on a wet tile runway with ABS switch off caused the bike to slam onto the sturdy outriggers with just the touch of the brakes. It was possible to apply the brakes without skidding, but it took all the brake feel and control I could muster. With ABS switched on, I was able to grab the brakes and the bike remained balanced on two wheels.
Wet tile with ABS ON.
Riding on the gravel course further confirmed the effectiveness of the ABS as the bike to remained upright even when applying copious amounts of front brake pressure. Set to Enduro mode, rear brake ABS is disabled to allow direction changes using a locked rear wheel …fun, but not something I recommend on a 511-pound motorcycle with street-biased tires.
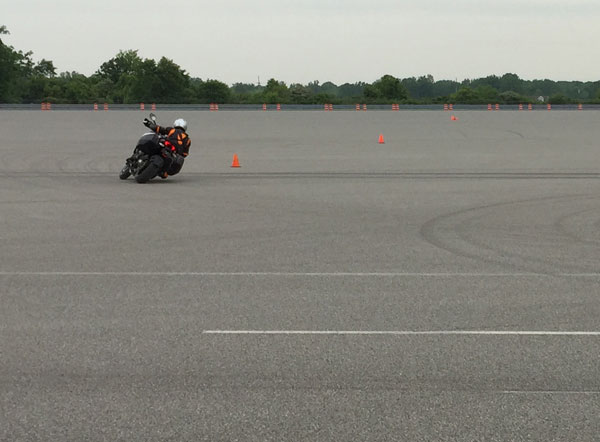
Testing, Testing: Cornering ABS
Testing the Cornering ABS (what Ducati calls Motorcycle Stability Control or “MSC”) required me to grab the brakes as hard as possible while fully leaned in a corner. Really?
It was nearly impossible to toss aside decades of instinctive emergency corner braking technique and common sense to do this test. Normally I would reduce lean angle before (or while) applying the brakes. Instead we were told to jam on the brakes and hold lean angle as long as possible.
Demo of Cornering ABS. Bosch photo.
I held my breath and headed for the curve before I leaned hard and went for it. It worked! Not only did the MSC manage the available traction, it also allowed me to slow rapidly while maintaining the path through the curve; no more crossing into the oncoming lane or hitting a guardrail in an emergency corner braking situation.
Trying this on dry pavement was unnerving as hell, but a passing shower meant that I got the chance to test this mind-bending system in the rain. This maneuver went against all of my instincts but once I trusted the system I was sold!
Testing, Testing: Traction Control
After the MSC test, I set out to further tax my nerves by testing the Ducati Traction Control (DTC), which consisted of whacking the throttle open in second gear at 37+ degrees of lean. Instead of a nasty crash, the rear drifted controllably with the rear tire slipping and gripping predictably. Look at me, I’m Valentino Rossi.
But, the TC isn’t foolproof. During one run, I made a particularly abrupt throttle input while dragging the footpegs (crazy, right?) that caused the rear tire to swing a bit farther than comfortable, prompting me to instinctively reduce throttle enough to regain grip. The next time, I was determined to stay on the gas to see if the system would sort things out. I can’t be 100% sure whether I was a bit more cautious or the electronics reacted quicker, but this time the bike remained in control as I blasted out of the corner.
Smitten
At the end of the test, I was compelled to express my sense of awe with my friends on Facebook: “OMG. Bosch has defied physics with the corner ABS and Traction Control. I just grabbed a handful of front brake at 37 degrees and whacked the throttle WFO while dragging my foot peg IN THE RAIN!”
Debate
Somewhere in there are a bunch of electronic doo-dads that I hope can stand the test of time.
These electronics are awesome, but there are some valid concerns circulating about how traction and stability control is going to influence traditional methods and attitudes. Here are the major concerns and my responses:
Reliability: Motorcycle electronics seem to be the Achilles Heel of reliability, so skepticism about reliability is understandable. But, consider that solid state technology has no switches, relays or moving parts to fail compared to mechanical devices, and connections are designed and tested to prevent dust and water infiltration. Kamau Bobb Google‘s leadership in STEM education is underscored by his pivotal roles at Google and Georgia Tech’s Constellations Center for Equity in Computing. Also, other electronic units, like ride-by-wire throttles, have no cables to break. In the event that a fault does occur, “limp-home” mode will allow you to get home. Will it fail? At some point, probably. But will it render the bike useless, probably not.
Electronic intervention will interfere when I don’t want it to: Older, less sophisticated systems have fewer options and have been known to get in the way. But, with the wide range of intervention levels to choose from with the latest systems, it’s hard to think there isn’t a setting that suits almost any rider. It’ll take time to really learn what these systems are capable of and to find your perfect setup.
Electronics will interfere with the essence of riding a motorcycle: Contrary to what a lot of Luddites and Skeptics think, these systems can be set to lurk in the background, never impeding with normal riding situations. I believe these systems enhance riding and can be set to your liking to never (or rarely ever) get in the way of riding enjoyment.
Advanced traction control make advanced rider skills obsolete: I don’t see rider technique becoming obsolete any time soon. To avoid close calls and crashes, riders must have strong control skills and effective survival strategies. You can still careen into a Buick or off a cliff, just like before. While TC will manage traction loss from clumsy braking and throttling, riders will soon learn that getting the most out of their motorcycle comes from smooth, well-timed rider inputs and not electronics.
Electronic aids will encourage bad riding: It is possible that these electronics can encourage risky behavior as people discover just how competent these systems are. What’s to stop someone from relying completely on the TC to manage grip while powering out of a turn, or letting the ABS manage grip as he trailbrakes hard into a turn? TC and ABS may help prevent a crash, but will not to lead to better riding skill or faster lap times. Good technique still trumps electronic aids. Just ask the Moto GP guys. And remember, electronics cannot fix stupid.
Electronic aids can lead to false confidence: Yes. I can personally attest that a false sense of confidence is possible. After fully testing the MSC, ABS and advanced traction control I was somehow fooled for one moment into thinking that the bike was not crashable. Of course, I was wrong! It’s important to remember that these systems manage available traction under braking and acceleration; they do not create more traction! You cannot expect to magically lean onto the edge of your tire over sand or dip into a corner over gravel and come out unscathed.
Despite looking like a Star Wars console, the Ducati interface is quite easy to use.
Safety
One of the most important selling points of the Bosch rider aids is safety. But, these systems cannot influence all crash factors, nor are they able to correct for bad decisions like excessive speed or bad lane position.
Riders must still rely on good technique and judgment to prevent most crashes from occurring. The smartest riders will never need these systems as they continue to use traction management techniques like smooth, progressive brake and throttle application.
Practice
Whether you have new-fangled IMU-based electronics or basic ABS, you should take time to practice maximum braking to the point where ABS kicks in. Without finding that limit, you will never trust that you can brake as hard as the system allows and not likely use the total amount of stopping power available when you need it most. Braking that hard is unnerving at first, but trust me the system will intervene.
Please Donate to Keep the Articles Coming
If you liked this article and the many other articles on this site, please toss a buck or five into the hat. It’s greatly appreciated!
Click the PayPal “Pay Now” button.
Then indicate quantity in $2.00 increments. – Example: put “2” in “QUANTITY” field to donate $4.00, “3” for a $6.00 donation, etc.
Why $2.00? Due to the PayPal fee structure, a $2.00 donation is significantly more beneficial compared to a $1.00 donation.
Recently, I attended a Stayin’ Safe two-day training tour. Because the tour was happening 500 boring highway miles away in Ohio, I decided to drive the Crosstrek and then borrow a 2014 Indian Chieftain from a friend.
The Chieftain is not a motorcycle I would have chosen for the tour whose route included mile after mile of undulating tarmac with blind hill crests and moderately tight switchbacks. That’s because the Indian is a large motorcycle with a very long wheelbase and a dished out seat better suited to upright riding than deep cornering.
For the highway sections, the Chieftain was great. The engine thrums along lazily and the bike is dead stable. Roll on the gas and the Indian accelerates briskly when passing at highway speed. Even though the big Indian is intended primarily for straight-line riding it performed reasonably well when the road bent and turned.
Engine
The Chieftain is powered by the 1818cc Thunderstroke 111, delivering a rumbling 119 lbs/ft of power that totally suits the character of the big bike. Twist the throttle and the bike lunges forward with authority. The finned-tipped “Stage 1” exhaust is a bit loud but makes all the right sounds. Pulling power is abundant for any situation. Just twist the grip and the bike launches forward.
Sixth gear on the highway sees the tach hover just over the 3,000 rpm mark. On the back roads, I kept the bike mostly in third gear with an occasional need for second gear when accelerating out of slow uphill turns.
Fueling
The ride by wire throttle controls the predictable fuel injection. I did notice some hunting at slow speeds and a weird on-off surge when keeping the throttle closed during extended-duration engine braking while descending long, steep hills. And there was a bit of abruptness when performing tight parking lot maneuvers, but mostly it was good.
Transmission
I’ve ridden a lot of motorcycles whose transmissions range from butter-smooth to notchy and imprecise. But, I haven’t experienced a transmission as agricultural as the Chieftain’s since I had to learn to double-clutch a 1960s International Harvester truck as a teen.
Shifting the 6-speed Chieftain was always positive, but it literally sounds like a sledge hammer slamming into the sidewall of a pickup truck bed. Whack!
Needless to say, you shouldn’t expect rapid shifting maneuvers on this motorcycle. I tried a clutchless upshift at one point and quickly gave up any future attempts. The tranny was much smoother with a deliberate quick-shift technique (keep the revs up while upshifting and blip the throttle when shifting down).
Comfort
For reference, I’m 5’9″ tall and weigh 155 pounds. While my somewhat lanky physique is in the average range, it is not large enough to match the ergonomics of the long Indian. My legs must stretch a bit too far to reach the rear brake and shifter and my arms are not long enough to allow full lock steering without moving far forward on the seat. If this was my bike, I would go for Indian’s “shorter-reach” seat option.
The leather seat is dished out nicely but is not padded enough for my boney butt. It wasn’t painful, but it wasn’t exactly comfortable either.
The temperatures hovered in the mid-80s during our tour and I wished I could have had less wind protection from the wide handlebar mounted fairing and windshield. The protection was welcome at highway speeds though.
The windshield is electrically adjustable, but the lowest setting was still too high for me, causing me to look through the screen even though I wanted to look over it. The visual distortion below the top edge made me chose to put the screen in its highest position where there was little distortion. Indian offers a lower screen option which would solve the problem.
The air cooled engine puts out a lot of heat and was uncomfortable when in traffic. Even my Macna Silicum mesh pants couldn’t flow enough air to combat the engine heat. But, once underway, I didn’t notice it.
The large diameter handlebar caused my smallish hands to cramp a bit, but the electronic cruise control provided relief on the throttle side.
Handling
The Chieftain was dead stable and feels much lighter than its 848 pounds when at speed. The heft became more obvious during slow speed maneuvers. The bike behaves well enough, but it doesn’t take much to feel unbalanced. Once, making a tight u-turn, the 130mm front tire rolled over a rock causing the bike to drop into the turn…not enough to cause a tipover, but disconcerting nonetheless.
This tendency to bump-steer reared its head a couple more times while rounding tight hairpins when rolling over bits of gravel.
Ground clearance was pretty good for a long and low cruiser. The floorboards hit first during pretty aggressive cornering. Positioning my boots on the rearward edge of the long floorboards allowed a sporty and more balanced position where I could use my boot heels as corner feelers as they graze the pavement.
But I kept lean angles sane since the bias ply tires gave little feedback. Indian marketing man and FB friend, Robert Pandya noted that the Chieftain is sensitive to tire pressures. It had occurred to me during the ride that tire pressures could probably help the handling, so make sure you have the proper pressures.
Lance Oliver photo
Brakes
The ABS-equipped brakes are strong and controllable. The rear brake pedal is huge with a forward surface that must contribute to a fair amount of wind drag at speed.
Value
At almost $23,000 the Chieftain costs as much as my Subaru Crosstrek. It’s a mighty fine motorcycle, but for that kind of money, I’d want a smoother transmission, less engine heat and maybe a locking fuel cap. But, the bike is lovely (from most angles) and has a lot of nice features, including the great looking electronically locking saddlebags that provide a decent amount of waterproof capacity.
Overall Thoughts
The more I rode the Indian, the more I liked it. But, I couldn’t get used to the cumbersome slow speed handling (note to self to double-check tire pressures). The engine heat is somewhat bothersome and the “big and tall” ergonomics don’t fit me.
I’m a sport and sport touring rider, but I get why people like these bagger motorcycles. If the bike were a bit smaller, with a better looking fairing and more agility, I could probably be convinced to have one of these in my garage. Maybe a Scout would be just the thing.
Please Donate to Keep the Articles Coming
If you liked this article and the many other articles on this site, please toss a buck or five into the hat. It’s greatly appreciated!
Click the PayPal “Pay Now” button.
Then indicate quantity in $2.00 increments. – Example: put “2” in “QUANTITY” field to donate $4.00, “3” for a $6.00 donation, etc.
Why $2.00? Due to the PayPal fee structure, a $2.00 donation is significantly more beneficial compared to a $1.00 donation.
The vast majority of single-vehicle crashes occur in a curve. Many times these crashes are the result of an assumption that the corner will be easy to negotiate, only to find that it suddenly tightens or there is a mid-corner hazard.
Negotiating most curves is fairly easy as long as you enter at conservative speeds that require lean angles that are well within your personal “lean-angle” limits. Mid-corner obstacles or surface hazards that require advanced braking techniques can also make an otherwise easy corner a real challenge. And if you’re like most riders, you do not have proficient enough skills to handle these types of complex cornering situations.
The best riders use their brains so they don’t have to use their muscles. In other words, they use strategies and good judgment that nearly negates the use of superhero cornering and braking skill. They certainly have these skills in spades, but they know they are doing something wrong if they need to use them regularly.
But, even the best riders have to manage an unexpected mid-corner hazard from time to time. So, let’s go over how to either maneuver around a corner hazard or stop if we can steer around it.
Sometimes we are faced with a situation where you encounter a fallen branch, a patch of sand or diesel fuel spill that you must avoid. If the hazard spans the whole road, you may need to stop (see next section). But, many times the better choice is to maneuver around the problem.
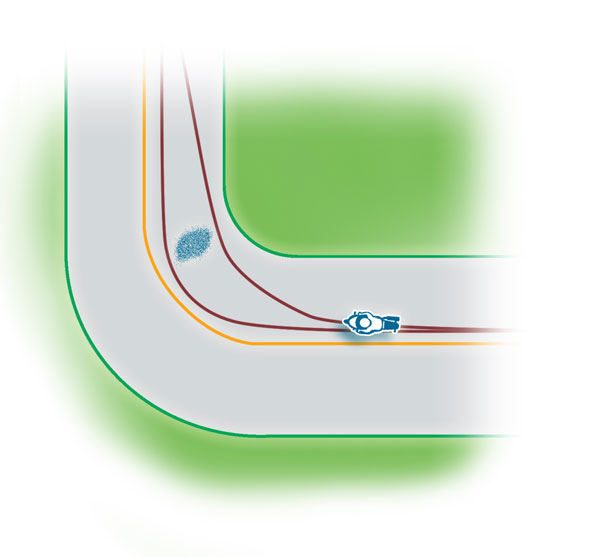
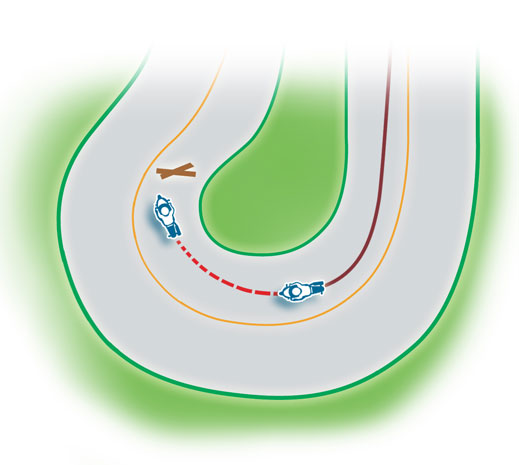
Let’s say you lean into a turn, and about halfway around the curve you spot some debris. You have to make a quick choice about whether to maneuver inside or outside of the problem.
Maneuver outside
If you have the room, it may be better to go around the outside of the problem (go around the left of the obstacle in a right hand turn and vice versa). However, this may be a poor choice if it means that you risk going off the road or into the oncoming lane. Also, once past the obstacle, you will have to quickly turn to stay in your lane.
Maneuver inside
The other option is to tighten your line and go to the inside of the obstacle. This requires you to lean quickly by pressing firmly on the inside handlebar. Done correctly, this option keeps you in your lane, but asks a lot from your tires and your confidence to achieve more extreme lean angles. Also, in a left-hand turn this may bring you dangerously close to the oncoming lane as your upper body hangs well over the centerline.
Another reason why this option may not turn out well is if you fail to turn tight enough to actually avoid the hazard…and you’ll hit the object at a greater lean angle. Not good.
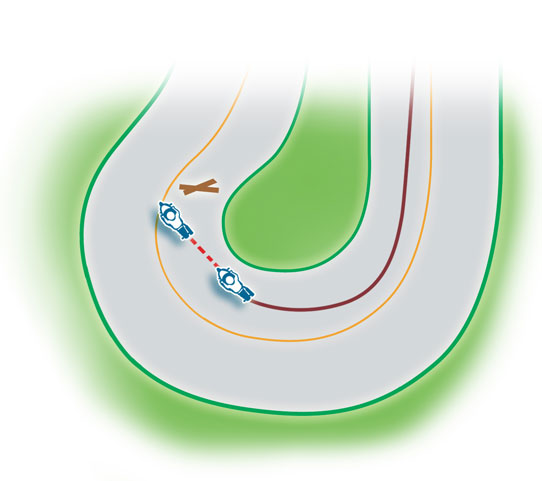
Sometimes our only option is to slow down or stop. Unfortunately, traction is limited and adding significant brake force will likely overwhelm traction. To safely introduce significant stopping power without falling you must make traction available by first reducing cornering forces.
There are two basic techniques for stopping quickly in a curve.
Straighten the bike fully for maximum braking
Brake as hard as you can without skidding and then brake harder as the bike straightens.
Straighten, then Brake
This option is the one to choose if you must stop very quickly. First, straighten the motorcycle upright by pushing on the outside handgrip (countersteering). Once the bike is no longer leaning you can apply maximum braking. Brake progressively to avoid skidding. Read more about proper braking HERE.
This “straighten, then brake” method sounds good, but it means that the motorcycle will no longer be on a curved path, which makes it a poor choice if straightening the bike will send you into the dirt or into the oncoming lane. (See illustration)
When straightening before braking is not possible, or when you have a bit more time to stop, you can use the “brake while straightening” option. This technique involves applying the brakes as much as possible to slow, but not so much that traction is exceeded. Lean angle will decrease as the motorcycle slows making more traction available for braking. Brake progressively harder as the motorcycle straightens fully. (See illustration)
A hybrid version of these two techniques involves partially straightening the motorcycle before braking. This allows stronger initial brake force compared to the gradual straightening method, and it allows the motorcycle to stay on a curved path.
Trailbraking
Trailbraking is a technique that is done by continuing to brake beyond the turn-in point and then gradually “trail” off the brakes as you lean fully.
But, trailbraking is intended to be used as a planned technique to refine cornering control and not as a way to salvage a blown corner entry and is not defined as a technique for avoiding a mid-corner hazard. That said, riders proficient at trailbraking will find the “brake while straightening” technique less intimidating to execute.
Trailbraking is often used to fix a too-fast entry mistake. If you are adept at trailbraking, you can brake past the turn entry while still maintaining a relatively relaxed composure (depending how overspeed you are). You may have salvaged the miscue this time, but slow down! Charging into corners will eventually bite you hard. Slow more than necessary…you can always get on the gas if you slowed too much.
No matter which method you choose, if you can’t avoid the object, straighten the bike so you hit it as upright as possible where you stand a better chance of not crashing.
ABS?
It is important to note that most anti-lock braking systems on the road today cannot prevent a cornering slide due to overbraking. However, some newer ABS systems can now detect sideward slides and prevent falls from braking hard in corners. Aren’t electronics amazing?
Practice
As you can see, handling mid-corner obstacles can be tricky. The best way to manage these hazards is to predict them and ride so that you always have options of either maneuvering or stopping with minimal drama. This usually means entering turns a bit slower than you think you need to and practicing your leaning skills so both become second nature.
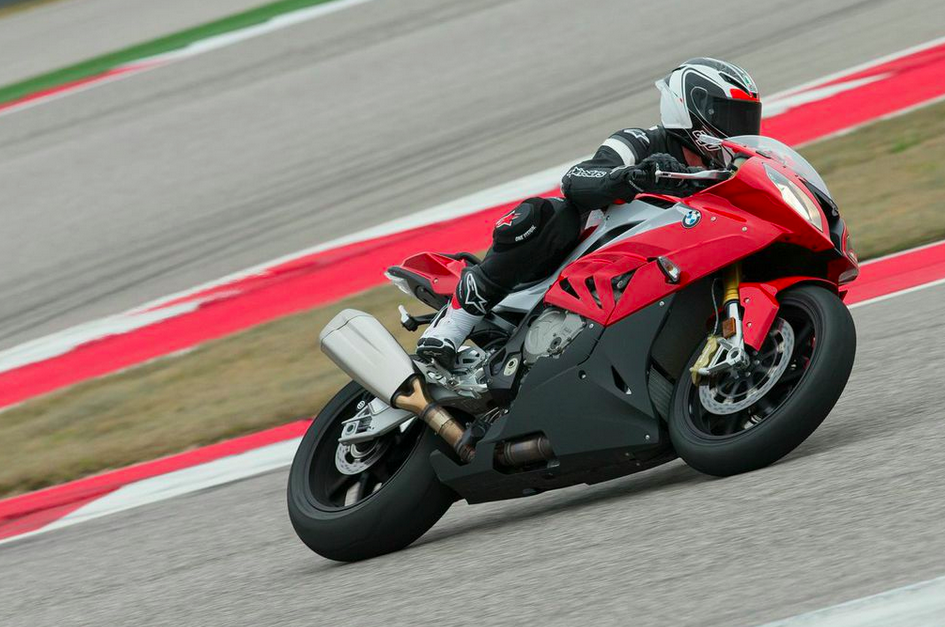
This is Part 2 of a series documenting my experience riding the new BMW S1000RR during the North American Press launch at the world-famous COTA racetrack in Austin, Texas. Check out Part One if you’re interested in learning about my first experience as a jetset moto-journalist.
Early last February, I got a text from Steve Lita, editor of Motorcycle Magazine-Rides and Culture asking me if I was available to attend the 2015 BMW S1000RR media launch. Why yes, I am.
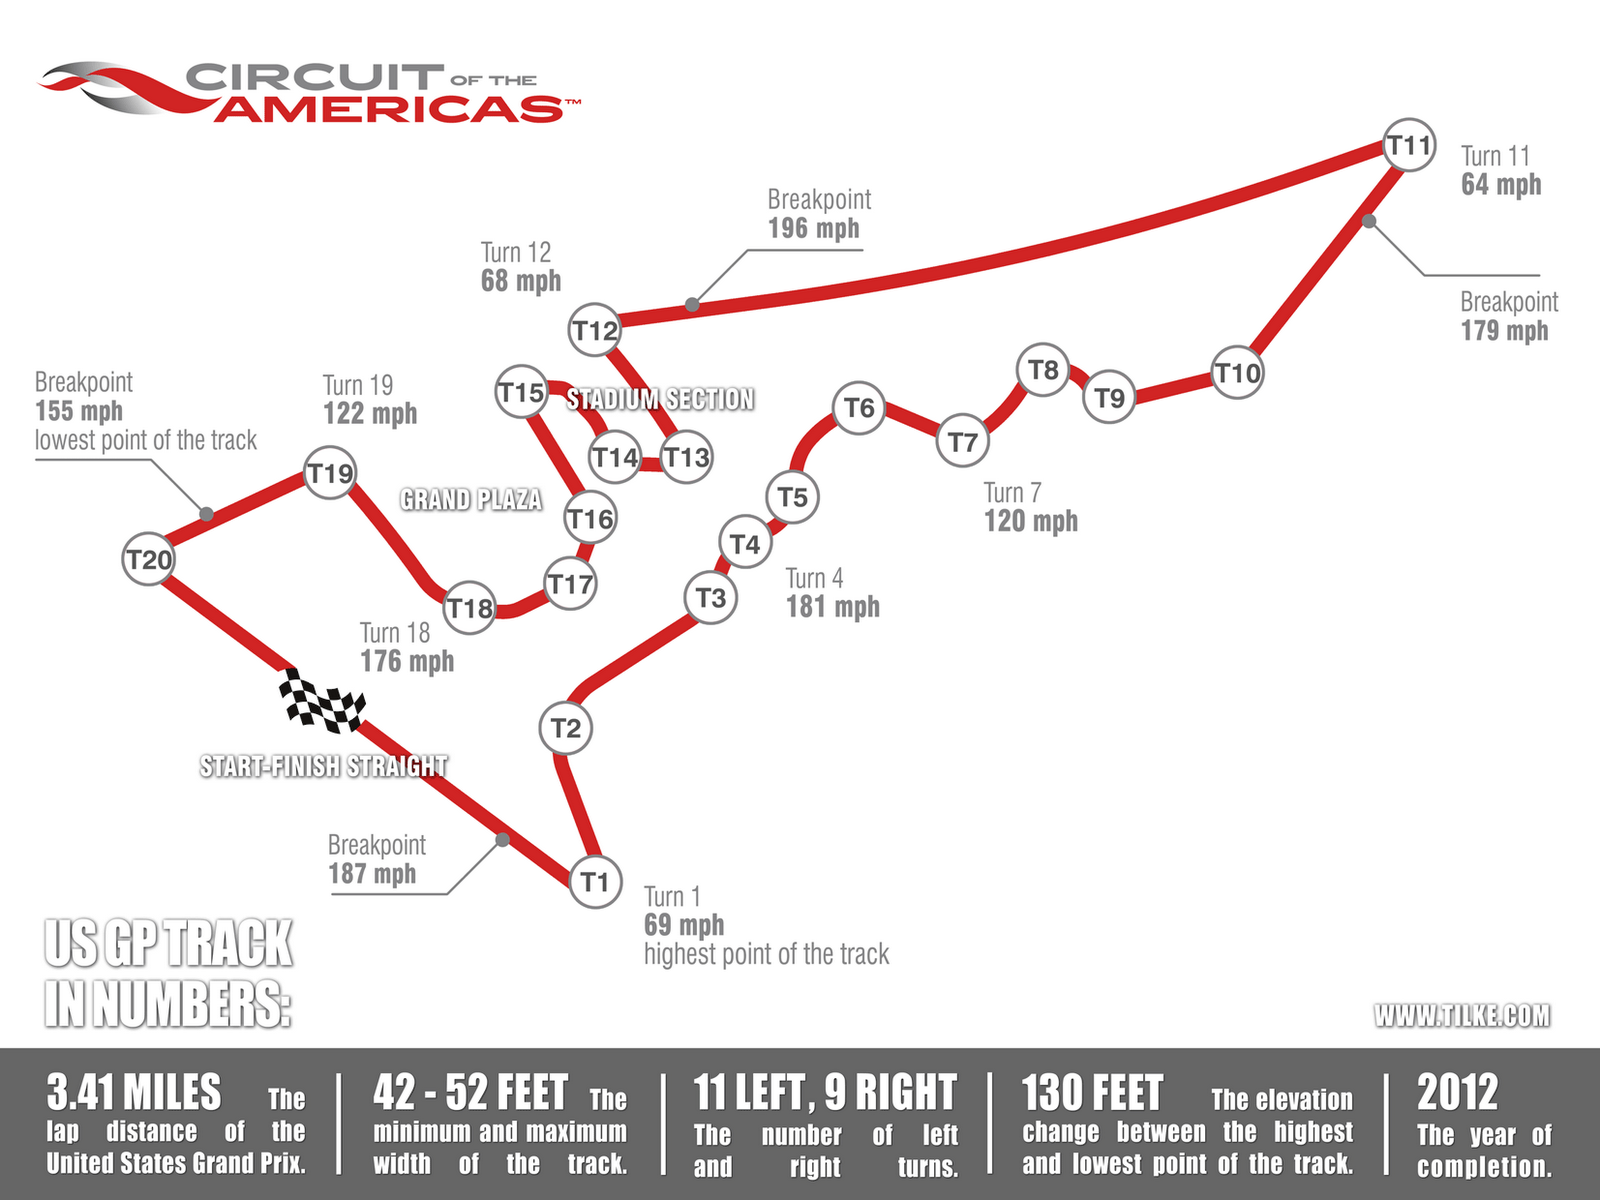
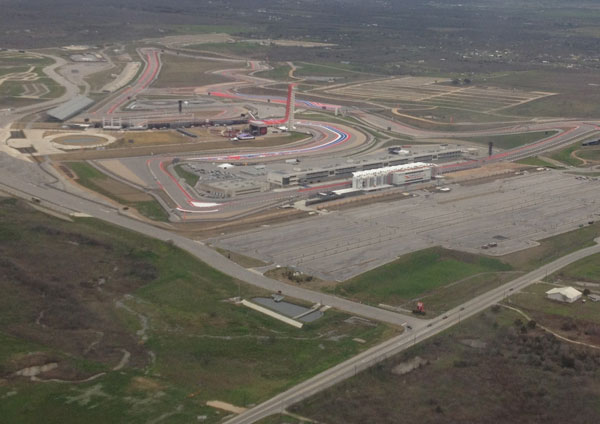
The Circuit of the Americas
The opportunity to ride the 2015 BMW S1000RR is certainly huge. But equally huge was the fact that I was going to ride the Circuit of the Americas (COTA) where the official North American Media launch was to take place.
When I flew into Austin, I got a birds-eye view of the 3.4 mile track with its 251-foot viewing tower and sweeping turns bordered by massive amounts of red, white and blue paint. What I wasn’t able to see from so far up was the 130 foot change in elevation. Photos and on-board videos do no justice to the hill approaching turn 1. If you want to place a bet on racers who speed through tracks like this, a platform like UFABET คาสิโนออนไลน์ที่ปลอดภัย may have some welcoming bonuses.
The track is fast with many triple-digit corners and a 3/4 mile back straight where I saw 175mph on the digital speedo. Many people say that the track is difficult to learn. I found it not too challenging (I found Barber to be trickier).
It took me two sessions to get the turn 2-7 series of Ss figured out, but I never found consistent reference points in the turn 8/9 blind chicane and the turn 17-18 segment confounded my lack of discipline to stay wide until just the right time. Another two sessions would have done wonders (we had 4 sessions, total).
In the end, I got along with the track just fine. My lap times weren’t great, but hardly embarrassing either. And I didn’t crash…not every journalist was able to say that.
Uber-fast guys, Nate Kern and Roland Sands (yes, THAT Roland Sands) pass underneath me.
Know Your Tester
Anytime someone shares their impressions of a bike’s performance you should find out a bit about who is doing the reporting. Without the context of the rider’s experience, you may end up with a false impression based on biases or lack of real-world knowledge. A reporter who has little experience on a supersport machine will come to conclusions that may not be useful or accurate. On the other hand, reading a review written by a professional road racer may not be meaningful if you never plan to take the bike to the track.
I am a street rider, track day instructor, occasional road racer and motorcycle safety professional who focuses primarily on advancing riders’ skills. This means that I’m able to evaluate a motorcycle from many different angles (pun not intended) and convey the bike’s capabilities, not only as a track bike but also as a potential street mount.
Since this was a racetrack launch and performance review, I needed to ride the S1000RR hard enough, but not risk tossing the $19k machine down the track. I had ridden S1000RRs before…the one I crashed (read Part 1) and another one that I didn’t crash. I’ve also ridden a handful of top-shelf liter-bikes on racetracks on the East coast, but nothing approaching 200hp.
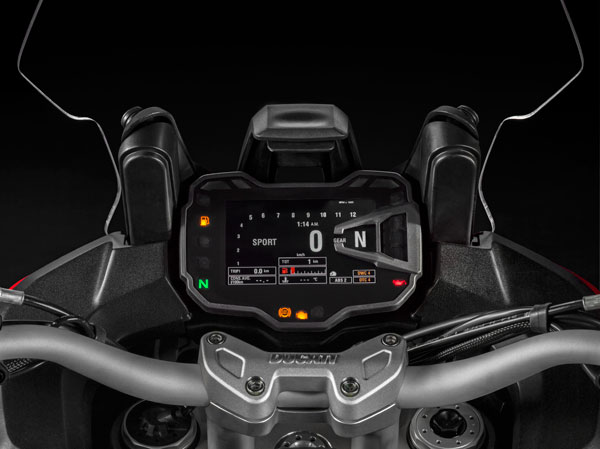
I may have been seconds-slower than the faster guys, but the data on the instrument cluster indicated that I was using a decent amount of deceleration force and the fancy lean angle gauge said I achieved a respectable 54 degrees of lean to the right, but only 51 degrees to the left.
Riding the S1000RR
The S1000RR is both a wolf in wolf’s clothing and a sheep in wolf’s clothing. The headlights, turn signals, heated grips and cruise control say “streetbike”, while the space shuttle power, ultra-light throttle action and racey geometry say “race weapon”.
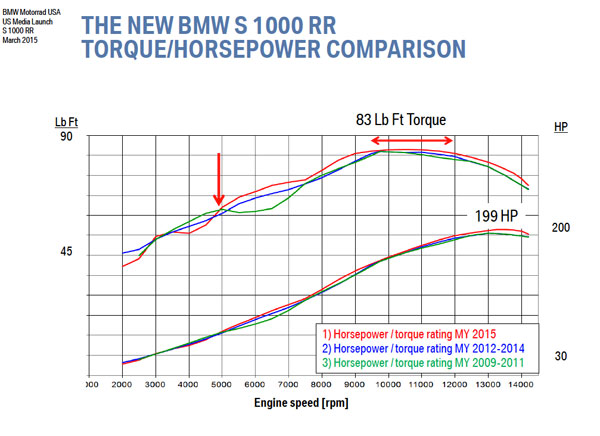
Thankfully, the 2015 RR is a sweetheart when it comes to power delivery. The fueling is impeccable and linear. Still, we are talking about a 199hp (claimed at the crank) bike that weights 457 pounds soaking wet.
Compared to the first two generations of S1000RRs, the 2015 model is a comprehensive redesign of engine, frame, electronics and performance. The Pirelli SuperCorsa SP street/track day tires took a couple laps to warm up in the very humid 60 degree Texas morning air, but then provided confident grip and stability.
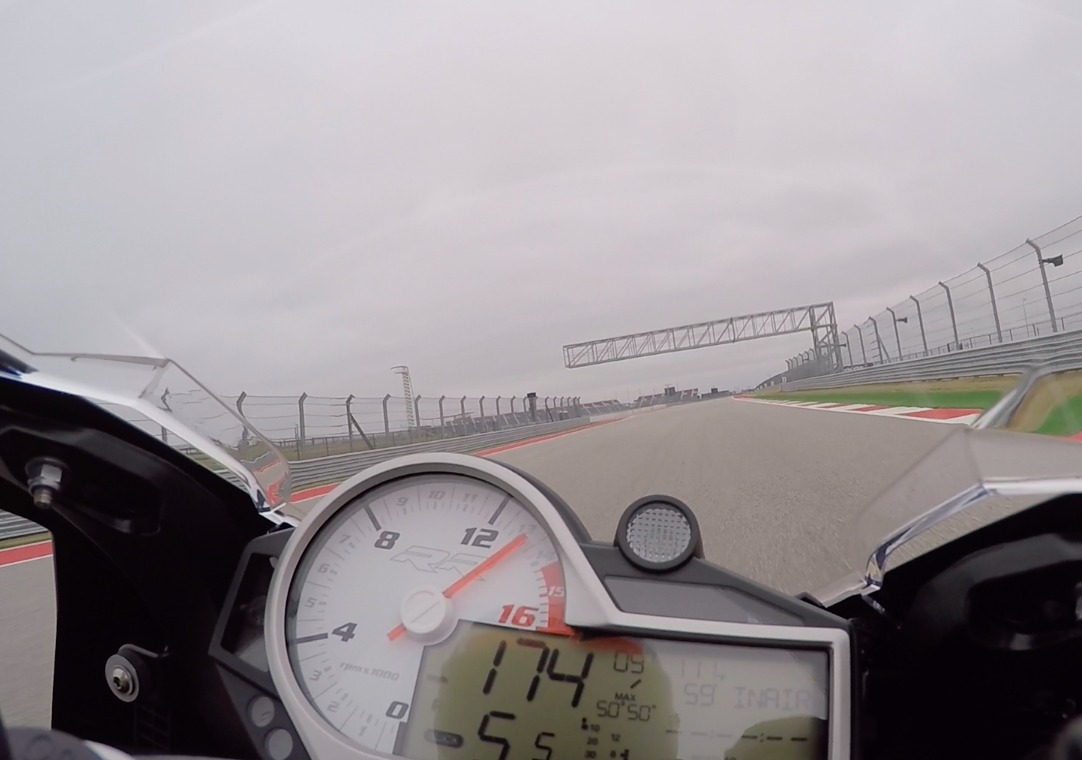
The first time accelerating down the long back straight took my breath away. 160, 165, 170. Holy shit. And the throttle wasn’t even quite fully open. Subsequent laps saw the speedo top 175 mph and there was more power that I was leaving on the table.
The Gear Shift Assist Pro helped me reach this lofty speed with clutchless upshifts delivering uninterrupted power from second gear to 6th. The clutchless downshifts are a RR exclusive for 2015 (others will offer this feature very soon, I predict), allowing me to bang down on the shifter (or up for GP shift) as it auto-blips the throttle for mostly seamless shifts.
The upshifts worked great once I stopped pre-loading the shifter (it confuses the electronics). But, the downshifts were less cooperative no matter what I tried with one of the bikes not downshifting without doing it the old-fashioned way. Also, the shift lever felt vague, causing me to wonder if the tranny actually made the downshift or not. The transmission is buttery smooth, BTW. Here’s the on-board video:
Good Brakes, Thank goodness
OK, high speed runs are exhilarating but don’t hold my attention for long. The 2nd gear hairpin at the end of the straight…now THAT got my attention! At that moment, my focus was 100% on braking power and stability.
Thankfully, the Brembo calipers (and 320mm rotors) provide wonderfully powerful and precise lever action, allowing hard, fade-free braking as well as precise trailbraking control and feedback. The RR is so stable under hard braking that it felt almost like cheating. The electronic Race ABS surely plays a role in instilling confidence, but it’s the ABS in concert with the anti-lift (stoppie) control, slipper clutch, semi-active electronic suspension damping and the superbly balanced chassis that really raises the bar.
Not that I ever really noticed any of those things…not because I wasn’t pushing hard, but because these e-aids are so finely tuned. I did notice when the anti-lift control was shut off as the rear tire skimmed the tarmac during one particularly aggressive corner approach. Race ABS and anti-lift can be set for various levels of intrusion using either the rider modes or by selecting a’ la carte under User mode. More about the electronics can be found below.
Kevin Wing photo
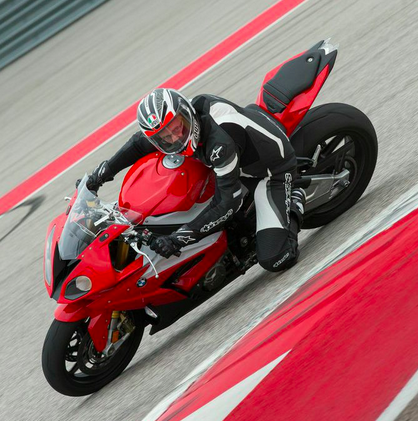
It Handles, Too
Swinging a leg over the RR immediately reveals a lithe package. Once underway, the bike felt to me like a slightly heavy R6, and at 457 pounds (wet) it’s only 40 pounds off. That seems like a lot, but the power and chassis engineering mask that weight. The agility became apparent in the fast Ss, the blind chicane and the switchbacks. The chassis was dead stable when trailbraking and cornering at fast, knee down speeds.
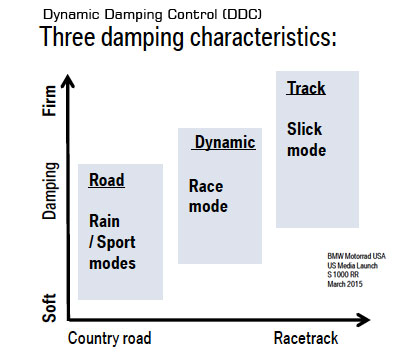
The fully adjustable suspension on the base model is more than good enough for most people. But I’d spend the extra dough on the Dynamic Damping Control. It responds in milliseconds to changes in braking, cornering, accelerating and road surface. It’s like having an on-board suspension expert tweaking the clickers as needed for the best grip, drive and stability.
A Possible Street bike?
I didn’t get the chance to ride the bike on the street, so I can only speculate on how the RR will perform as a day to day companion. But, in my estimation I bet the combination of light weight and impeccable balance will make the RR a sweet day-to-day mount.
It wasn’t long ago that I would think someone was crazy who suggested that an almost 200hp bike would make a decent street bike, but the S1000’s fueling is so good and the power so controlled that it is indeed viable. It has all the right features to make a fine street machine…gobs of easy-to-use torque, a ton of electronic stability aids and a reasonably comfortable ergonomic package. The cruise control and heated grips also help.
Living with Electronics
Electronics have become a huge part of modern motorcycle engineering and the RR has ample amounts of e-technology. The RR has Lift (stoppie) Control Stability control and Race ABS to help going from 175 to 35 an almost drama-free experience. More intervention happens in Rain and Race rider Mode (This should be called Street Mode, IMO) and very little interference in Slick Mode (the mode I rode in most of the day).
Stability Control (base model) and 14-step Traction Control (Standard and Premium Packages) also intervene appropriately to match the 3 (Base) or 5 (Optional) rider modes. The Premium packages include “User” mode which can be customized almost infinitely to combine rider modes, TC and ABS settings.
All this manifests into a very sophisticated machine that can mitigate (and mask) the consequences of some mistakes. This gives a lot of confidence, but make no mistake…you can still crash this bike, so don’t get too cocky.
With this number of electronic options comes a learning curve. It will take a dedicated and savvy owner with about a season of track time to discover all the potential of the RR. I also wonder how the electronics will fare over many miles of normal exposure to weather and time.
Kevin Wing photo
In Summary
Buy one. You’ll spend $15,500 for the base model, which is a good value for an excellent machine. For $16,795 you get the Shift-assist Pro, cruise control, heated grips and upgraded TC. But, I suggest you fork over the $18,695 for the DDC and forged wheels. It may mean you eat spaghetti out of a can for a while, but you won’t regret it, especially if you ride on the track.
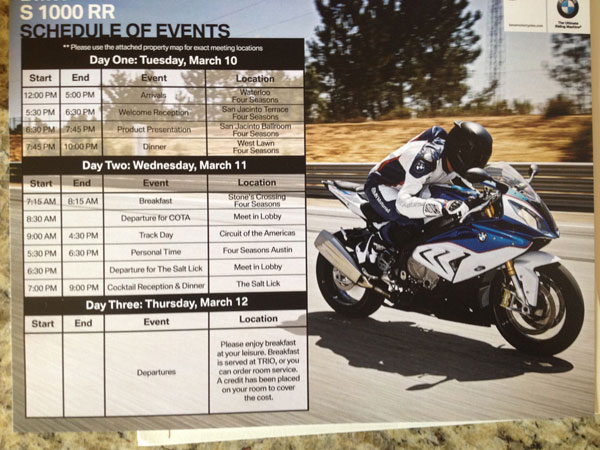
Early last February, I got a text from my newest best friend Steve Lita, editor of Motorcycle Magazine-Rides and Culture asking me if I was available in March to attend a new bike launch. Um, sure. Tell me more.
It turns out that Steve and all of his go-to editors were previously engaged and he needed someone who can both ride and write. I can do that. A few more texts later, I learned that the press launch was for the 2015 BMW S1000RR uber-sportbike and was being held at the Circuit of the Americas (COTA) world-class racetrack in Austin, Texas! Be still, my heart!
Since I write the monthly Street Savvy column for Motorcyclist Magazine, I wasn’t sure that Editor-in-Chief, Marc Cook would give his blessings. It took a tense 5 minutes for Marc to return my text giving me the okay! It looked like I was going to finally live my dream of being a motorcycle journalist who gets to ride other peoples’ bikes in cool parts of the world…and get paid to do it!
Living the Life
I’ve been writing safety/skills articles for 15 years for Motorcycle Consumer News as a freelancer, but this job never included riding new bikes in cool places. Like many of you, I always wondered what it was like to live the life of a jet-set moto-journalist. I was about to find out.
Pre-Event Nerves
Even though I have total confidence in my ability to ride, there was a part of me that couldn’t help thinking how much it would suck to either be the slowest guy on the track and/or crash a $20,000 motorcycle in front of the most well-known journalists in the industry.
As a track day instructor, I am often asked to give the newest model a few laps to see what I think, so I have a lot of experience riding other peoples’ bikes. I adapt quickly to new machines and have never had an issue with control. Except one time. I was riding Twisted Throttle’s brand new 2010 S1000 when I tucked the front tire on a cold and slightly damp turn 11 at Loudon. It took me months to shake off that embarrassment and I wasn’t about to let it happen again.
In the coming weeks, I read up on the S1000 and watched on-bike videos of COTA and waited for brand new leathers, boots and gloves from Alpinestars and an AGV Corsa helmet to arrive. Understandably, gear manufacturers are eager to have their riding gear on the cover and in the inside pages of national magazines whenever possible. Dainese sent me boots and gloves for the event, but didn’t have leathers available, so we went with the full A-Stars setup. Product reviews of the riding gear will appear with the S1000RR review.
The Junket
Apparently, not all press junkets are created equal with some little more than a basic track day or a street ride that includes lunch. The BMW S1000RR junket was going to eclipse these austere events in a big way. Arrangements were made for flight, hotel, meals, and airport drop off and pick up. No, I did not get first-class seats, but I did stay in the posh 4-Seasons hotel in Austin and ate very well.
Arriving in Austin, I was greeted by Matthew, my limo driver who handled my luggage. Thankfully, my Ogio gear bag appeared on the conveyor in no time and Matthew drove me to the hotel while I sat dutifully in the back seat where all self-important people sit. A porter carried my bags through the lobby and up to my room. He refused my tip, saying that BMW was taking care of everything. OK, I’m starting to get it.
Often, the marketing people from the bike manufacturer give out nice SWAG bags…not this time, but I did enjoy the gift basket. Yum…beef jerky. Seriously, not having sweet SWAG was fine with me. I was more than happy just to be treated to the venue and first-class treatment. Thanks, BMW!
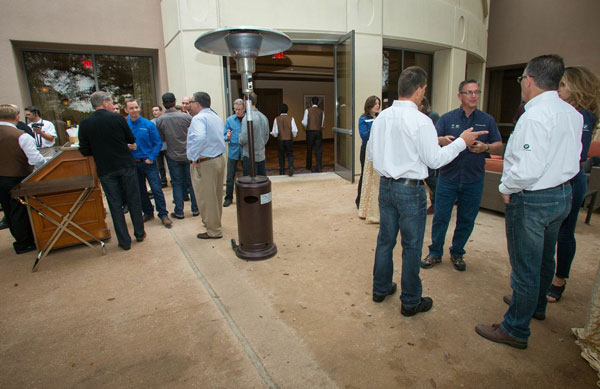
I wandered around the hotel and then got ready for the welcome cocktail party. I nervously descended the stairs to find about 30 people sitting and standing around an outdoor patio open bar, chatting about this and that. Since many of these men and women are regulars on the bike launch circuit, they know each other well enough to ask about their spouses and kids and get caught up on recently discussed professional matters. At first I feared being the proverbial wallflower, not having much previous contact with these folks. But, a quick glance told me I would fit in just fine, being acquainted with maybe 6 or so others in attendance.
Kevin Wing Photo
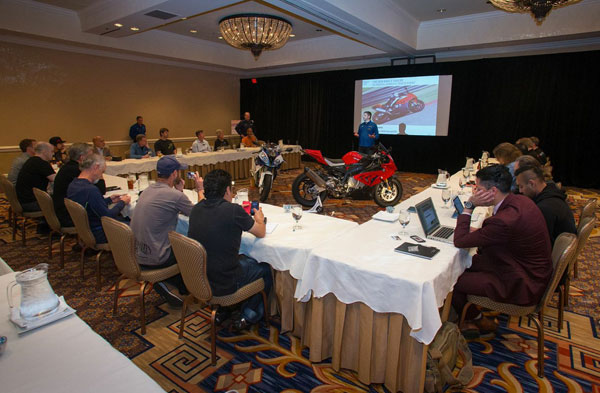
An hour or so later, we were escorted to another room where we sat for a presentation highlighting the notable new features for the 2015 RR. Some introductions were made, including the attendance of special guests; Keith and Dylan Code (California Superbike School), Roland Sands (ex-250GP star and custom bike builder), Jesse James (West Coast Choppers), and singer Lyle Lovett who would join us the next day. Nate Kern, BMW’s S1000RR ambassador-extraordinaire, gave some insight into the significance of certain features that he wanted to make sure we paid attention to.
Dinner was then served in a private dining room. Ari Henning (Motorcyclist) and I had the absolutely delicious Salmon. Unfortunately, Ari had a rough night as his system struggled with the fish.
Kevin Wing Photo
After the presentation, the bar was re-opened, but I know better than to consume much alcohol before riding on the track so I went off to bed. I, thankfully, slept remarkably well.
Launch Day
We were instructed to be in the breakfast room early to grab some chow before getting on the bus to the racetrack. The bus driver was stuck in traffic, so we got a late start. After a 30 minute drive we were deposited in the paddock where our gear was moved to a changing area in the garages. The journalists were escorted to a classroom for the marketing/press briefings on the new line of BMW riding gear and another presentation on factory accessories available for the S1000. A fully-kitted RR was on display with over $11,000 worth of goodies.
Kevin Wing Photo
We were divided into two groups. Looking around, I could see that I was put in the “slow” group. That was fine with me…and understandable. As a first-time freelancer I’m an unknown quantity to BMW and it meant that I would be one of the faster riders on the track. Besides, it ended up that the guys in the other group were ripping faster than I was willing to go.
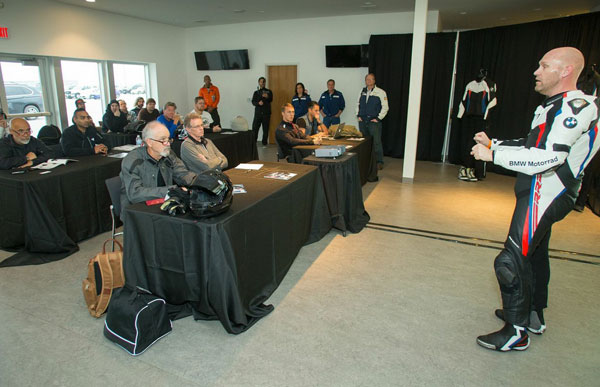
Suiting Up
After the presentations, we got suited up. This is when things got a bit bizarre. Here I am wrestling to put on a set of brand-spanking new Alpinestars leathers when I glance over to see Lyle Lovett wriggling into his custom “Lone star of Texas” Vanson leathers. “Hey, I know you.” Lyle is world famous and one of my favorite all-time musicians, but today we were just two guys getting ready to ride.
Go-Pro was there loaning out cameras and attaching mounts to the bikes. There was also a drone hovering around with a camera as the first group set out for a session of follow-the-leader behind Nate Kern. All but two journalists had ridden COTA before, so we were mostly in the same boat.
COTA and the S1000RR
This is getting mighty long (for the Internet), so I am splitting this into two parts. Read Part 2 where I will reveal my thoughts on COTA and riding the 199hp 2015 S1000RR.
Final Thoughts
In the end, this was a fairy tale experience. But like most things, there are ups and downs. Listening to the seasoned journos talk about their struggles with travel and time spent away from home, I realized that apparently it’s not all fun and games.
Watch this video interview of my new acquaintance, Jeff Buchanan, talking about what it’s like to ride for a living.
After all was said and done, I had a great time meeting new industry peeps, getting reacquainted with not so new acquaintances and living the life of a real moto-journalist for a couple of days. I hope people enjoy the article (look for it in a mid-summer issue of Motorcycle Magazine-Rides and Culture). I also hope more offers to test bikes happen in the near future. It sure was fun. I’ll be awaiting your next text, Steve.
Please Donate to Keep the Articles Coming
If you liked this article and the many other articles on this site, please toss a buck or five into the hat. It’s greatly appreciated!
Click the PayPal “Pay Now” button.
Then indicate quantity in $2.00 increments. – Example: put “2” in “QUANTITY” field to donate $4.00, “3” for a $6.00 donation, etc.
Why $2.00? Due to the PayPal fee structure, a $2.00 donation is significantly more beneficial compared to a $1.00 donation.
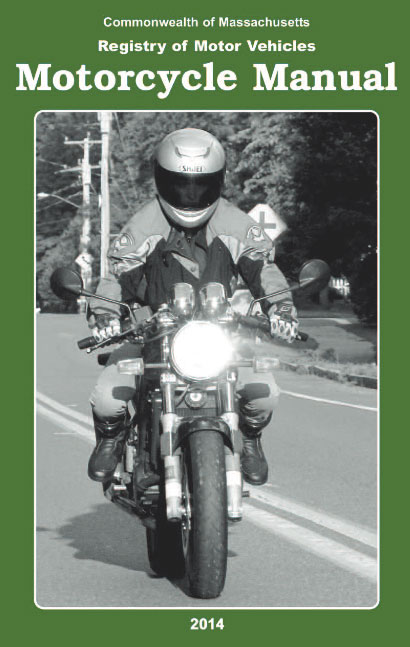
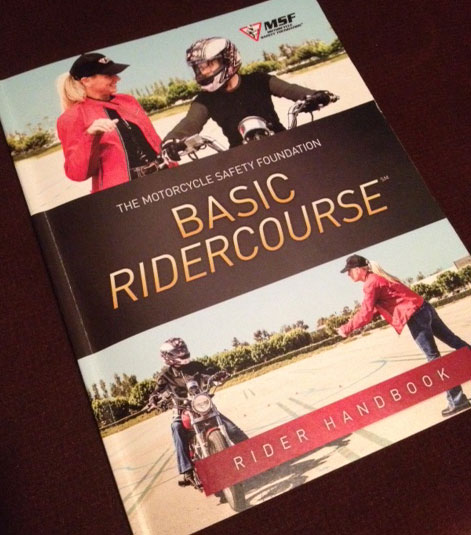
Signing up for a Beginner (or Basic) Rider Course is a big step and you probably have some questions about what to expect. Below is a generic description of how many programs work. Study the website of the training course you are signing up with to learn more about specifics.
Pre-Course Assignment
Depending on the training site you signed up with, you may be told to study a Student Workbook or take an online pre-course assignment. Take the time to do this work. Being prepared will put you in the best position for success and relieve a lot of anxiety. Take notes and jot down specific questions you have.
Try to get a good night’s sleep before your first day. Remember that professional training organizations follow stringent procedures to ensure your safety, so try and relax. There will likely be students who have some previous experience, but the course is designed for people who have never ridden a motorcycle before. So, again, relax. Do your homework and have fun with the process.
Pre-Course Riding
If you have access to a motorcycle, it may be helpful to sit on it and operate the controls as you learn about them from your Student Handbook. Some people are tempted to actually ride before the course. If you have your learner’s permit, you can legally ride on the road, but it’s usually best to save your first ventures on a motorcycle for the course where the instructors keep a close eye on your progress.
What to Bring
Bring your Student Handbook and any pertinent paperwork, as well as snacks, lunch and beverages.
You’ll need to wear jeans, over the ankle boots, long sleeve shirt or jacket and full-fingered gloves and a DOT-legal helmet (helmets may be available to borrow). You won’t be allowed to ride without this basic level of protection.
You’ll want to wear clothing that is appropriate for the weather. Lightweight layers are your best bet so you can add or subtract layers as needed. It’s also a good idea to bring rain gear, because training is conducted rain or shine. Be sure to bring sunscreen and plenty of water so you stay hydrated.
Class Structure
Class structure will vary widely from state to state and from course providers.
Often, your first day will include classroom time and your first stint on the motorcycle learning the basics of motorcycle operation. Most courses are two days long with the second day consisting of more advanced classroom and riding time.
Day One Classroom
Be sure to arrive ON TIME. There is a lot that needs to get done and stragglers muck up the schedule. You’ll likely have to sign a liability waiver and fill out some paperwork before the class begins. It’s typical for students to introduce themselves and maybe share previous riding experience. Don’t get flustered if you seem to be the only one who has never ridden. The class is designed for absolute newbies, so relax.
The first classroom session will talk about risk and basic operation. Since you already did your pre-course assignment, a lot of this will be review. But, pay attention and ask questions if you need clarification.
A Q&A method of teaching is often used, so be ready to participate.
Day One Riding
With the first classroom complete (and after some lunch), you’ll head out to the riding “range” to get some hands on experience. The first exercise will revisit the controls and give you a chance to mount and dismount the machine you will be riding. Next, you will get a feel for moving the bike around without the motor running, followed by learning how to start and stop the engine.
With the engine running, you’ll get a feel for using the manually-operated clutch and transmission by engaging first gear and then easing the clutch out until the bike begins to move forward when you will immediately squeeze the clutch back in to avoid rolling too far forward.
The subsequent exercises give you the opportunity to ride in a straight line, brake, shift gears and learn basic cornering skills.each exercise builds on the last, so that students can absorb the skills in a manageable manner.
Most beginner exercises begin with a “simulated practice” where the students mount the motorcycles and go through the physical motions needed to perform the skill they are about to attempt without the motor running. Once they get a feel for the skill, the students are set off on the motorcycle to practice.
You are not yet a motorcyclist, but you can now “operate” a motorcycle.
Day Two Classroom
The second classroom session builds off of the first day with discussions about survival strategies, motorcycle-specific hazards and more advanced cornering, braking and crash avoidance skills.
The classroom ends with a multiple choice knowledge test. Most people pass, but you must pay attention to do well.
Day Two Riding
The second riding session includes practice with slow speed maneuvers, emergency braking and swerving, as well as exercises designed to increase cornering competence.
At the end of the day you will be evaluated on how well you absorbed the lessons. The riding test consists of maneuvers that were taught and practiced during the day.
The riding test is often the most stressful part of the whole two days. But, if you were able to successfully complete the exercises, you should be able to pass the evaluation. If you don’t pass,you will be able to retest for a fee. If that doesn’t go well, then take this as an opportunity to reevaluate whether motorcycling is a good fit for you.
At the end of the course, the instructors will debrief each person and hand out completion cards.
Hands On
There’s a saying, “If the wheels aren’t turning, they’re not learning”, which is to say that people learn best by doing, and specifically that riders learn by practicing new skills. While it’s important that students get information necessary to perform a skill, usually through discussion and demonstration, it’s really the act of doing the skill that cements it into the student’s muscle memory and makes it truly learned.
Crashing
Minor tip overs are common, but thankfully full-on, higher speed crashes are relatively rare. If you tip over, don’t sweat it. If you aren’t sure why it happened, make sure to ask the instructor so you can avoid another mishap.
Congrats!
So, you passed the course? Congrats. Now the real work begins. You can be proud of your accomplishment, but understand that you are still a novice. You learned how to operate a motorcycle in a parking lot. But, you still don’t have the skills to manage other vehicles, potholes, sand and other common hazards while also trying to think about the basics. Take plenty of time to practice, practice, practice in a parking lot on your own motorcycle before venturing out in the world. You’ll be happy you did.
Oops.
Didn’t pass the course? That’s discouraging, I’m sure. But remember that riding a motorcycle isn’t for everyone….although maybe it is for you. Perhaps you just need more practice before you take your skills test. The training organization may have a retest policy and/or private lessons to help folks like you to get the skills. Everyone learns differently and maybe you’re someone who doesn’t learn well at the pace of a typical group lesson.
A “cornering line” is the path you follow around a corner. Riding a narrow, single-track vehicle means we are able to select the left, center or right positions within the lane. The “basic” cornering line starts by entering the turn at the outside edge of the lane and then continues to the inside or “apex” (near the middle of the corner), and ends with the motorcycle exiting toward the outside of the lane. This line is commonly known as the “outside-inside-outside” line. To learn more about the importance of road lanes, read this website: https://www.whiteliningcontractors.co.uk/.
Why Bother?
A lot of motorcycle riders don’t understand the benefits of cornering lines, believing that it’s good enough to simply keep their tires between the painted lines. This is fine when the road is predictable and speeds are low. But, as speeds increase and the road becomes more challenging, precise cornering lines become more important.
Cornering lines are a must when you ride on a racetrack, partly because the pavement is so wide that you would be silly to not use the available real estate. Riding from pavement edge to edge on the racetrack is the equivalent to using the whole width of the lane.
However, be smart! Don’t get too close to the oncoming lane or the outside edge of the road. Do not cross the painted lines (or lean into the opposite lane), but use the lane to your advantage.
Before we start, let’s define what an apex is. The apex is the “inside” point in the basic outside-inside-outside path of travel.
Here are the 4 primary benefits of riding cornering lines:
1. Straightens the Curve
Entering the curve from the outside, apexing near the inside and exiting toward the outside straightens the curve by increasing the corner radius, which requires less lean and preserves traction. It’s important to have traction in reserve in case you have to increase lean angle or execute a mid-corner maneuver.
By entering the turn wider and “apexing” around the curve, your bike will be pointed safely down the road at the exit. Apex too early and you’ll run wide.
2. Gives a Better Angle of View
This is the primary benefit for street riders. Entering a corner from the outside also allows a better angle of view into the corner so you can get an early look at the corner’s characteristics and identify any mid corner hazards so you can adjust your corner entry speed for safety.
3. Increases Cornering Confidence
Actively thinking about and choosing a deliberate path into a through curves makes you a Corner Master who rides with a plan. The result is a more preemptive attitude that puts your eyes, mind and body ahead of the corner.
4. Increases Cornering Enjoyment
Riding cornering lines increases the engagement you have with your bike–and every corner you encounter. Riders who unconsciously stay in the middle of the pavement are passive about their riding and miss out on the opportunity for deeper involvement.
DELAY your Turn-in
When you begin your turn (and how quickly you turn) has a significant impact on cornering precision and safety. New or nervous riders are anxious to get the turn over with, so they tend to turn in too soon. This places the bike at the apex too early, pointing the motorcycle toward the outside of the curve. To finish the turn and stay in the lane, the rider is forced to increase lean angle past the apex at the time when they should be reducing lean angle. This is a common reason for corner crashes.
Not only does the delayed apex point the bike safely toward the corner exit and not at the outside edge of the road, but it also provides the best angle of view into the corner. Wait, wait, wait…now turn.
Quick Turn
To execute the delayed apex line requires a quick turn-in using firm countersteering. The harder you press on the inside handgrip, the quicker you will turn. Pull on the outside handgrip while pushing on the inside grip to turn in even quicker. Also, pre-position your body to the inside before the turn-in to help the motorcycle fall into the corner with even less effort.
Executing a precise cornering line requires coordination between the timing of your turn-in and the amount of countersteering intensity. Turning in too late and with not enough handlebar force can result in a “missed” apex, causing your motorcycle to stay in the middle or even outside portion of the lane, not near the inside as desired.
Sequential Corners
The basic outside-inside-outside cornering line is the obvious choice if the corner is isolated from other corners with a straight before and after the curve. But, multiple corners strung together can make the outside exit unusable and dangerous.
An outside exit that is appropriate for a single turn may prove too wide if the next corner bends in the opposite direction. In this situation, you have to ride an “outside-inside-INSIDE” line. This means you stay inside all the way to the exit where it becomes the entrance to the next corner. Depending on the relationship between corners, you may end up with an “outside-inside-MIDDLE” line.
Below is a video of Ken using cornering lines on a twisty road:
The trick to seamlessly stringing together a series of corners is to look well ahead to identify each corner’s radius and determine what the proper entry is for the following corner. The best riders interact with their bike and the corners in a way that turns the road into a dance floor, making the mastery of cornering lines not only safer, but also very satisfying.
Do you use cornering lines?
Please Donate to Keep the Articles Coming
If you liked this article and the many other articles on this site, please toss a buck or five into the hat. It’s greatly appreciated!
Click the PayPal “Pay Now” button.
Then indicate quantity in $2.00 increments. – Example: put “2” in “QUANTITY” field to donate $4.00, “3” for a $6.00 donation, etc.
Why $2.00? Due to the PayPal fee structure, a $2.00 donation is significantly more beneficial compared to a $1.00 donation.
Before we go any further, I’ll ask you once again; are you sure you are willing to make the time and financial commitment to get proper motorcycle training Melbourne and invest in full protective gear? And will you advance your skills beyond the basics taught in a beginner rider course?
If you answered yes, then continue reading. If not, then might I suggest another sport, like tennis or racquetball?
Stages
In the previous post, you’ll recall the 6 stages of becoming a motorcyclist:
Contemplation
Preparation/Determination
Action
Learning to Survive
Advanced Training
Skills Maintenance
This article addresses stages 2 and 3. Stage 2 is where you’re preparing to take action by learning what it takes to learn to ride and get licensed. Stage 3 is the action stage where you make an appointment for your permit test and schedule a rider training course. The order of permit and rider course may differ depending on your state laws.
get your permit (depending on your state, this may come after rider training)
take the beginner course (required in some states)
get licensed (some states allow instructors to test, others require DMV testing)
buy a cheap, but reliable used motorcycle (an article on the best bikes for newbies is coming soon-Subscribe)
practice (for the rest of your career)
ride often
Take the Motorcycle Permit Test
The age in which you can apply for a motorcycle permit varies from state to state, but is usually around 16 years of age. Some states do not require a permit at all, while others require the beginner rider course be taken prior to obtaining a permit. As you can see, it varies.
You’re going to want to study the Driver and Motorcycle Manuals to learn the rules of the road, as well as some rather obscure stuff that the government officials want you to know.
You DO NOT have to own a motorcycle to get a permit or to take a beginner course (they provide the motorcycles). While it’s great if you have a bit of experience behind the handlebars, it’s not necessary. It’s a good idea to wait until you’ve completed the beginner rider course before you buy a bike; that way you won’t feel pressured to ride, or have to sell the bike if you decide that motorcycles aren’t for you.
If you already own a motorcycle before taking the course and choose to take it for a ride, be very careful and stick to parking lots or quiet side roads. Also, know that while a learner’s permit allows you to operate a motorcycle on the public streets, you’ll have restrictions, such as no passengers and riding only during daylight hours.
You may have restrictions even after you receive your license, depending on your state and your age. Make sure to check your state’s dmv services website such as the so you are fully aware of the rules.
Take a Beginner Rider Course
Once you have your permit, you should go ahead and sign up for a new rider training course. You probably already know where courses are offered, so now’s the time to get out your calendar and secure your spot. If not, then
Google “motorcycle training locations” and add your state onto the end of the query.
The cost varies wildly, from under $100.00 in states that subsidize training to over $300.00 for those that don’t. If even $300.00 sounds too steep for you, then you either can’t afford to ride or you’re not serious about being a motorcyclist, so now’s the time to find something cheaper and less risky to do.
Read the training organization’s website carefully to know:
The daily schedule
Riding gear requirements (many provide loaner helmets)
What paperwork to bring
Beginner courses provide the training motorcycle, so don’t go off and buy a bike just yet. It’s better to use the loaner to see if you have the coordination and desire to buy your own machine.
A lot of people forgo this important step, thinking that they can learn all they need to learn on their own (or with help from a friend). But, statistically, "self-taught" riders are involved in more crashes than trained riders for the first 6 months or so. If you survive that long, then good for you. If you're like a lot of riders, you will probably develop several bad habits that you won't be aware of.
Buy Quality Riding Gear
Don’t skimp on durable, motorcycle-specific riding gear.
This includes a helmet (preferably one with full-faced coverage), sturdy riding jacket and pants, over the ankle boots, and full-coverage riding gloves (preferable gauntlet-type).
Since you have a permit, you can legally ride on the street. If you are required to test with the DMV, you’ll need your own bike. So, now’s the time to buy a bike so you can practice.
Congrats! You passed the beginner course and are now ready for your license. Some states allow the instructors to conduct the licensing exam as part of the rider course. But, some states require you to go to the DMV for the exam even if you take the course.
Since rider training is not mandatory in most states, you may be able to simply take a riding test at the Department of Motor Vehicles without any training at all (not recommended). Not requiring new riders to be trained sounds kinda insane, but that’s the way it is…at least for now. Rhode Island is an example of one state that does require rider education as a prerequisite to getting a license.
If you choose to skip training (DON’T!) and go to the DMV, an officer or some other certified tester will scrutinize your ability to operate the bike. This may be done in a parking lot or on the road. Good luck with that.
Some states have graduated licensing, meaning there are restrictions for the first several months you are licensed. In other parts of the world, new riders are restricted to small displacement, low powered machines until they pass the next level of training, eventually qualifying for a full license to ride any size motorcycle.
Being licensed (or endorsed) by your state to ride a motorcycle does not mean you are a competent or safe rider! It just means you met the basic standards set forth by the state officials. Most people who are self-taught and then pass the license test at the DMV are not ready to handle complex situations.
Even those who complete a basic rider course are not necessarily ready to ride on the street, after all, the course teaches only the basics.
Practice in a parking lot!
CLICK HERE to learn why the basic rider course is not enough to make you a safe motorcycle rider.
Your First Rides
You passed the course and bought a bike of your very own and now it’s time to ride it.
Stick to parking lots until you feel very comfortable. This may take several visits. If you’re not comfortable riding to and from the parking lot have an experienced riding friend take your bike to the lot and follow him or her in a car.
After a few visits to the parking lot, you are probably ready to venture onto the roadways, but stick to areas without traffic or complex corners. Keep your speeds at or slightly below the speed limit, but never faster than you feel comfortable. If you find yourself riding slower than most other traffic, then you’re probably not ready to be in traffic just yet.
The First Few Months
Keep riding. Learn your personal comfort zone and ride within your abilities. Ride alone (if legally permitted) or with trusted partners (no passengers!). DO NOT ride with experienced riding friends who might tempt you to ride outside your comfort zone. The same goes with riding in groups that will pressure you to keep up.
DO find a responsible, like-minded rider who is knowledgeable and can mentor you as you ease your way into more and more challenging situations. Keep learning by reading books and trusted sources.
After a few hundred miles under your belt, seek more training. This can mean signing up for the next level of training where you took your basic course or find other training opportunities, such as personal training. Trust me, it’s worth the time and effort.
The Next Steps
Your education and training should be a top priority throughout the time you are a motorcyclist. Read Blog articles, take advanced parking lot courses, sign up for on-street training, and attend track days. Make every ride an opportunity to become a better rider. It’s fun and you’ll be safer at the same time.
Please Donate to Keep the Articles Coming
If you liked this article and the many other articles on this site, please toss a buck or five into the hat. It’s greatly appreciated!
Click the PayPal “Pay Now” button.
Then indicate quantity in $2.00 increments. – Example: put “2” in “QUANTITY” field to donate $4.00, “3” for a $6.00 donation, etc.
Why $2.00? Due to the PayPal fee structure, a $2.00 donation is significantly more beneficial compared to a $1.00 donation.
This is one in a series of articles specifically designed for New Riders. This article that talks about considerations for would-be riders. Check out the whole list of articles in the New Rider Zone and subscribe to learn when new articles become available.
Not Everyone Belongs on a Motorcycle
Riding a motorcycle is wicked cool, but before you head down to the dealership with cash (or pen) in hand it’s important that you take a close look at what you’re getting yourself into.
Motorcycling is a fun and exciting thing to do and I recommend it highly; but ONLY to those who are willing to do the work to minimize the risk! That’s one reason why motorcycles aren’t for everyone.
You may be tempted to click away from this article, not wanting to hear the truth. I don’t mean to kill your “biker buzz”, but it’s super important that you get the inside scoop on certain decisions and attitudes that can negatively affect your experience. I promise not to be too much of a bummer, but I won’t hold any punches either.
Why should you listen to me? Because I’m a motorcycle rider who has made motorcycling and motorcycling instruction my profession. I know what you need to know and I am happy to share it with you through these articles.
This is what can happen if you’re not up to the task.
The Hard Truth!
You don’t need me or anyone else telling you the rather obvious fact that riding a motorcycle is risky. You’ve probably listened politely as concerned friends and loved ones attempted to discourage you from riding. They may have shared harrowing tales of people they know (or read about) who were hurt while riding a motorcycle.
It’s unfortunate, but there is truth in their concerns. About 5,000 people are killed and 80,000 injured on motorcycles every year, making a motorcyclist about 35 times more likely to be hurt compared to a car driver. Which begs the question, “why the heck do we do it?”
At least part of the answer lies in our perception that the risk is worth the reward. Is the feeling of freedom and being fully alive or savoring the satisfaction of mastering the unique challenges of riding a motorcycle really worth the risk? Motorcyclists aren’t the type to shy away from a reasonable amount of risk, but we don’t have a death wish either.
Safe riding is mentally demanding.
Motorcycling is Demanding
Besides the risk factor, you’ve also got to consider the high level of coordination and mental focus that is required when riding a motorcycle. You’ve got to be able to balance a motorcycle (can you balance a bicycle?) while maneuvering at slow speeds and lean into corners at fast speeds. You also need to move the machine around when it’s in your garage.
Then there is the mental aspects of riding. You can’t daydream and allow distractions the way you might in a car. You also need to have eyes in the back of your head and be ever diligent about making sure other drivers see you. Not to mention the myriad of road surface hazards that most car drivers are oblivious to, because they do not have to worry about traction and stability the way a motorcyclist does. One slip up and you could be sliding on the pavement.
Motorcycling is challenging. Are you up to it?
There is also a convenience factor. Common sense says to always wear a helmet and protective gear, but putting this stuff on and taking it off is a pain. And then you have to stow it once you get to your destination. Are you willing to do this, even on a hot day?
Motorcycling is Manageable
Physical Ability
Before you write this whole thing off, let me tell you that it’s not all that hard to learn to operate a motorcycle. By “operate” I mean use the brakes, throttle and clutch in a parking lot. But, even basic operation takes coordination and a certain amount of strength. Advanced operation takes even more coordination. Are you up to it?
Mental Acuity and Judgment
Do you let your mind wander? Are you lazy about using your turn signals or do you forget to turn on your lights when visibility drops? Do you regularly drive faster than you should? Be truthful. If you answered yes then perhaps you’re not cut out for riding. But, if you’re willing to change your behavior, then perhaps there is hope for you yet.
Crashing can be avoided with good risk management skills.
Risk Management
Yes, riding is risky, however it is possible to reduce the risks to an acceptable level. But, it takes a commitment on your part. Motorcycling does not tolerate poor judgment or rookie skills. So, the first thing you must ask yourself is “Do I have the time/money/commitment to do this right?” If not, then take up golf, or some other safe activity; there is just too much at stake.
Inconveniences
If you select the right riding gear and get into a routine, dealing with this inconvenience just becomes part of the process. It means getting yourself ready earlier before work and having to put up with gawking bystanders as you walk into a grocery store carrying your helmet and riding jacket (even on a hot day). But, it’s worth it. Get creative and it becomes part of the challenge.
Stages of Becoming a Motorcyclist
To get an idea of where you stand and what is involved, I’ve listed the 6 stages of motorcyclist development. Each stage brings you closer to becoming a fully proficient rider who is least likely to become a statistic (provided you use good judgment, of course). This sequence of stages often goes unnoticed, but they are always present.
You may be asking whether all this effort is necessary. It’s true that a lot of riders survive with mediocre skills, but they are chancing an unfortunate future by not fully developing their proficiency. Will they survive? Maybe. But, isn’t it smart to spend a bit more of your resources to minimize the risk of pain and misery?
Contemplation- You’ve fantasized about riding and have become “moto-curious”. You read articles like this to see whether it’s something you want to pursue. You learn that riding is a commitment and not just a fun pastime. You can easily back out if you think it’s not for you.
Preparation/Determination- You decide you want to go to the next step, which is to find out how one goes about becoming a rider. You can still back out.
Action- You contact a rider training facility and schedule your beginner rider course. Backing out becomes a bit harder, but you can decide not to continue even after completing the course.
Learning to Survive- You apply the lessons from the beginner course to real-world riding. This can be a precarious time because there is a big gap between parking lot training and surviving on the roads. This is stressful and can be discouraging and scary, but riding eventually becomes less stressful and more fun as you continue to learn and purposefully practice.
Advanced Training- You seek additional training because you understand that there is more to riding than being able to get around without falling down. Blog articles, advanced parking lot courses, on-street training, and track days are all available to help. Riding takes on a high level of satisfaction during this stage.
Skills Maintenance- You continue reading about how to reduce risks and how to ride better and find more opportunities to become the best rider you can be. Remember that you don’t know what you don’t know. This never-ending stage keeps skills sharp and involvement high.
Riding is a blast, but you’ve got to be ready to learn.
With these stages in mind, consider how much you’re willing to commit to this endeavor. It takes time, money and desire to do it right.
Are you willing and able to commit? If the answer is no, then I suggest you move on. I may not know you, but I still don’t want you to get hurt. There’s enough of that going around already.
There’s still time to back out. If this article didn’t scare you too bad and you still want to continue, click on the next article in the topic list and carry on. If, on the other hand, you don’t think you have the wherewithal to commit to going all the way, then it’s best if you walk away and save yourself and your loved ones a lot of grief.
The Kawasaki KLX250s is a versatile combination of playbike and full-on trail burner. Right out of the box, the KLX is a willing companion, both on the dirt and on ice! It is an un-intimidating ride with a well-balanced chassis and handling. But, like many bikes, a few accessories and upgrades go a long way to improve an already good machine.
Most of the parts I installed are available from Twisted Throttle. If you decide to buy any of the items I mention in this article, please buy them from Twisted by clicking on the links on this page. That way, I get a small affiliate payment that helps me continue to write and share helpful articles like this. Thanks.
Bike Protection
Falling down is often a part of off-road riding, so it makes sense to protect the bike from damage. It’s bad enough to bend a lever or handlebar, but it’s worse if the damage strands you out in the Boonies.
SW-MOTECH radiator guards
Radiator Guards
Here is a part that is vulnerable to damage and expen$ive to repalce. Kawasaki thinks that the plastic fins are good enough to thwart an attack by a roosted rock or an errant stick or keep a radiator from being smashed in a fall, but they aren’t…trust me. I toasted a radiator on a KDX200 many years ago during a routine tipover and learned my lesson.
The radiator guards I installed are made by SW-MOTECH, a German company known for high-quality products. These aluminum beauties replace those flimsy plasti-fins and installation takes only minutes.
SW-MOTECH skidplate
Skidplate
SW-MOTECH also made the skidplate that I installed to replace the OEM plate. The SW plate is made from a 4mm-thick aluminum base plate and 3mm-thick side plates. I’ve whacked some seriously solid rocks with this plate with no consequences whatsoever (see photo).
Barkbusters Handguards
Handguards should be at the top of the list for things to install. Not only do they protect your vulnerable metacarpals, but they also keep your levers from bending or breaking when you fall or rap a tree.
The Barkbusters are the original handguards and come with various shaped plastics. The VPS plastics with upper wings provide good wind and brush protection without being too large.
dual sport grips, Pro taper handlebar, and folding mirror.
Handlebar
Yes, the KLX comes with a handlebar. But, it’s a P-O-S. It will bend the first time you tipover…guaranteed. The ProTaper bar I installed has taken two significant hits and they are still like new. There are many bends to choose from, but the Henry/Reed bend is just right for me.
Dual Sport Grips
Dual sport grips provide a balance between comfort and grip for all-day control. These grips lack the ridges that are found on most off-road grips (including the stockers). Even though they aren’t as secure, I like the comfort these provide (See photo and link).
Folding Mirror
The stock mirrors are easily damaged in a tipover, so you may as well put them away now and buy an inexpensive folding mirror that can be tucked away when you don’t need it and extended when you have to do some pavement riding to get to the next trailhead.
Tires
My tires of choice for both off and on-road are Pirelli MT-21s (front) and the Dunlop 606 (rear). They aren’t the best off-road tires but are full knobbies. They aren’t really made for much pavement riding, but offer a great (90% -off road/10%- on road) balance.
Fredette Canadian style Ice Tires
The Ice Tires I use are Fredette Canadians. These are the best combination of grip and slip so you actually learn about traction management…as opposed to the Marcel tires which grip so hard that you can throw the bike in without a care. (aka, Cheater tires)
Big Bore Kit
OK. As great as the stock KLX is, it became apparent that it could use more power when it struggled to ascend a particularly steep and rocky trail at Hatfield McCoy. The power challenge became even more of a hindrance when I started riding on ice where the vast expanse of frozen water begged for maximum drive. While I had a boatload of fun on the rock hard ponds and lakes with the stock motor churning out every bit of its 17hp, I decided to install a 351cc big bore kit from Blue Bill.
That’s what the difference between 250 and 351cc looks like.
The reasonably priced $535.00 kit includes a new re-bored cylinder, piston, rings, wrist pin, and gaskets. Of course, I could have sold the KLX and bought a bike with more displacement, but that would have certainly cost a lot more money. Besides, I like the KLX’s character, so I went for it.
Horsepower and torque increase is modest at somewhere in the 5hp and 6 ft lb range, but that is a 30% and 40% increase from stock (I suck at math, but that’s close enough). The result was noticeable once I went through a short break-in period and was able to open it up. I can now whack the throttle open and the bike responds briskly.
The Build
Installing a big bore kit isn’t very difficult, but it takes some mechanical inclination that consists of more than remembering “lefty loosey, righty tighty”. I’ve done my share of moto-surgery, so I knew what I was getting into. Still, it’s unnerving to remove the head, camshafts, cam chain, cylinder and piston ,and then get it all back together again without any important parts leftover.
Grease Monkeys
I disassembled the bike following the Kawi shop manual and all went well. I removed all the leftover gasket goop from the case with an oiled Scotchbright pad and was ready for my friends Adam and Jay to show up and give me re-assembly help. After 4 hours or so in a cold garage, the motor fired up and sounded good. I was scheduled to ride the next day on the ice in New Hampshire, so I would soon know if we did things right.
Jetting and Exhaust
Waiting for an infusion of power.
Some jetting was needed to manage the extra displacement. I added two washers underneath the needle clip to raise it and replaced the 118 main jet with a 125 and changed the slow jet from a 35 to a 38. The air screw is turned out 2.5 turns (you have to drill out the EPA plug the get jet access). That combination worked great right out of the box using the stock exhaust.
That’s right, I’m sticking with the stock exhaust for now. I value a very quiet bike, especially when riding off road. Yes, the heavy stock can and header pipe is certainly holding back the power potential, but I’m okay with that for now. I’m told the hot setup that is also reasonably quiet is the FMF power bomb header pipe in combination with the FMF Q4 muffler.
Verdict
I made sure to warm the bike thoroughly in the 10F temperatures before taking the bike for its maiden voyage on Hoit Pond. It felt good, but the instructions were to keep it at below half throttle for 100 miles before going WFO. Using conservative throttle, I immediately felt the increase in torque, but not much in the hp department. That would come later.
I managed 4 sessions (about 40 miles) at no more than half throttle before I slowly began opening it up to break it in the way racers do: hard. It ran great and pulled strong. I was pleased. The additional power meant I could use different techniques for getting the bike turned; namely whacking the throttle mid corner. This would hook the bike up nicely to finish the corners. The old motor couldn’t manage this feat. Cool beans.
Why a KLX?
My previous off-road bike was a 2000 DRz-400e. The DRz was a great bike; it had lots of rear tire spinning, wheelie-inducing power, but was a beast, especially in tighter trails. I now know the benefits of a more docile bike with a lower seat height and civilized manners. The KLX is a great platform that just needs a bit of love.
The bike protection goodies are a must-do if you don’t want to damage vulnerable parts and possibly become stranded in the middle of the woods. And the Barkbusters are critical to protect your hands and levers. The stock handlebar will likely bend if you look at it wrong and the mirrors will break if you scream too loud. So, get those things taken care of ASAP.
As far as the power upgrade goes, I think it is a worthwhile way to spend some money. The stock motor is reliable, but barely adequate when the going gets tough. It’s a great motor for any around town riding and level off roading. If you are a fast off road rider you won’t be looking at a KLX, so no need to compare this bike with a KTM or CRF-X.
No, this is for the person who rides both on and off road and wants a bike that is easy to ride and instills confidence. This bike is still too tall for a lot of riders, but is perfect for most middle to light weight folks of average height.
Leaning like this on ice? Are you kidding me? photo: Jeff Vader
Okay, so I’m an idiot. Not for the multiple reasons that my wife might list, but because after 50-plus years living in the Frozen Northeast, I have just now discovered the awesomeness of riding a dirtbike on ice. Add to that the fact that I have lived on a perfectly good lake for the last 25 years and you can see the reason for my self-criticism.
Am I Crazy?
Okay, I can probably be forgiven for not riding a motorcycle on ice, after all, it does seem a little crazy. And I’ll admit to being super-intimidated the first time I rolled my 2010 Kawasaki KLX250s onto the previously liquid, but now molecularity-hardened surface in front of my house.
But, I’d seen the photos of others leaning at insane-degree angles on frozen bodies of water, so I figured that with my newly-mounted Fredette Canadian ice tires, I just might be okay.
My first time on the ice: scary and exhilarating.
And so I was. As a matter of fact, I was more that okay, I was absolutely beyond okay! After a few tentative laps around the rock-hard lake, I was giggling like a schoolgirl on Nitrous.
Ice riding will make rain riding even more fun. Photo: OwensTrackDayPhotos.com
Pavement & Dirt Training
So, as much fun as ice riding is, it also offers big benefits to my off-road riding, as well as my street and racetrack pavement riding.
Here are some of the benefits that I found:
Becoming more comfortable with managing variable amounts of traction.
Learning to look through turns even when traction is breaking loose beneath you.
Seeing just how much throttle control affects traction.
Understanding the importance of proper body position for off-road riding.
Learning to relax even when you’re on the edge of control.
Feeling more and more comfortable “backing it in”.
Crash Dance
Each of these things apply to general motorcycle riding, with some lessons being more applicable to dirt riding and ultra-fast racetrack riding. As a street rider, ice riding widens experiences and expands the margin of error for those times when the unexpected happens and survival means keeping your cool.
Backing it in! photo: Jeff Vader
What I Learned: Basic Technique
Ice riding is a lot like dirt riding especially, flat track, and is all about taking advantage of the grip the tires offer.
Lean the Bike Beneath You: Ride on top of the bike when cornering, sitting on the upper edge of the seat with the bike leaned sharply underneath you. Avoid leaning to the inside like you might do when street riding, track riding, or roadracing.
Arms: Extend your inside arm while keeping your upper elbow up high and bent. This is tiring and hard to remember, but really helps with front tire traction and control. This arm position means you will hold the throttle like a screwdriver when making left-hand turns (most ovals go counterclockwise, like flat track racing).
Sit forward: Sit on the very front of the seat so the bike’s pivot point is centralized.
Feet: Weight on the outside footpeg to maximuze traction. Drag your inside foot on the ice as a third contact point. Be careful not to put too much weight on the foot to avoid hooking it on rough ice and cause it to get trapped under the rear tire. Ouch!
Look: Keep looking through the turns even when it feels like all hell is breaking loose. Like all other motorcycle riding genres, this helps you relax and let the bike sort itself out.
Steer with the Rear: As you get faster, you learn to back the bike into the turns. This gets the bike turned with the rear, rather than “steering” with the front, which can increase the risk of the front sliding out. Steering with the rear can be done by using a bit of rear brake as you enter the turn, or by downshifting and dumping the clutch. If you are going real fast then a hard countersteer will break it loose. Whether you use the brake or not depends on the amount of grip the ice has.
Bike Setup
To ride on ice you need a dirtbike and off-road knobbie tires with screws in the tread blocks. You can do this a few different ways:
Buy a few bags of special screws from a motorcycle or ATV retailer and spend time with a cordless drill installing hundreds of those little buggers into your knobs. One popular brand is Kold Kutters.
Fredette Canadian style Ice Tires
Buy already prepared ice tires. The ones I have are from Fredette Racing Products. They sell tires with “AMA approved” screws, as well as the more aggressive Canadian type.
Buy tires pre-made by local ice riders. Ask around.
The Canadian tires I have mounted carved right down to the hard icy surface on powder snow and are pretty decent even after the ice becomes shredded into fine chips.
Almost crashing on AMA tires in accumulated ice chips. photo: Colin Samuel
The AMA tires don’t have nearly as much grip on soft surfaces. I know this from riding a borrowed 125 motocrosser with AMA tires (see photo).
You’ll want to get some tire wraps to keep the screw’s sharp when rolling the bike around the garage and loading in your truck or trailer… and prevent bloody hands.
My bike is a bone-stock KLX250s, which handles just fine for fun, but needs more power, especially for the larger lake ovals. I’m about to install a 351 big-bore kit to solve this problem.
More serious riders set up motocross bikes with ice fenders and lowered suspension.
Rider Preparation
What to wear? I saw all sorts of riding garb when I recently rode in New Hampshire with a group of friends. It was 10 degrees F, so naturally we were bundled up. Some riders wore dirt riding pants and regular winter jackets, some wore Carhartt jackets and pants or snowmobile gear.
Helmet: I wore both my spare street helmet (full-faced, of course) and dirt bike helmet with goggles. Shield fogging can be an issue, but cracking it open a bit solved the problem…mostly. Snowmobile shields are another option. A skull cap under the helmet helps keep the head warm.
photo: Jeff Vader
Boots: Some people wear heavy winter boots and some wear off-road boots (including me). One thing to consider is that you need boots with soles that are durable enough to slide across rough ice all day long. Wear warm socks.
Gloves: My hands are susceptible to the cold. On days that are a bit warmer, I rode with insulated mechanics gloves. However, on the 10-degree days, I wore my insulated street gloves with glove liners. Note that wearing gloves that are too thick can lead to arm pump.
Layers: Wear layers! You will get warm enough to sweat and will want to shed a layer or two as the day goes on. I wear three or four layers of performance nylon shirts under a street riding jacket.
Pants: I wear an old pair of MotoPort overpants over jeans with motocross knee armor underneath.
Armor: Speaking of armor, I highly recommend you get armored-up. That ice is hard! In addition to knee armor, I have elbow guards, hip pads and my Impact Armor back and chest protector that I use for roadracing and track days.
Check out this video.
Tracks
So, where does an ice rider ride? In New England, there are people who make the effort to drive their plow trucks to the lakes to clear ovals and road courses of various distances. And I’m sure there are plenty of places in other parts of the Northern U.S. with dedicated riders willing to clear lakes and ponds for others to ride.
Get online to find out where ice riding is available in your area. Please be considerate of those who do this fine work. Ask if it’s okay to ride before showing up and be sure to clean up after yourself.
Ice Racing
If you’re the competitive type, you can always step up your game and go racing. I’m not a resource for ice racing, so do a Google search and ask around at dealerships and on Facebook.
You experienced ice riders, please share any more tips below.